Tuesday, May 31, 2011

Speech Therapy: Action Words

This weeks assignment from the speech therapist was to practice action words.  My first thought was "Lights!  Camera!  Action!"

So introducing the movie themed, "not so quiet book"!


The flash cards her therapist gave me were not as pretty as the animal ones but they really reminded me of Sesame Street.  You know, the only show in the world to have current episodes with the occasional clip of a kid from the 80's. 

Psssttt... Sesame Street, just so ya' know - the feathered bangs are a total giveaway. 
We know you're using stock footage.  You can't even find clothes that outdated at thrift stores anymore. 
Don't be hurt.  I still love you.  I just thought you should know.

 How I did it:

I used my Mickey and Friends Cricut cartridge to cut out the green sign and the movie reel.  Because it reminded me of Sesame Street, I remembered an ad I saw in one of my magazines that had the Sesame Street characters so I glued their faces in the movie reel.  I used my Cricut cartridge, All Mixed Up to write the word "ACTION!".  I then laminated the entire page (leaving out the clapper board pieces).

I ten cut out the pieces of a clapper board by hand and laminated them separately.  I sewed the large portion to the main page and attached the small part with a scrap booking brad so she could easily move the top up and down.

She pulls down the top, makes the "cha cha" sound and says, "Action!"  We then pull out a flash card, say the name of the action, "Jump!" and then perform the action.  We then repeat the whole thing.  It's been a fun game and we both really enjoy playing along.  She also loves saying the names of her favorite characters from the show.  So much more fun and effective than just flipping cards!

Monday, May 30, 2011

The PERFECT Perfect Tee

A lot of tee's claim to be the perfect one.  Well, they are not.  But this one is.  It's PERFECT perfect. 

And I love it.


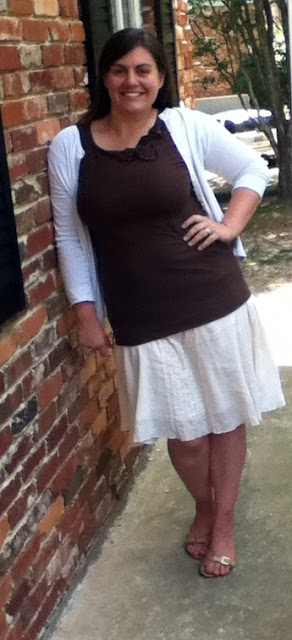
The other day when sweating playing with my kids at the park in 90 degree weather I realized that I was wearing 5 layers of clothes!  What's wrong with me?  I'll tell you what's wrong with me - I'm a mom.  After two kids, my body just isn't the same, this is wider, that is squishier and don't even get me started on those!   

I often find myself layering to compensate for the lack of coverage that my store bought clothes are not providing: undershirts to cover my stomach, tank tops to hide cleave, cardigans to cover my arms.  I'm sick of it.  The worst part?  I can't find clothes that I like that fit.  Anywhere.  So I've resolved to make my own clothes and try to conquer the clothing battle I face daily.  This was my first piece and I'm so happy.  I feel like this tiny accomplishment is going to change my life.  I feel better already.

I had some jersey (basic t-shirt material) fabric that a friend bought me and Saturday night I decided to try it out.  I've always heard that working with knits is hard so I've been scared but this fabric was so easy to work with and was very forgiving.  It just required lots of pinning.
   

What I wanted:
  • High but flattering neckline.
  • Long so I can bend down to pick up a baby without flashing my backside to the world.
  • A sleeve of some sort.
How I did it:
  1. Used a shirt I already own to trace the pattern for the main body and made adjustments according to my wants listed above.  (Next time I'll add another inch or so to the body.  I'd like the shirt to be a little more loose)
  2. Attached a wide trim for the bottom and a thinner trim for the sleeve.
  3. Finished off the neckline with some homemade bias tape.
  4. Attached flower decoration.  This was made by layering hand cut circles of varying sizes and sewing a button in the middle. 

 I would have done a tutorial for you but to be honest, I wasn't really expecting it to work out.  Next time.


Still layered with a cardigan, (I'll probably never be able to stop wearing those) but I have to tell you I have felt so liberated all day.  I've been wrestling and playing with my kids on the floor and my clothes have stayed in place!  And I didn't have to tug on my shirt once today!  It feels so good.


This is The PERFECT Perfect Tee not because every stitch is done perfectly. 

It's so great because it's exactly what I want, what I NEED. 

It's perfectly perfect.


_________________________

Visit thecsiproject.com

Saturday, May 28, 2011

Oh Canada, Here's a Card for Thee...

Here's a set of cards I made a while ago as a gift.  My husband grew up in Canada so we know quite a few Canadians.  I cut out red maple leafs using a template I hand drew.  It took several takes to get it just right, the key is to fold the template paper in half and just draw one side, that way it is symmetrical.  I glued them on some cream colored cards I cut out and rounded and inked the edges.

I thought these could be fun as a Happy Canada Day greeting or just to rub your Canadian pride in.


Cute, eh?

(Sorry, I just couldn't help myself.)

Friday, May 27, 2011

Two Ways to Revamp Canvas Shoes

A few months ago my friend Kolby (Ape Island Index) and I discussed the best way to remove an image from canvas shoes.  We both got a sweet deal on some shoes but they just weren't exactly what we wanted.  After some brainstorming I decided that what I was going to do was simply paint mine.  I'll show you what Kolby did a little later.


I got these shoes 3 and a half years ago at a consignment sale for 50 cents or a dollar, I don't really remember.  I love toile but really what in the world are you going to wear it with.  Remember the Project Runway disaster with Peach's toile pants that Ivy ruched?  What was she thinking?  Anyway... back to the story... I got these for my daughter but she outgrew them before I could put her in them.  They are way too girly for my son so they needed a manly makeover.  Here's what I did -


Step 1:  Remove Laces.

Step 2:  Carefully paint shoe using acrylic paint.  You can tape it off if you don't have a steady hand.  If you are impatient like me and make a mess (like in the photo above) simply use a q-tip and nail polish remover to remove any mistakes from the rubber.  I even painted over the metal lace holes.  The paint doesn't stick to this so I just scratched it off.

Step 3:  Be patient and let it dry before you put the laces back in.  I wasn't and got some paint on the laces.  Bummer.  That doesn't come off.


So simple right???  Thirty minutes later I was squeezing those fat baby feet into the shoes.  Love the makeover.  Love the squishy baby legs more.


Now, back to Kolby's shoes.  He didn't like the color and he wasn't sold on the pattern.  Here's what he did.

"I tried bleach, oxy clean, hydrogen peroxide. I should have tried some paint remover for automotive paint but didn't. I tried dying the pattern with RIT dye and that didn't do anything. So I took some dark blue RIT dye and taped off the parts I didn't want dyed like the rubber sides of soles and stuff and put them in a bucket. The turquoise part ended up a good looking navy blue color. I put some leather laces in em and wear em quite often because now they aren't so festive. People compliment me on them but they are mostly girls so maybe they just want my girly looking shoes?"
His before:
The After:

I think they look awesome and not girly at all.  The pattern is much more subtle and the color is fantastic.  Make sure you check out his blog, Ape Island Index.  He's so funny and very talented.  He builds cars and makes creme brulee!  What's cooler than that?  Nothing. 


So, there you have it.  Two ways to revamp canvas shoes.  Next time you see a pair on sale and aren't sold on the color/pattern you now know what to do.

Thursday, May 26, 2011

Apple Raisin Bran Muffins

These muffins are really yummy.  They also make good use of the last of the raisin bran box, you know, the broken little flakes at the bottom no one likes to eat.  I got this recipe from the back of a box somewhere and have slightly altered it over the years.  I make a large batch and what we don't eat the first day I put in the freezer.  They are still moist and delicious even weeks later. 

 Ingredients:
  • 2 C. Raisin Bran Cereal
  • 1 C. Milk
  • 1/4 C. Vegetable oil (can substitute with apple sauce)
  • 2 Eggs
  • 1 tsp. Vanilla
  • 2-3 Medium Sized Apples, Small Dice
  • 2 1/2 C. Flour
  • 3/4 C. Sugar
  • 2 1/2 tsp. Baking Powder
  • 1/2 tsp Baking Soda
  • 1 tsp. Cinnamon
  • 1/2 C. Raisins
Directions:
  1. Preheat oven to 350F
  2. Spray muffin tins or use paper cups
  3. Combine: Cereal, milk, oil, eggs & vanilla.  Let stand 10 minutes.
  4. Combine:  Flour, sugar, powder, soda, salt, cinnamon.  Add to wet mixture.
  5. Add apples and raisins.
  6. Pour into tins and bake for about 16-18 minutes*.


*Note:  Baking time depends on many variables (pan size, oven, etc.).  I never time my baked goods.  To know if your muffins are ready, lightly touch the top of a muffin.  If it gives some resistance and springs back, it is done.

Tuesday, May 24, 2011

Storage Solutions: Grocery Bag Holder Tutorial

Are you like me?  You have those plastic grocery bags all over the place?  Everywhere.  They make me crazy.  We never throw them out and always resuse them as little trash bags for the kids diapers.  They used to sit in the hall in a big ugly, messy pile.  Then I found an empty can to keep them in, no longer messy but still ugly.  Solution?  A little scrap of fabric can make a big difference.

Are you ready to make this with me??  Let's go!   


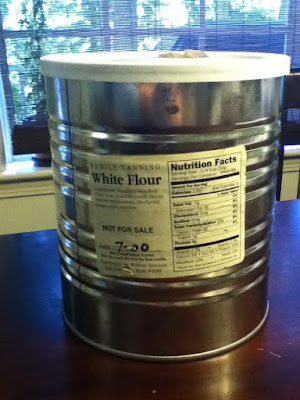
Step1:  Get a large can with a plastic lid.  (I got this a long time ago from the LDS cannery but I have a nacho cheese can from Sam's club that would have worked too.) 
Step 2:  Cut a hole in the lid.  It doesn't have to be perfect.  You're storing trash bags for goodness sake!
Step 3:  Measure your can and cut a scrap of fabric that size (or slightly larger).  Mine was 19 x 7 inches.  Don't bother ironing it.  You don't need to.
Step 4:  Use mod podge to adhere fabric to can.  Dab the glue on generously just a few inches around at a time.  Make sure your pull your fabric on tight and smooth out any bumps or wrinkles.  My 3 year old assisted with this step.  If she can do it, so can you.
Step 5:  Trim off any extra fabric.  You can use scissors or an exacto knife.
Step 6:  Coat the whole thing in more mod podge.  Don't worry if you didn't get every bump.  The mod podge will shrink it and seal it up nice and tight. 
Step 7:  Let it dry and embellish however you want to.  I added this ribbon and bow with hot glue.  Replace lid and stuff with bags.


Viola!  Done and done!  That was easy, it took just 10 minutes and my house looks cuter and cleaner already. 

______________________

Visit thecsiproject.com

Speech Therapy: Barn Yard Animals

My daughter Maggie is in speech therapy.  She just has a really hard time with speech.  She's been diagnosed with speech delay.  She's extremely bright and there's a lot going on in her mind she just doesn't or can't let it out yet.  She has improved TONS since she started in January but she still doesn't say much for her age, so we work hard on practicing her words each day.

This week her speech therapist gave us the goal to practice saying barn yard animals names, not just the sounds they make.  She gave me some gorgeous flashcards to work with.  Of course I couldn't just leave them alone, I had to get creative!

I rounded the edges and laminated each flash card using my personal laminating machine.

I wanted a place to store the cards but I also wanted it to be fun and interactive so I created this barn.  I free hand cut the barn body, grass, sun and a little chicken and then laminated the whole page.  I created a stable fence and doors that I laminated separately.


I used my sewing machine to sew the fence onto the page.  (Yes, your machine can sew more than just fabric!)  All of the flashcards fit nicely into the fence.  I left a little of the lamination on each of the doors and sewed the clear lamination straight onto the page.  Sewing the lamination and not the paper door itself helped the doors open more easily. 

A little surprise chicken in the loft. 


Maggie has loved her new barn.  We "knock, knock, knock" on the doors, tell them to "open" and get excited when we see "horsey" and "cow".  We line them up and make them play.  Then we put them back to bed, "night night doggie". It's been good practice and a lot more fun than flipping flash cards.

Our point in this is to be anything but quiet, but this would also make a great quiet book. 
So simple.  Now go make your own!

Monday, May 23, 2011

Dino Decorations

My kids share a room.  For over two years Mags has had her room decorated with birds.  I felt like Jackson had to have his own style.  Though the room will never make it to HGTV, I still enjoy making things for each child.  Here is the first decoration I created for baby Jack's theme - Dinosaurs!!


I was inspired by a wooden painting of a dinosaur in the Pottery Barn catalog.  I plan on doing a whole wall of different dinosaur and monogrammed things but so far this is my first piece. 

I hand drew the dinosaur using a pencil and then painted him in with some vibrant robins egg blue.  I added spots using a burnt red.  The "j" was created by cutting out a stencil with my Cricut.  Finally, I sanded the edges of the whole thing and dry brushed on the same red paint in an attempt to give it a rusty, aged look.  It will hang using an "alligator teeth" picture frame hanger that I will hammer to the back.  Can't wait to make more of these!

Saturday, May 21, 2011

Mother's Day Personalized Washer Necklace

I love my kids.  I love being a mom.  I want everyone to know it.

I wore this proudly on Mother's Day.
How I did it -  You take hardware stamps and simply hammer whatever you want to say into a typical everyday washer.  You can buy these stamps at almost any hardware store but I've also seen them on Etsy and other places around the web.  The original intent for these stamps is to hammer your name on your tools so the neighbor has to retun them. 

I started to write the kids names on the bigger washer but I messed up pretty badly on the lettering.  Did I throw it away?  No.  Of course not.  I fixed it.  I covered the washer with mod podge and several layers of tissue paper in my favorite color.  I tied the cord around the big washer and then used Gorilla glue to attach the small washer.  To make the letters pop I used a permanent marker to fill in the crevaces, making sure to wipe of any eccess.

Now go make your own!  It will seriously take you less than 10 minutes to do.

Friday, May 20, 2011

Creative Guest: My Mommy!

Today's my mothers birthday! 

You should love her.  I know I do! 

Her name is Marsha but you can also call her Grandma Nonie if you're under a certain age, you know like 4.  Well, Nonie spoils us rotten with her creations.  She's a knitter.  She's a crocheter.  She's a yarn addict.  My mom does mostly 3 things, work, talk to me on the phone and knit.  Knit, knit, knit.  And crochet. Let's not forget the crochet.  I'm constantly having to remind her that I live in Alabama and that in July the kids just can't wear the gorgeous sweaters she makes.  Luckily we do have winter, just not year round.  

Here is just a tiny sampling of some of the beutiful things she has made for us.


Gorgeous, soft blessing blanket. 

(The hand crocheted bonnet was my grandmothers, the dress my mothers and the shoes and socks, mine.)


One of many fun washcloths.  This is for my husband, the Canadian. 


Dinosaur blanket.  Don't you love the bright colors!?!


Seafoam green... can you say love? 


So sad this one no longer fits.  I'll just have to have another sweet boy so the sweater gets another life.


In case you didn't spot it right away, sister wants you to notice the adorable hat.

Nonie made the super cool hat.  My skills are limited to just the basic Harry Potter scarf.


Do you see how amazing this woman is?  I'm so glad she's my mom!  Happy Birthday Mommy!!  Hope it's the best yet.  I love you so much!  The yarns in the mail...

Oh yeah, and if you're on Ravelry (the social networking site and brag board for yarn lovers) you can check out even more of her handywork.  Her user name is "moboyle" so check her out!

Thursday, May 19, 2011

Oopsie Into Oohhhh!

Sometimes people say to me,

"How can you just make stuff up?  I'd be too afraid I'd make a mistake."

The best thing about creativity is it's okay to make mistakes!  Just figure out how to make them fabulous.  The thing I like most about creating is the problem solving journey, not just the finished product.

This card is one of those mistakes.


When I was first learning to use my Cricut I wanted to cut something out of black paper.  Well, I pressed the wrong button and out popped a black wedding cake.  Black?!?  No one has a black wedding cake.  But instead of chucking the cutout, I tried to figure out what in the world to do with it.  Why let it go to waste?  Then suddenly it hit me and the antiqued cake silhouette card was born. 

There's just something about it that makes me feel like I'm looking through all of my Grandmothers old things.  The best part?  It gave me a chance to take a picture using my gorgeous wedding dress as a backdrop.  Good to know that after all these years it still has a use!

Wednesday, May 18, 2011

Take Me Out To The Ball Game

It's baseball season!  (I think.)

Wouldn't these cupcake toppers be great on some delicious cupcakes?
Or maybe stuck in some little smokies?


I made these toppers out of paper and toothpicks.  The stitches were hand drawn with a calligraphy pen.  I was going to list them in my Etsy shop when I had it up and running but I never did for some reason.  I guess I just need to put them in my own cupcakes and enjoy a game or two.
Related Posts Plugin for WordPress, Blogger...