Showing posts with label Sewing. Show all posts

Monday, June 24, 2013

The Snitch Tee

What is the best book series in the whole entire world?  If you answered Harry Potter you are correct.  100 points to Gryffindor!

I'm always looking for new t-shirt ideas for Jackson and when I can throw a little Harry Potter in the mix it's just a great big golden bonus.  Speaking of golden, here is Jackson's golden snitch tee.
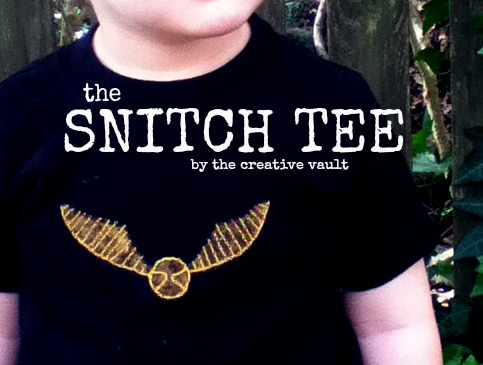

This is a hard shirt to photograph {mostly because it's always covered in dirt from a messy little boy who won't stand still}.  It's just a plain black tee, a painted snitch and hand embroidered detail and if you keep reading I'll tell you exactly how to make one of your own.


A few weeks ago the school age son of a friend of mine saw this shirt and begged his mom to go to the store to buy him one that very instant.  It was nice to know that the shirt was "cool" and that he recognized it as a snitch.

Jackson usually wears it with his mustard skinny cords.

 
Want to make your own??
 
ACCIO TUTORIAL!!!!!
 
Supplies:
  • t-shirt
  • interfacing
  • gold craft paint
  • gold embroidery thread
  • needle
  • iron
  • freezer paper stencil
Directions:
 
Step 1:  Cut out an image of a snitch onto freezer paper.  You can trace a snitch onto paper and cut it out or you can print it directly onto the freezer paper and cut it out from there.  This makes your stencil.  You don't need any detail with the stencil just the outlined image.
 
Step 2:  Iron on a small rectangle of interfacing to the inside of the shirt in the area that you want the design.  This acts as a stabilizer for your embroidery.  Without it your image will come out wonky and will not hold shape over time {for reference the shirt you see in the picture has been washed dozens of times and still holds it's shape}.
 
Step 3:  Iron the freezer paper stencil onto the front of the shirt and use the gold paint to paint inside the stencil.  * You'll probably want to put a piece of card board inside the shirt before you paint to keep the paint from bleeding through to the back.
 
Step 4:  After the snitch is dry, add detail using embroidery thread.  There are many ways you can do this.  I didn't do anything technical, I just free hand stitched.  I really don't know anything about hand embroidery but according to this pin the technique I used looks similar to the "threaded running stitch".
 
And that's it!  The whole project took me about an hour to create while I watched Downton Abby for the millionth time.  You really can do so many things with this painting and embroidery technique you're only limited to your imagination.


This shirt and this boy are just so cool that the crazy Mamarazzi just can't stop taking pictures of them!


Alright, I'm off to go dig up my old Harry Potter books and read them all again! 
 
Are you as obsessed as I am? 

Friday, October 12, 2012

The 7 Layer Ruffle Skirt

Fun fact you probably don't know about me - my computer and my camera are broken and have been for some time, so until I can save up for new ones I've been blogging from my iPod and my husbands laptop late at night when he's asleep and not using it for his Phd.

I have a million projects that I want to show you but it's been hard.  So thanks for sticking with me through these iPod days.  Y'all are the best.

So I'm going through the pictures that I have that didn't get lost on the broken computer and thought I'd show some projects that are old for me but ones that you haven't seen before so

Bah da da bah.....  The 7 Layer Skirt!


I kind of love these sassy colors and prints.  I wish it was easier to photograph - the ruffles don't want to lay flat.  The skirt is 2T and the only 2T kid living in this house is Jackson and he was not interested in posing for photos in it.  In fact, when I went to try it on him to test out the size he screamed and cried, "Nooooo!  Noooo!  I'm a boy!  I'm a boy!"  So yeah, sorry little buddy but that's just the price of being a craft bloggers son.  The skirt lasted on him a total of 10 seconds - he put up an excellent fight.  No model pictures but I'll tell you it just poofs out so cute on his little chubby booty. 


Details:  The skirt has an encased elastic waistband and the ruffles alternate between cotton and two layers of tulle under each patterned layer.  The edges of the ruffle are surged in black.
 
I'm not quite sure yet what I plan to do with the skirt as it is for a smaller girl than Mags {PS we started to shop in the "big girl" section this week and I cried.  What business do they have growing up so fast?!}.  I may decide to sell it, gift it or have another baby {John is over here shaking his head no} but either way some little girl is gonna' look super cute wearing it.  I mean baby ruffle butts?!?  Nothing cuter than that!
 

Saturday, October 6, 2012

No nonsense talk about fashion

This is a Sponsored post written by me on behalf of No nonsense. All opinions are 100% mine.
 
 
I struggle with fashion.  Don't get me wrong, I love it but it's more like a love/hate relationship.  I love a style but hate that it's so expensive or I want to wear a cute new trend but my body type just can't pull it off.  And right now I really hate my post two children body.  I also struggle with pinning down my style.  In the past I have been all over the place.  Over the years my clothing has reflected punk {complete with shaved head, I'll tell you all about it later}, skater girl, conservative, preppy, hipster, mom {that's a style right?}, sophisticated, boho, you name it I have an outfit to reflect it.  After 30 years, I'm still trying to figure out what style is "ME".
I really feel like Pinterest has helped me pin {pun definitely intended} down a style that is really me.  You can view my clothing inspiration board HERE.  I think having all the clothing that I like in one place let's me take a look at it an see a commonality and really shows me what pieces I really want in my closet as opposed to what was on sale that day.  Am I the only one that does this? 
But despite my struggle with fashion there are a few things I know for sure about my style -
  • High heels, sandals and shoes that require no socks.  I hate socks.
  • You will never see me wear athletic shoes with jeans.  I've only worn this combo hiking and it is probably the reason I hate hiking.
  • Cardigans and granny sweaters make me happy.
  • Flowy tops.
  • I don't wear shapeless t-shirts in public, like sports shirts etc.  And I don't wear them with jeans.
  • I love skinny jeans and I don't care what anyone says.
  • Layers, layers, layers.
  • I love bold colors but also neutrals.
  • I love wearing something unexpected with every outfit like a bright pop of color or a crazy pattern, heels with jeans or a random piece of jewelry.  Sometimes it ends up a little wacka-do but I try to own my quirky style rock what I got.
I've been wanting so badly to take the things I've been learning about fashion and myself and apply them to my real life closet and this week the folks at No nonsense helped me with my goals.  I was surprised by an awesome package in the mail from No nonsense.  Inside were No nonsense tights and leggings.
Both fit perfectly into my style.  I put together two looks from clothes in my closet and I even made a few pieces that were inspired by them.
First, here are the leggings.  I loved that these were corduroy leggings.  What?!  I've never heard of such a thing but I love them.  It totally fits with my love of the unexpected.  Plus I think they up the style factor because they don't just look like leggings you threw on to work out in.  This is an outfit I would wear basically anywhere.  And yes, I would wear those heels to the park.  I know, I'm crazy.


Leggings - No nonsense tights and leggings, Shirt - handmade from vintage linen {tutorial to come}, Cardigan - Target, Shoes -  Payless, Belt - Z Outlet

I love these tights because they are feminine but also a little foxy.  They have these sweet flowers on them but also give a hint of fishnet without going overboard.  I also love that the toe is so sheer that I can wear them with an open toed sandal.  This would be an outfit I would wear on a Sunday or a dress up occasion.
 
Tights - No nonsense tights and leggings, Shirt - handmade from vintage poly blend {tutorial to come}, Skirt - repurposed from skirt I've had since high school {tutorial to come}, Shoes - Payless, Belt - Z Outlet, Necklace - Z Outlet
Jill Martin has recently partnered with No nonsense and shows you some more ways to wear their tights and leggings in this short little video.

I really am planning on buying more of these now that I know they are so comfortable and cute.
If you're interested in getting some yourself you can get them at food & drug stores as well as mass retailers.  And the best part is they are super affordable and who doesn't love that?!  You can also visit No nonsense on Facebook to check out all of their fun colors and styles.
So tell me - -What is your fashion style?  What do you love to wear?  What won't you be caught dead in?  What makes you happy and feel most relaxed in your body?  Are you a jeans and t-shirt kind of girl or are you like me and a pair of heels just makes you smile?

Visit Sponsor's Site

Tuesday, September 25, 2012

The Marguerite Ribbon Tied Dress {Tutorial}

I've been kind of MIA lately haven't I?  How 'bout I make it up to you with a new dress tutorial?? 


Am I forgiven?


I wish the picture quality was better but all I had to work with was my iPod.  So please push past the overexposed parts to see the cuteness which is this dress.  And the fabric... that's my favorite part!  So pretty!
 

 The dress has ribbon straps that are fed through button holes in the back and then tied into a pretty bow. 
 
 
I originally posted this tutorial over at The Ribbon Retreat.
The fabric is from the new Marguerite line by Cynthia Walker for Riley Blake.  It's so feminine and gorgeous.


A simple dress with a lot of sweetness and it's easy to make too!


Let's get started.  Here's what you'll need:


Supplies:
 
For size 5-6T I used...
 
-  1 1/2 yards Marguerite Red Main
-  1/2 yard white muslin
-  1/4 yard Marguerite Blue Dot
-  Bodice pattern {see below}


Step 1:  Create pattern pieces.


Trace a shirt onto paper as you see above {I guess I can't list digital drawing as one of my special skills.  I hope you can still get the gist of it. You'll of course make your lines much more straight than you see here}.  You will want to add at least 1/4 inch seam allowance.  This is your front piece.


For the back piece you will cut out a replica of the front except for this piece you will mark approx. 1 1/2 inches in on each side {This measurement may vary depending on the size of the dress.  Just go with what looks right}.  From that mark you will then draw a curved line to the top of the armpit.


You'll now have two pattern pieces.  A front bodice piece and a back bodice piece.


Step 2:  Cut out your pieces.
 
You will need the following to complete your dress.
 
- 1 front piece out of main fabric
- 1 front piece out of muslin
- 1 back piece out of main fabric
- 1 back piece out of muslin
- 1 rectangle for the skirt that is approx 2x's the size of your waist out of main fabric
- 1 rectangle the width of your main skirt by about 6 inches out of accent fabric
- 2, 1 yard pieces of ribbon


Step 3:  Sew together bodice.


Take the two front pieces and lay them right sides together.  Between the layers pin the ribbon on the inside approx 1/4 inch from the sides of the top.  Stitch where you see the blue line.

Now take the two back pieces and place them together, right sides facing, and stitch just the same as above.  *Note:  you will NOT place ribbon between the back pieces.


Trim the pieces.  Cut off excess ribbon.  Cut the corners off.  Cut slits at the curves to so the curves will lay flat.


Now, open the back and front piece and pin together, right sides facing, like in the photo above.  Sew up the sides.


Flip bodice out and iron flat.


Top stitch around the top of the bodice.


On the back piece, sew two button holes spaced evenly apart.

You are now done with the bodice.  It's easy peasy from here.  You're almost done!


Step 4:  Sew skirt.
 
 
Fold the accent fabric in half so that the long rectangle is about 3 inches wide.  Sew accent fabric to pain piece.  Sew up side seams until you get one large tube.  This is your skirt.


At the top of the skirt use a ruffle foot or setting on your machine to ruffle or gather the top of the skirt.


Step 5:  Attach the pieces.


Right sides together, pin your skirt top to the open bottom of the bodice.  Stitch together.


Top stitch the seam by the hem on the bottom of the skirt.


Step 6:  Trim up your ribbon.


Try the dress on and slip the ribbon over the shoulders and through the button holes.  Tie a bow and trim them to your desired length.  Use fray check to secure the fibers on the ends so it will not fray.


Step 7:  Enjoy watching your sweetie pie in her new beautiful dress!
 
 
If you make the dress be sure to stop by and show me a picture of your darling and her new dress!


P.S.  I thought I should mention that I didn't win the Ultimate Room Makeover.  Super bummer.  But I did want to say how much I appreciated all of your support and love.  I have the best readers and really appreciate you.  So even though I don't get an awesome room makeover I still feel blessed to have y'all, so thank you!
 
______________________
 

Sunday, September 9, 2012

One Seam Pajama Pants Tutorial

I have a really fun tutorial for you today but I just have one order of business before I begin.  Remember when I showed you my sad, sad living room?  Well voting is happening right now so if you can hop on over and vote for #69 (yours truly) I'd love you forever.  Just click on the star below #69 and that's it.  You can vote once a day.  Thanks for your votes in advance!


Today I show you how to make single seam cuffed pajama pants.  Y'all, these are so easy and you can make them in any size or style you want.  You will not find an easier pants tutorial.


Most pants you see will have an inseam and and outer seam that runs down the sides of the pants.  One seam pants have just an inner seam which means less work, more comfort.  This one seam technique is perfect for comfy pj's and lounge pants.

You can make these in any size, adult to kids, and once you have your pattern it takes less than 30 minutes to put it together.  Great for gifts for the upcoming holidays.  {Yikes!  Did I just say it was almost Christmas!?!}


I also wanted to highlight The Ribbon Retreats Licensed Fabric and how great it is for boys.  What little man doesn't imagine himself as Batman or Superman?  The fabric is awesome enough for boys to want to wear and it gives us an excuse to craft for the guys in our life because let's face it, crafting for them can be so hard!  There is also licensed fabric for girls too so be sure to check it out.

Let's get started!

Supplies:


- Main Fabric, Batman Blue Logo
- Coordinating Fabric, Batman Black Brick
Thread
-  Pants Pattern (see below)


Step 1:  Create your pattern.  

Lay a pair of pants onto craft paper.  I buy my paper at the dollar store but you can also use the back of wrapping paper.  


Trace your pants by adding half an inch to the sides.  Add about an inch and a half to the top and 1-2 inches to the hem.  You'll see that I made the waist and the hem line as straight as possible.

You can make adjustments according to how your starter pants fit your child.  I wanted my pants to be looser than the jeans I measured from so I added a little room.

For the cuff you will mark 1-2 inches above the original hem.


Now you have two pattern pieces - a pant leg and a cuff.


Step 2:  Cut out your pieces.  

Lay your pant pattern on the fold of your main fabric.  Cut 2.


For the cuff, fold your coordinating fabric horizontally and then once over vertically (see photo below).  Lay your pattern piece on top, lining it up where the folds are and cut 2. 


You should now have a total of 4 pieces.


Step 3:  Lay the pants right side together and stitch the sections indicated in the picture.

{Don't let the different fabric throw you off.  I just forgot to take a picture of this step in the Batman fabric.  Sorry.}

Step 4:  Keeping right sides together open the pants up and stitch the entire curve of the inseam.


If you don't want a cuff to your pants you're basically done.  After this step you would just need to add an elastic casing and hem the bottom.  If you're wanting a cuff, read on...

Step 5:  Prepare the cuff. 


Sew the short sides of the cuff together, right sides together. 


 Fold the cuff in half with the seam on the inside. 


Attach the cuff to the outside of the pant (while they are still inside out) and stitch.  When you attach the cuff this way the raw or serged edge will be on the outside of the pant.  When you roll up the cuff you won't see it at all.  I like it this way because it creates a smoother inside and is more comfortable but if you'd rather the edge be on the inside of the pant than you would just attach in the same way with the pants right side out. 

Step 6:  Create a casing for the elastic.

 Fold over the waistband and stitch, leaving about a one inch opening.  Pull your elastic through and stitch it together.  Sew the opening closed.


I find that the best way to sew the elastic together is to lay one piece on top of the other and stitch together.
 
 
Step 7:  {Optional} 

The cuff should stay nicely when you flip it up but if you wish you can tack it in place with a few hand stitches on the side.  I didn't do this to mine.


   See how easy they are to make?  You'll have a dozen done before you know it.
 
If you make these jams I'd love to see a picture!
 
 
{This tutorial was originally posted at The Ribbon Retreat be sure to stop by and check out their awesome blog and shop.}
 
 
Related Posts Plugin for WordPress, Blogger...