Showing posts with label Crafts. Show all posts

Saturday, October 19, 2013

Jake & Izzy Neverland Pirates Costumes {DIY No Sew Scalloped Tee Tutorial}

Remember back in the day when Halloween consisted of just one night when you went around your neighborhood and trick or treated your heart out?  Now, Halloween has turned into a month long extravaganza with parties, carnivals, parades, dances, events and a whole lot of candy.  I'm not really complaining since Halloween is one of my favorite holiday's but it does mean that I have to get an early start on the costumes.  Luckily the kids decided on what they wanted to be all the way back in May - Jake and Izzy from the Neverland Pirates.

And today I'm going to show you how I made the Izzy scalloped tee.  I know it seems weird for me to be on top of things and actually put out a holiday tutorial in an appropriate time frame in relation to the holiday but this year I shocked even myself and got 'er done!  Don't be fooled into thinking I have my act completely together though.  Just yesterday I found an uncashed check for my 25th birthday {I'm *ahem* 31.}  Also I went an entire day this summer running errands with my yoga pants on inside out.  There was even a little crotch panel and a tag on the back.  I died.  But I digress...  Let's get back to the costumes-


And just in case you don't know who Jake and Izzy are, it's these guys -


I'm sure you can guess by my lack of crafty posts lately that I have been not quite feelin' it in the creative department so I wanted to keep things as simple as possible and wanted to make these NO SEW!  Each costume consists of clothes they already have and a custom made-by-mom t-shirt. 
 
Each tee cost me $3.  The bandana was $1.99 and a $1 tube of puffy paint was all I needed.  The rest of the supplies (felt, fabric, buttons & ribbon) were from my stash. 


For Jackson's I mean Jake's tee I just hot glued pieces of felt onto the front.  I then glued on ribbon trim and buttons.  I chopped up the sleeves to give it that authentic tattered pirate look.  Or as Jackson would say, "Mom, I look like a pie-rick!"  If you're wondering about the face this is his "yargh!" face.


Maggie oops, Izzy, got the coveted pixie dust necklace.  I used hot glue to make a little pouch, filled it with a little fluff and tied it off with some ribbon.

But the great little scallops are what this tutorial is all about.


This scallop technique is a great no sew way to add a great detail to any costume.  I can see this working for a knight, or a fairy, a flower, you name it.

 
Are you ready for the world's easiest tutorial?
 
Step 1:  Cut off hem of shirt and turn it inside out.
 
Step 2:  Iron a strip of light weight iron on interfacing to the bottom of the shirt.  This will make sure the scallops on the cut t-shirt don't roll and keep their shape.


Step 3:  Draw scallops onto interfacing.  Tip - Start with a half scallop on the sides and work your way into the middle of the shirt so you have nice even scallops all the way around.

Step 4:  Cut.  I cut both layers at once so that the scallops were even on both sides.


Step 5:  Flip shirt right side out and add details with glitter puffy paint.  The glitter is important because for reasons unknown to man it makes girls feel pretty and fancy and it's just plain cute.


At this point I added my paint scallops to the arms, and neck as well.  After the 4 hours the bottle told me to let it all dry, I flipped it over and added the paint details to the backside of the shirt.

As far as tips for the bandana I would recommend putting it on your child and marking where the ear ends.  Do this for each side. 


Place your paint detail between those spots so that when you tie on the head band you don't get snagged up on paint and so none of the pattern gets lost in the tie.  It just makes for a cleaner look in my opinion.  Plus I didn't want to hear the freak out if the paint started to peel off from the friction of the tie because you know those kinds of things are the end of the world to a 5 year old.


And Booyah!  It was THAT easy! 
 

Costumes that require little time, little money and little skill and effort always get a big thumbs up from me!  Not to mention the joy they bring your kids.  Mine were so happy and grateful that not only did they hug me but they hugged each other.  It was a Halloween miracle.

 
So do tell, what are your munchkins going to be this year?? 
 
Feel free to link up any pics or posts you may have so we can all visit and give a great big collective "awe". 
 
Did I mention I just love Halloween? 
 
I love Halloween.

Monday, June 24, 2013

The Snitch Tee

What is the best book series in the whole entire world?  If you answered Harry Potter you are correct.  100 points to Gryffindor!

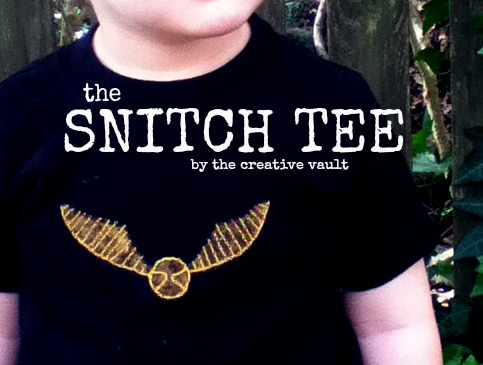
I'm always looking for new t-shirt ideas for Jackson and when I can throw a little Harry Potter in the mix it's just a great big golden bonus.  Speaking of golden, here is Jackson's golden snitch tee.


This is a hard shirt to photograph {mostly because it's always covered in dirt from a messy little boy who won't stand still}.  It's just a plain black tee, a painted snitch and hand embroidered detail and if you keep reading I'll tell you exactly how to make one of your own.


A few weeks ago the school age son of a friend of mine saw this shirt and begged his mom to go to the store to buy him one that very instant.  It was nice to know that the shirt was "cool" and that he recognized it as a snitch.

Jackson usually wears it with his mustard skinny cords.

 
Want to make your own??
 
ACCIO TUTORIAL!!!!!
 
Supplies:
  • t-shirt
  • interfacing
  • gold craft paint
  • gold embroidery thread
  • needle
  • iron
  • freezer paper stencil
Directions:
 
Step 1:  Cut out an image of a snitch onto freezer paper.  You can trace a snitch onto paper and cut it out or you can print it directly onto the freezer paper and cut it out from there.  This makes your stencil.  You don't need any detail with the stencil just the outlined image.
 
Step 2:  Iron on a small rectangle of interfacing to the inside of the shirt in the area that you want the design.  This acts as a stabilizer for your embroidery.  Without it your image will come out wonky and will not hold shape over time {for reference the shirt you see in the picture has been washed dozens of times and still holds it's shape}.
 
Step 3:  Iron the freezer paper stencil onto the front of the shirt and use the gold paint to paint inside the stencil.  * You'll probably want to put a piece of card board inside the shirt before you paint to keep the paint from bleeding through to the back.
 
Step 4:  After the snitch is dry, add detail using embroidery thread.  There are many ways you can do this.  I didn't do anything technical, I just free hand stitched.  I really don't know anything about hand embroidery but according to this pin the technique I used looks similar to the "threaded running stitch".
 
And that's it!  The whole project took me about an hour to create while I watched Downton Abby for the millionth time.  You really can do so many things with this painting and embroidery technique you're only limited to your imagination.


This shirt and this boy are just so cool that the crazy Mamarazzi just can't stop taking pictures of them!


Alright, I'm off to go dig up my old Harry Potter books and read them all again! 
 
Are you as obsessed as I am? 

Thursday, May 30, 2013

Graduation Crafts! Diploma Cover Scrapbook

Hey, hey, hey! It's graduation time!  There's nothing like the feeling of letting all those school burdens go and feeling that sense of accomplishment.  Plus, it makes me want to sing School's Out by Alice Cooper and who doesn't love that song?  Nobody, that's who, because that song is awesome.

Johnny Boy and I got married our Junior year of college so we spent our Senior year and our first year of marriage enjoying date nights at the library.  Oh yeah, keepin' the romance alive.  Nothing says love like a 1,000 page science textbook.  We graduated Spring of 2006 from BYU-Idaho, John with a bachelor degree in Chemistry and me with a bachelor degree in Geology and Earth Science.  Nerds.  You can say it.  We know. 

John's parents were generous and bought us nice frames for our diplomas which left us with these empty diploma covers.  You know I wasn't going to let that go to waste.


The cover is a nice pleather and satin bound cover with our university stamped in silver on the front.  This isn't a piece of junk {I mean I paid thousands of dollars and years of my life to get it} and it had a greater purpose than just tossing it.

So I added a few scrapbook stickers and pictures from our big day and The Diploma Cover Scrapbook was born.


This scrapbook is John's.  Mine is basically the same.  Just with a few more pictures of my parents.


I also had these cute little diplomas that I stuck in there.  You can buy a similar one HERE.  If you don't frame your original diploma you could still keep it in the cover and just scrapbook the left cover.  Lot's of options here.

 
The scrapbook is nice and compact and fits on my bookshelf but I can also take it out every spring to remember the accomplishments that we achieved and look at how cute we look in black robes and cardboard hats pre-children.
 
 
Happy Graduation to All You Grads! 


Feel free to turn this post into a little graduation brag board - Did your baby graduate Kindergarden, High School, College?  Give a shout out to your High School {Reed High class of 2000!} or did you finally pass all your classes and get that higher degree?  Whatever it is, y'all have worked hard so be sure to brag about it below in the comments!  


Saturday, May 18, 2013

Personalized Paper Doll Quiet Books

I was going through old posts on my family blog today and discovered this fun project I did for Maggie a few years ago.  It's a personalized paper doll quiet book.  This book was very easy to make and could be used not only for entertainment but would be a great way to help with speech therapy, or even learning how to match and dress oneself.


How I made my book:

1.  I used my Cricut cartridge, Paper Doll Dress Up to create all of the images, however you could always just cut out pieces by hand if you do not have a Cricut.

2.  I created the main doll by cutting out a doll and trying to make it look as much like Mags as possible, long brown hair, blue eyes etc.  I also used different outfits on the cartridge to make an undershirt and underpants.  {The fewer naked dolls we have around here the better.  Why are there always so many naked Barbies at my house??}  I also decorated the background page by cutting out grass and flowers.

3.  I then used patterned paper and cut out a few dresses.  You could also cut out shoes, socks, pants, shirts, hats, headbands, wands etc.  This cartridge basically has everything.

4.  I then used my personal laminator to laminate all the pieces.  I laminated the entire page of the main doll and each dress individually.

5.  Glued the main page into a cheapy file folder.

6.  On the back of each of the dresses is a piece of sticky tack.  This allows for the pieces to be placed on the doll and stay in place.


Super simple little book that can provide lots of entertainment for your little one!

If you're looking for more ideas for paper dolls be sure to check out my tutorial for


Saturday, April 6, 2013

Easter Bunny Egg Cozies & Owl

Did you have a nice Easter?  I hope you did!

Ours was very nice and relaxing.  Church and the bunny stuff and dinner with friends.  What could be better than that?!

A few days later we were surprised with a great big box of even more Easter stuff from Nonie and Grandpa.  Inside were the cutest little bunnies I ever saw.  My mom had knit these adorable Easter Bunny Egg Cozies.  I died.  Inside each one was a little Cadbury egg that I did not let the kids touch because I did not want them messing with the bunnies.  I declared them MINE!


I've showed you other great stuff that my mom has knit or crocheted before HERE and HERE.  She's just so talented.  I can't get enough.  If you're on Ravelry (a social network for yarn enthusiasts) you can check out her page and even more of her projects.  Her user name is MOBOYLE.

The pattern she used is called Huggie Bunnies and is available for free download from Ravelry by Sandra Paul.

{P.S. If you're wondering about the background fabric, it's a clothing cotton I found recently at JoAnn Fabrics.  There's a whole line that goes with it.  Super cute.  It will soon be a dress so keep an eye out for that post in the future.}


Mom put a Cadburry egg in each one but they could easily fit a regular sized egg too.  Such a cute little project that I can't wait to save and pull out for next years Easter baskets.  Maybe by then I'll be more generous and share with the kids.  Maybe.

But the bunnies weren't all that Nonie knitted up for the kids.  She also included this adorable little Owl Puff.  I thought the eyes were especially neat.  It's little rounds of felt attached with rounded safety buttons.


The pattern for the Owl Puffs is available for free on Ravelry by Jenna Krupar.


Hope you feel inspired by my talented mom and all these adorable patterns! 

Kisses from the Cutts Family!  xoxo


Wednesday, January 2, 2013

The Mustache Bandana

Happy New Year!

It's been a while. Hope you had an excellent holiday season. Despite being sick for a month we still managed good times. Santa didn't bring me a new computer (so I'm still blogging from my iPod) but I'm working on it. So many things to show you!

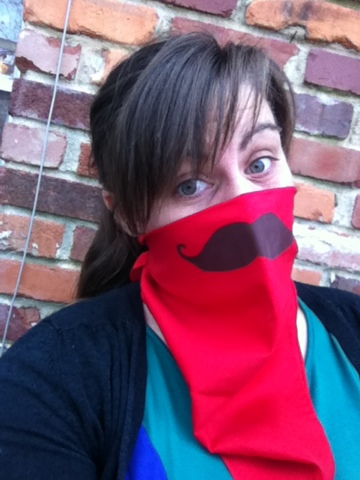
In the mean time, I thought I'd share the gift I made for my little brother. He rides a Harley so I thought a nice bandana would help keep the bugs out of his teeth when he rides. It's a bit of a gag gift but I figured every rider needs a nice full mustache.

To make your own simply fold a bandana in half (I bought mine at Hobby Lobby) and make a stencil of a mustache from freezer paper. Iron it on about an inch below the fold so that it sits right where your upper lip is. Paint inside the stencil and then peel off. Easy peasy!

It almost makes me want to take up bike riding. Too bad I'm a total chicken. I think I'll just stick to arts and crafts.


Thursday, August 9, 2012

Tribal Triangles - Potato Stamping Tutorial

I'll never understand why people say to never play with your food.  It's one our earliest creative outlets.  But I guess the last thing mom wants is the meal she just slaved over to become a work of art.  While mashed potato sculptures {anyone remember the movie UHF??} might not be welcome at the dinner table, you can use those potatoes in crafting! 


I had another neon tote on hand and decided that some tribal triangles were in order.  {I already did gold chevrons here.}  The only problem was that I didn't have a triangle stamp.  No worries, I just reached into my cupboard and pulled out a potato and made my own.


Supplies:

- colorful tote bag {similar totes can be found here}
-  craft paint
- potato
-  knife
- masking tape


TUTORIAL


Step 1:  Cut potato in half.  {My potato was fairly old and was feeling a little rubbery.  I used this one because it was on it's way out and I didn't want to waste a nice one.  However, I don't think it matters if your potato is old or new.}


Step 2:  Cut shape in potato.


Step 3:  Trim off the scraps from the sides.


You should have a nice little stamp now.


Step 4:  Tape off the lines you want your stamp to go in between.  This will serve as a guide to help you stamp in straight rows.


Step 5:  Did potato in paint.  I wanted my triangles to be a little worn so I rubbed the stamp on some cardboard to remove excess paint.  If you want your triangles to be more solid then just dip and stamp.


Step 6:  Using your tape as guides, stamp away!  I alternated the direction of the triangles in each row.


Step 7:  Let dry and remove tape.

And enjoy your new neon tribal triangle tote!


Related Posts Plugin for WordPress, Blogger...