Pages

Wednesday, August 31, 2011

Make Your Own Coupon Keeper

Whether you're a major coupon clipper or just use a coupon here or there it's a great way to save money.  I used to be a big couponer and sadly after I was pregnant with baby #2 I just fizzled out.  I do use coupons when I can but I don't collect them from the paper anymore.

Here is what I would use to store my coupons in an organized and easy way. 


I was in desperate need of a larger coupon holder and I didn't want to have to buy a binder and business card holder inserts. I estimated that to do so would have cost me around $10-$15 which would have defeated the point of all my coupon clipping these past few weeks.
 
 
I went digging in an old drawer and found a picture holder from the 7th grade (yes, that would be over 15 years ago). Thank goodness I didn't throw it out! There were a few crummy pictures in it and I hadn't touched it for years. I took the pictures out and created paper tabs (I cut my tabs using my Cricut but you can just fold over rectangles of paper) and stapled them to the inside. I then sorted my coupons.  The labels are for the sections of the store, baby, dairy, meat, cereals, toiletries, medicine etc.  The photo book spaces are the perfect size to store irregular sized coupons too. 
 
 
Simple as that! They are now organized, easy to view, and easy to find. Now I'm not flipping through my messy stacks of coupons trying to find what I am looking for.  And it's a great way to reuse all those picture books you are not using.


Saturday, August 20, 2011

I bet you're wondering if I dropped off the face of the earth. The truth is my computer is broken and I have just had my iPod to work off of or I have to wait until the hubby surrenders the lap top. Between a PhD, video games and fantasy football I obviously don't get to use it much. :)

Would you forgive me though if I told you that I have tutorials coming for which you can make yourself a new dress, leather purse and a bunch more stuff to help you keep your house clean and cute?? I hope you can. I may just throw in some giveaways too.

Thanks for your patience and keep an eye out for awesome stuff to come.

Y'all are the best!!


Wednesday, August 17, 2011

Homemade Play Dough from The Worlds Best Cookbook

You've probably seen lots of recipes for homemade play dough but this one is the best because it came from the best cookbook there is.

I got this cookbook when I was 4 years old.  Throughout my childhood I poured over its pages and made nearly every recipe in it.  The first thing I ever made was guacamole.  Since then I've been perfecting the recipe and it's one of my best dishes.  I'll share the recipe with you just as soon as avocados don't cost a million dollars.

Well worn but in pretty good condition considering it's 25 years old.  I still use it all the time.  It also came with a set of colorful measuring spoons which I still use every day.

Here's everything you need, taken straight from the book. 


Ingredients:
  • 1 C. white flour
  • 1/4 C. salt
  • 1Tb vegetable oil
  • 2 Tb cream of tartar
  • 1 cup water
  • 2 tsp food coloring
Directions:
  1. Mix flour, salt and cream of tartar in a medium pot.
  2. Add water, food coloring and oil.
  3. Stir over medium heat for 3-5 minutes.  Don't worry if the mixture looks like a globby mess; it'll turn into dough.
  4. When the mixture forms a ball in the center of the pot, take it out and put it on a floured surface.  Squish it and punch it around a bit; this is called kneading.
  5. When you're done put it in a plastic bag or airtight container.

This play dough works beautifully and lasts forever.  The only time we make more is when we want another color.  Have fun making this with your kids.  You'll all love it!

Monday, August 15, 2011

Art Bags for Kids

I've seen this activity done a few different ways.  I'm not sure what to call it so I guess I'll call them art bags for lack of a better name.  I guess it's sort of like a homemade Magna Doodle.

Mags really enjoyed drawing and making designs, erasing them and making more designs.  It's a great boredom buster and you can make one with supplies you have around the house.


It's hard to see her drawings because the table is the same color as the art bag but it's there.  I promise.

Supplies:
  • Gallon size Ziploc bag
  • tape
  • 1/4 c. pudding  **avoid chocolate flavor - read story below
  • about 1 Tb. glitter
  • Q-tips
Directions:
  1.  Place pudding in bag along with glitter.
  2. Mash bag to mix the pudding and glitter thoroughly.
  3. Remove all air from bag and seal it up.  Use tape for additional seal {especially if your kids are younger and are tempted to open it and eat the pudding like Miss Maggie was}.
  4. Use q-tips as writing utensil.
  5. You can store in fridge when not using it.  It should last a long time especially since you won't be eating it.
Yay!  Easy as that!


Okay so I have to tell you a story.  This is a warning actually so if you ignore my warning and this happens to you I get to point and laugh at you and say "I told you so". 

Several years ago my friend Laura saw in a family magazine an idea to do finger painting with pudding.  That way the kids can paint but it's also safe to eat.  Well Laura wanted to do this with her daughter Emmeline who was maybe 2 at the time so she pulled out the chocolate pudding she had in her cupboard and they painted.  It was great!  They had so much fun!  Later Emmeline took a nap after a while Laura went in to check on her and creative little Emmeline discovered that there were "finger paints" in her diaper!  There were poop murals everywhere!!!!  She said the activity was fun but the chocolate pudding color apparently sent some mixed signals to the kiddo.  I sure hope Laura can laugh about it now.

Flash forward to last week when we made our art bags.  All I had was chocolate pudding in our cupboard.  I was reminded of Laura's story, giggled in my head and used the chocolate pudding anyway.  I told myself that this would never happen to us because "Maggie is older than Emmeline was"  "Maggie is potty trained" "Maggie has never been interested in poop" "We're not finger painting exactly.  It's in a bag."  "She would never do that" etc. You can see, I had lots of reasons to carry on with the chocolate pudding.  I made the bag and ran upstairs to grab a q-tip, not more than a minute later Maggie is standing next to me showing me her dirty hands.  She says, "Uh oh.  Dirty."  I realize that I should have sealed the bag better and she must have opened it up.  Upon closer inspection I discover that it was poop!!!  She had an accident in her pull-up and decided to check it out.  Luckily she realized her mistake right away and there were no murals, but still -  Yuck!

I couldn't believe it.  I was warned.  Why didn't I listen?
Laura, this is where you get to point and laugh at me and say, "I told you so."

So the moral of the story is do this activity.  It's a lot of fun. 
But whatever you do don't use chocolate.


Saturday, August 13, 2011

Roasted Tapatio Chick Peas

A few weeks ago I made these salt and vinegar chick peas from Oh She Glows.  I found the recipe on Pinterest.  They are amazing.  This is the kind of snack that calls to me at all hours of the day and night, begging to be eaten.  Since then I've been experimenting with different flavors and the best one by a landslide is Tapatio flavor!


Now, I haven't decided on who I'm going to vote for for president yet but I'm considering this guy -


Tapatio is the greatest thing ever invented.

I have a confession:
I eat a liter of this hot sauce every month.

{Cardiologists around the world are having strokes as they read this.}

I just can't help myself, its so delicious it belongs on everything.  And I mean everything.  If it makes you feel better, I've cut down.  I used to eat 2 liters a month.


Ready for the simple recipe??


Ingredients:
  • 1 can chick peas, drained
  • 1-2 tsp olive oil
  • 1-2 tsp Tapatio hot sauce
Directions:
  1. Place chick peas in a baking dish (9x9 works well)
  2. Drizzle with olive oil and stir until all pieces are coated.
  3. Bake in oven at 400 F for 30 minutes, stirring the chick peas occasionally to make sure they don't burn on one side.
  4. Remove from oven and sprinkle with hot sauce, stir to make sure that the sauce coats the chick peas evenly.
  5. Place back in oven and cook additional 10-15 minutes until dark golden brown.
  6. Remove from oven again and toss more sauce on them.  They will be very hot and the sauce should bake right onto them without having to put them back into the oven.
  7. Let cool and enjoy!
  8. *** All ovens vary.  If they do not look like they are crisping up enough cook for longer.  But be aware that as they cool they will become slightly more crunchy. 
These are so crunchy, flavorful, and delicious with just the perfect amount of spice.  I store them in a container in my cupboard and it makes for a great snack packed with protein and of course, Tapatio!


Wednesday, August 10, 2011

KEEP CALM and READ ON


Have you seen the posters with a little crown that say

KEEP CALM
and
CARRY ON?

Of course you have.

Because they are EVERYWHERE.

It was cute at first.  Now it's just getting a little crazy.  I'm seeing these posters pop up everywhere.  And they want you to keep calm about almost everything.

{Harry Potter, travel, baking, sewing, typing, getting married, super heros,
fishing, shopping, rocking out, bird watching, dog owning, blah, blah, blah.}

Seriously the list goes on forever.  Click HERE to see my simple google search. 
You'll see what I mean.

Which has me asking -


I just don't get it.  Why is everyone freaking out?  Why is everything so upsetting? 

Have people gone mad?  Are they taking crazy pills?  Is there something I don't know? 

Is there some sort of bioweapon that causes mass panic like in Batman and the only cure is a message from the Queen telling us to keep calm? 

I always thought the cure for anything was more cow bells but surely, this must be it.

My only question left is what's next?

Possibly...


It's the only topic I haven't seen covered yet.

Actually, this one's not so bad. 

I think I'll have to print that one out and put it next to the little potty.  That way, the next time the 3 year old flips out and starts screaming and running away naked in a desparate attempt to avoid the "big girl potty", I'll simply just shake my head, point to the sign and then she'll be calm and completly understand.  It will be a potty training miracle.


Thanks KEEP CALM sign!  Now I understand you.


I kid of course, but seriously, what's up?  Where did these come from in the first place?
Though they are everywhere they still are kind of fun.  Which one is your favorite??


Tuesday, August 9, 2011

Menu Board

My friend Sabrina is the best.  She spoils me and my kids rotten.  I love spending time with her and look forward to the summers because that means extra Sabrina time.  She teaches High School science and has 4 {awesome} teenage kids that keep her busy the rest of the year.

Last week we made sure to get in an extra day together before school started back up and she came bearing crafty gifts.  She brought me an 11x14 inch frame {the size you would get for an 8x10 picture with mat} and the idea to make menu boards!  This was something I desperately needed!

I used scraps of 12x12 paper and included a ribbon embellishment.  I cut out letters using my Cricut cartridge, "All Mixed Up", to write Menu and the letters of the days of the week.  Place your page behind the glass and you have an adorable dry erase board to write your menu for the week.


This is the basic idea of a menu.  I'm still new to this planning things out business and this menu got changed about 10 times this week but it's a start.  I already feel like I have dinner better under control.  I love it.  The best part is you can make several backgrounds and switch it up whenever you want.  How fun will it be to do different backgrounds for the Holidays?

Sabrina did 3 different fun backgrounds and this was one of them.  The font was from the cartridge, "Plantain School Book" italic font.  The coolest part about Sabrina's was that she had this amazing idea to attach a magnetic shopping list to the board.

She used e-6000 glue to attach two metal pieces.  The list sticks right on.  She said that she didn't take into account the extra weight on one side but once she used some double sided tape on the back the leaning was no problem  I'm certain an extra hook in the back of the frame would work as well.
Hope you feel inspired to make your own.  This was so simple and fin to do.

Thanks Sabrina!!!

Sunday, August 7, 2011

So Grateful Sunday: Reno Temple Cross Stitch from Alicia

I need to introduce you to my dearest and oldest friend, Alicia.  No, not me, Alicia.  A-lish-a.  I'm
A-leash-a.  Clear as mud?  That's okay.  We're used to the name confusion.

Alicia and I met my Freshman year of High School (her Sophomore) and we've been besties ever since.  We've been through some good times her and I.  Like tagging random stupid stuff on the walls next to gangster and tag artist's street names.  Yeah we know we're cool.  {Don't worry it was a designated place in Reno for this kind of thing.  No need to call the authorities.}  Do you like how I took a picture of a picture?  I told you she was my oldest friend, we didn't even have digital cameras back then.

Here's a picture of Alicia with her adorable family.  I love that her kids hate pictures just like mine do.
(photo stolen from facebook.  sue me.)

Alicia is amazing.  She is the friend that everyone should have.  She is so generous.  She is always doing things for others and is always thinking about what she can do to help out.  She's a talented photographer and will take any ones pictures for free.  Anytime.  You don't find a lot of people who will do that.  She also takes the time to put on wonderful showers for people (she did my bridal shower!) and they always turn out so fabulous.  I also love that she is so funny.  Seriously, I don't even know if she means to be but everything she says is so thoughtful and hilarious.  She's so stinkin' smart it kills me.  In High School she pretended to play the trumpet because the band was going to Hawaii that year and she really wanted to go.  She was terrible!  But she got to go to Hawaii!  Ha ha.  I wish I could list all of her "best of" moments but this post would be forever.

The thing I love most about Alicia is that she's honest.  Not just the kind of honest where people will return a lost wallet honest.  I mean honest honest.  She will always tell you the truth about anything.  She's not going to sugar coat something just because.  She'll always tell you if your breath stinks or if there's spinach in your teeth.  Everyone needs a friend like that.  One that will tell things to you straight because they care about you.  More people on American Idol need friends like Alicia.  I love that I know that Alicia is always being genuine and true to herself.  And when I get compliments from her they mean so much more to me than anything else because I know that she really means what she says.

Another thing that I think is cool about Alicia is that she's always trying new things and when she makes a goal she follows through.  You don't find many adults that decide that they want to learn to play piano and then go out and do it.  She's gotten quite good too.  So if you're nervous about learning something new or following a dream you should just do it.  Alicia did and it's made her very happy. 

As expected she was at my wedding and she had her camera in hand.  I don't know if she would pick this as her favorite of the roll but I really love it. 

In addition to pictures and a slide show she also gave us this beautiful cross stitch of the Reno Nevada Temple where John and I were married.  It's quite large and very detailed.  Even the tulips in the front are the exact color.  This must have taken her forever to do.  I've cross stitched before I know know the time it takes.  This just blows my mind.

I apologize for the bad pictures it was the best I could get with my skills and lighting issues.  I hope you can get a glimpse though of this gorgeous piece of art.  It has hung on my wall every day and will continue to hang there forever.

I'm so grateful to have Alicia in my life.  It would be so dull without her!  Thanks Alicia for being there for me all these years.  I couldn't have asked for a better friend!


Saturday, August 6, 2011

Caramelized Onion, Spinach, & Bacon White Pizza

I love experimenting with pizza.

This was this weeks pizza experiment and we really enjoyed how it turned out.  John likes more of a marinara pizza with lots of meat and I love well... this.  But we both agreed it was a keeper of a recipe.  In my opinion the onions put this over the top.  Definitely a technique I'll be using again for pizza.


Ingredients:
  • Pizza dough (I buy the refrigerated fresh dough from the Publix bakery)
  • 1/3 c. Alfredo sauce
  • 2 medium onions, thinly sliced
  • 1 head of garlic (about 5-6 cloves), chopped
  • 1 TB butter
  • 1 tsp sugar
  • 2 large handfuls of fresh spinach, chopped
  • 6 slices of bacon, chopped
  • Mozzarella cheese (I used fresh slices but grated would be fine too)
  • 1 TB cornmeal
  • Pan spray
Directions:
  1. In medium pan melt butter and saute garlic and onions until soft and light brown.  Add sugar and continue to cook until onions become caramelized.  Remove from heat.
  2. Preheat oven to 400F
  3. Spray pan with pan spray and sprinkle with cornmeal.  This will keep dough from sticking to pan.
  4. Place dough in pan and spread Alfredo sauce evenly onto dough.
  5. Spread onions onto Alfredo sauce evenly.
  6. Place chopped spinach onto pizza. 
  7. Cover with mozzarella cheese
  8. In pan you cooked the onions in partially cook the bacon pieces.  They should still be soft but not raw.  This will ensure they will crisp up enough in the oven and be cooked thoroughly.  It also reduces some of the extra fat.  Sprinkle on top of pizza when par-cooked.
  9. Place entire pie in oven and cook for 12-15 minutes or until light brown and melty.
When you're done, it looks something like this.


Wednesday, August 3, 2011

Mango Salsa

Are you ready for an easy, fresh, delicious, chunky salsa to go with well... anything?


Ingredients:

Directions:
  1. Place first 4 ingredients in bowl.
  2. Drizzle with oil and lemon juice.
  3. Season with salt and chili powder to taste.


Told you it was easy.

You can put this on anything or everything. 
It's also yummy to just eat straight out of the bowl!


Here's how the Cutts Family {that's us} likes it:


On top of grilled steak tacos
~
Red leaf lettuce salad topped with Siesta Chicken and Mango Salsa
~
As a side to bacon wrapped BBQ baked chicken with basmatti rice
~
Plain ol' chips and salsa


Tuesday, August 2, 2011

How To Cut Up A Mango


Sometimes I get sad when people say they love mango's but they can't figure out how to cup them up {because of that huge weird seed in the middle} so they don't ever get them.  Mango's are so delicious!  Don't deny yourself mango's anymore!  I will show you how to slice and dice to your hearts delight.


Step 1:  First things first - get a ripe Mango.  Too hard and the flavor won't be ripe.  Too soft and it will taste fine but will be stringy.  Pick one that is firm but still has a little give when you squeeze it.


Step two:  Turn your mango up so that the pointy tip is pointing toward the sky. Carefully {Don't cut yourself!} place the knife slightly off center and slowly cut downward {I use a slight sawing motion when I cut} following as close to the seed as you can.


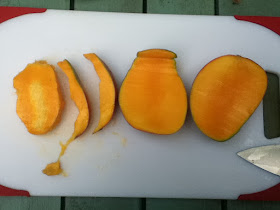
 Should look like this when you are done.  See the seed on the one on the left?


Step 3:  Do the same thing you did in step 2 but with the other side.

And it now looks like this.  The seed is on the left.

Step 4:  Do the same thing you did in step 2 & 3 with the skinny sides around the seed. 

Step 5:  Don't let the seed go to waste.  For doing all the hard work you are now to reward yourself by scraping that baby clean.  You can use your teeth for that part.  See?  I even have some mango stuck in mine.  Go to town.


Step 6:  Being careful not to slice through the skin, score lines in the mango horizontally, then vertically.

Step 7:  Push on the back of the mango and flip it inside out.

Step 8:  Use your knife to shave off pieces into a bowl.  I cut it once and then cut it again just closer to the skin the second time.  This part will all depend on what size you want your pieces.

Step 9:  For the smaller pieces, score it the same way but you can lay these flat and fillet the skin off the mango.


Now you can stop being afraid of mangoes and embrace them in all of their deliciousness!


_______________________


I always put my mangoes in my super tasty, super fresh, super simple Mango Salsa. 

Be sure to go HERE to get the recipe.

Monday, August 1, 2011

The Ruffled Mod Dress

Do y'all remember when I showed you the Mod Mod Dress that I designed? 

Well, I used the same basic pattern but with a twist - Ruffles!!

Oh wait, here's another twist - It's completly repurposed!

I got this shirt for free a while ago.  It's Old Navy brand, maybe you've seen this shirt before??  I never wore it but kept it because I liked the fabric.  Time went on and I wasn't doing anything with it so I tried to sell it at a yard sale (twice) for $1.  No takers.  So I turned it into something new.  I bet I could get a $1 for it now.

The main fabric is this shirt.  The lining for the top part is from scraps from my New Glory His & Hers Outfits.  And the hook in the back is from an old bra.  {You can read about that HERE}

I know it's hard to see {the pattern is so busy} but there are 3 tuxedo ruffles down the front of the top.

A double layer of ruffled sleeve.

And right there in the corner {if you squint} there is a little pocket with a little white button closure.

Here's the back.

We tried to pose in the backyard for pictures.


But we were easily distracted by all of the interesing stuff back there.


And then the mosquitoes came and things got itchy.


Real itchy.


And two sad shots later we were done.

"Those darn skeeters!"


Hope you feel inspired to dig around your closet and turn something old into something new!