Showing posts with label 4th of July. Show all posts

Wednesday, July 3, 2013

Independence Day Tie-Dye


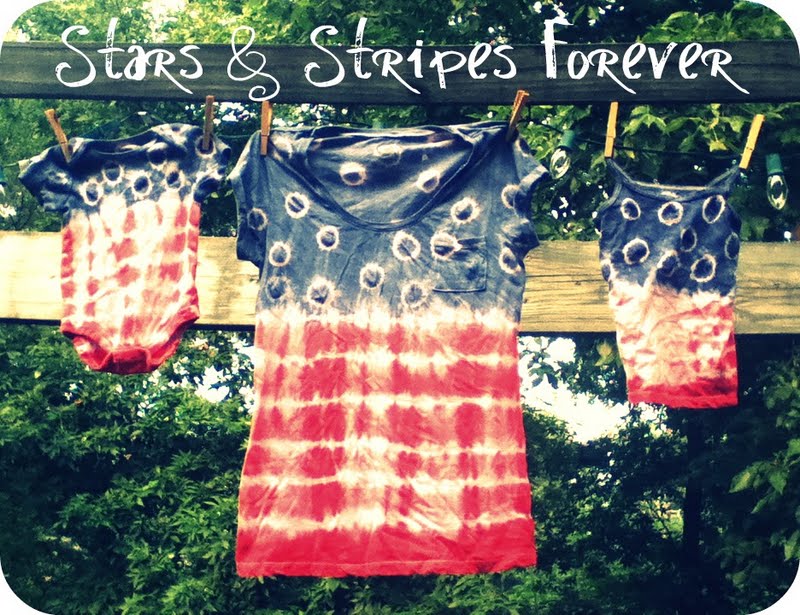
Are you preparing yourself for the 4th of July?!  We love all the celebrations every year {especially since you can light all the fireworks you want here in Alabama}!  I still don't know what I'm going to do for patriotic outfits for the kids.  I figured you might be in the same situation so I wanted to remind you of my super easy Stars and Stripes Forever Tie-Dye.  {Click the link for the full tutorial.}

I've gone all out in the past with red white and blue refashions like this Rocket Pop Dress.


Or the New Glory His and Hers Outfits.


But this year the holiday just snuck up on me.  I'll have to dig through old clothes to see if anything inspires me.  Do you have any ideas for me?  I'd love to hear them.  Feel free to leave links in the comment section if you like.

Have a safe and fun holiday!  Go America!

Monday, July 2, 2012

Quilted Stationary


Today starts a new week of voting at So You Think You're Crafty.  The theme this week is rpurposed crafts.  So head on over and vote for yours truly {or whichever you like best}.  I can't tell which is mine just know that it's awesome.  Haha! 

Last weeks theme for the competition was scraps so I dug into my scrap hoard and came up with some

Quilted Stationary!

I really love to sew on paper and fabric gives a quality and texture that even the cutest scrapbook paper paper can't.  Before sewing, I secured the fabric to the paper with a gule stick so really this can be a no sew project as well.


Quilt Block Card:  This was an extra quilt block that never got used so I stitched it to a square card.  For the envelope I attached some of the leftover fabric from the block to the inside.  It's complimentary to the card and adds a nice little surprise.


Nautical/Americana:  For these I dug into my fabric, notions and paper scrap bins as well as the recycle.  The anchor card design is made from a fabric background with a fabric anchor appliqued with gold thread.  The flag card is a combination of fabric, red ribbon, white trim and a paper star.  The "freedom" card uses a combination of fabric, trim, paper and even uses the red plastic cover that they use to cover the tray of Cuties oranges at the grocery store.


Bright & Bold Birthday: For the balloon cards I used some black and white gingham fabric and attached it to bright cards by playing around with the different fun and decorative stitches on my machine with hot pink thread.  I then cut out a stencil in vinyl and painted a neon balloon on each one.  For the bunting cards I made teeny tiny flags and attached the tops using a straight stitch and added a birthday greeting.


So there you have it.  A fun and useful way to use up those scraps you've been hoarding!

Sunday, July 3, 2011

Stars & Stripes Forever Tie-Dye

We sang all three verses of The Star Spangled Banner today at Church.  It felt amazing.

I love my country.


 I showed you The Rocket Pop Dress and New Glory His and Hers Independence Day Outfits and here's one more.  Stars and Stripes Forever Tie-Dye. 

Here's how I did it -


Supplies:
  • White Cotton T-Shirts
  • Regular Rubber Bands
  • Mini Rubber Bands (for hair)
  • Rit Dye Scarlet
  • Rit Dye Denim Blue
  • Marbles ( I used the flat bottom kind that you get in the floral department)
  • Salt

 Step 1:  Place a marble on the underside of the shirt.  Wrap tightly with mini rubber band.  Repeat over the top half of the shirt.

Step 2:  Gather the bottom of your shirt in an accordion like fashion and wrap tightly with rubber bands.  See photo above.

Step 3:  Wrap the entire top of the shirt in plastic wrap and secure with more rubber bands.


 Step 4:  Prepare the red dye according to the directions on bottle.

*The directions on bottle tell you how to make 3 gallons worth of dye.  Unless you're clothing an army you don't need this much.  My friends and I did a total of about 10 shirts and we only used 1 gallon.  To prepare for 1 gallon use the following:  1 gallon of water, 1/3 cup salt, 4 tsp liquid dye.


Step 5:  Soak the bottom half of shirt in red dye until it reaches the color you want.  (You can see from the picture I had to get creative in keeping the top half out of the dye.)

Step 6:  Remove from dye and rinse the bottom half of the shirt until water runs clear.

Step 7:  Remove plastic wrap and prepare blue dye. 
Step 8:  Soak and dip the top part of the shirt in the blue dye until it reaches the desired color.  Rise like you did for the red.

Step 9:  Remove rubber bands and follow directions on bottle of dye.

*Note: Directions said to wash in washer with warm water.  The red bled onto the white to give it a slight pink color.  I think next time I will wash in cold to help set the color better.  Any other suggestions?  It was just the red we had problems with.


Have a safe and fun 4th of July!

__________________________

Visit thecsiproject.com

Sunday, June 26, 2011

New Glory His and Hers Independence Day Outfits

Remember when I showed you last year's Independence Day dress and I told you I had big plans for this year?  Well, here it is. 

Introducing 

New Glory, His & Hers


Red, White and Blue.  Not a more beautiful combination.


Want to know what these outfits used to be???


 Grampa Pants!!

I've had these pants for what seems like forever.  I bought them at the thrift store, Saver's, in Reno.  I haven't lived there in forever so I must have been holding onto these for at least 8 years or more.  I don't know why I loved them so much.  Probably because they made my butt look awesome.  But it was time to face reality, I don't fit in them anymore and really, no mom should be wearing them.  I'm not saying I should be wearing mom jeans but pants like these are best kept in our early twenties and used for riding long boards in parking lots late at night.

So....  goodbye Old Glory.  Welcome New Glory!


 I made these outfits using patterns that I created. 

I've been loving BIG bows and HUGE pockets and thought that this dress needed to incorporate both.  Mags loved the pockets so much I caught her smuggling books to church in them.  The main body of the dress is a lightweight navy cotton.  I wanted it it be nice and cool for the hot summer.

Jackson's romper is a take on the typical Southern boy outfit.  The anchor is appliqued on.  I made some pretty big mistakes in the pattern but they were easy to fix in the end.  I wish I would have measured a little more thoroughly because it is exactly the right length.  The way this kid eats he's not going to be wearing it too much longer.  The shoulders have button closures.  Again I wanted a nice cool outfit for the hot summer.

Sweet Home Alabama! 


 Now, I don't want you to think that I plan out photo shoots where I get my kids to share an apple because it would make for a cute picture or have my daughter stare off dramatically into space for effect.  Because I don't.  In fact, you should feel sorry for me because every one in my family hates getting their picture made.  Hates it.  So I suck it up and instead of thinking of those other blogs where the cute kids smile, and laugh, twirl and pose in their new outfits mommy made them, I grab my ipod (because maybe they won't notice it's taking pictures) and start clicking away in the hopes that there is a decent one.  So you get to see Mags try and pull out her hair bow and run away from the camera.  You get to see that my kids have no interest in pictures, or putting down their breakfast. 

Sigh...

Oh well, at least they're still cute in their new outfits and ready to celebrate America!


___________________________________________________

Visit thecsiproject.com
Two years in a row!
2011 & 2012


Monday, June 13, 2011

The Rocket Pop Dress

Well, July is almost here and that means the kids need new Independence Day outfits.  I have BIG plans for coordinating outfits boy and girl this year so stay tuned to see them.  As soon as I'm done with crafts for Girls Camp I'll be able to get right on them.  Until then I thought I would show you Maggie's 4th of July dress I made her last year.  Maybe it will help give you some inspiration for your own dress.


It looks kind of like a rocket pop don't you think?  I thought the name was fitting.  Wanna' know how I did it?  It's simple and it cost me nothing to make because I just cut up old clothes.

The red part is the top of a pair of red check pajama pants that were 2 sizes too big for Maggie.  I cut them off just above the crotch like I did HERE.  I then cut up a white shirt and made one long strip of wide fabric.  I gathered it and sewed it around the bottom of the red pants.  I then cut up a blue striped shirt and added another layer and hemmed the bottom.  The trick is to make sure each strip of fabric you add is longer than the last.  That's what gives it the fullness.

I then attached ties that I made from the blue fabric and added some fabric rosettes to the top.  Easy peasy.  The whole thing took less than an hour to make and was a super cute way to celebrate in the hot Alabama summer.

Doesn't everything just look good when it's in red, white and blue?


_________________________________________

Visit thecsiproject.com


Related Posts Plugin for WordPress, Blogger...