Thursday, December 29, 2011

Ballerina Cupcakes

Maggie finished up her first semester in ballet. There is nothing cuter than a bunch of little 3 year olds dancing their hearts out.  At the end of the semester they had a small program and a little party afterwards.  I knew right away what I wanted to bring.

Ballerina Cupcakes!


I wanted them to be special but I also wanted them to be simple.  I used a box of strawberry cake mix and a jar and a half of strawberry frosting.  Not only were the strawberry cupcakes pink but Southerners love strawberry cupcakes so a win all around.  The easiest way to frost a cupcake is to place it in a piping bag and swirl it up on top.  I then tossed on a few valentines sprinkles and there's your cupcake!

For the topper I used the ballerina dress from the Cricut cartridge Paper Doll Dress Up.  I cut out two dresses for each cupcake.  I taped a mini bamboo skewer to one dress to secure it and then using a glue stick, I sandwiched the skewer with another dress.  Make sense?  Dress, skewer, dress.


This was one happy ballerina!


*** If you are interested in these toppers but are unable to make your own, feel free to send me an e-mail at thecreativevault(at)hotmail(dot)com to inquire about purchasing. 

Cran-Apple Spinach Salad

I want you to taste this salad.  It's so yummy.  I've had something similar to this before and I did my best to recreate it and it was a success.  The rich dressing, crunchy spiced nuts, salty feta and sweet apples and cranberries combine to create a delicious flavorful salad.  Perfect for any occasion.


Ingredients:

1 bag spinach
1 cup Craisins
1-2 Galla Apples, diced
1/2 cup feta cheese crumbles
1/2 cup cinnamon and sugar spiced pecans
1/3 bottle Briannas Poppy Seed dressing


Directions:
  1. Place spinach, Craisins, and apple in bowl
  2. Toss with salad dressing.
  3. Top with feta cheese and pecans.
  4. Serve right away.


Monday, December 26, 2011

Play Spools

We had a great Christmas.  I hope you did too.  So many highlights and so much fun.  The kids were really into it this year {last year I had to bribe Mags with candy just to open presents}.  And my husband treated me like a princess, just like he always does.  You know how on Modern Family Claire is a horrible gift giver to her husband and he's the best ever?  Yeah, that's us.  I think I made up for it this year though with electronics and sports gear.

I made several gifts for the kids and I'll gradually get to posting what I've made.  Today I'll show you the simplest gift I made.

Play Spools


Maggie is obsessed with my craft supplies.  My craft room is a disaster because really what 3 year old can resist bin after bin filled with ribbon and jars of buttons just waiting to be tossed in the rain to rain down on their head?  One of her favorites is to take my spools of thread, hold onto the string and drag the spools around the house.  It makes me nuts.  She needs some craft supplies of her own.

I like to reuse everything so I've been saving empty spools of thread.  I hot glued different kinds of yarn around each one and left about a foot of yard free at the end that way she can wrap it herself or pretend to sew.  It just took a few minutes to make each spool.

When she opened it she shouted "YES!" then promptly ran upstairs to place the spools onto my sewing machine and pretend to sew.  We eventually had to bring her back down so the family could finish opening presents!  I think it was a hit.

Take a look around the craft bins and see if there is some re-purposing you can do too!

Saturday, December 24, 2011

Vintage Handmade Stocking and A Great Big Merry Christmas!

Well, the stockings are all hung {or laid nicely on the couch} with care in the hopes that St. Nicholas soon would be there!  I surely can't sleep knowing that Christmas is tomorrow so I wanted to show you the beautifully, hand stitched stocking my Grandma Rosie {aka Nonie} made me when I was born.  Each member of my family has one with a different scene and each is just as elaborate and gorgeous as the last.  I hate to call it vintage because it's exactly as old as me but let's face it - it's getting there.


I've had a difficult time making stockings for my own family.  Nothing I can do will ever match what Nonie did.  What a wonderful, talented woman!  I miss you Nonie!

______________


I hope each of you have a wonderful Holiday Season filled with joy, happiness, family, creativity and lots and lots of love!


Merry Christmas from The Cutts Family!


And if you're wondering... yes... this is the best family photo we got this year.
Sigh...
I long for the day when we have beautiful family photo but for now I'm just happy with what I've got.  
Crazy kids, a great husband and lots and lots of love.

Seasons Greetings to All!!!

Tuesday, December 20, 2011

Ruffled Muslin Trees {Tutorial}

Y'all, I am a mess.  I've had so many projects I've been working on for Christmas gifts, that hardly any of them are getting done.  I'm just all over the place with no focus.  I guess most of them will be Happy New Years presents.  You're probably thinking, "Then why are you blogging if you have so much to do?"  The truth is, I have no idea.  But since I did get one gift done I thought I would share it, maybe it will help motivate me to finish the bajillion others.  Oh yeah, and don't worry I'm still working on a tutorial for the Mr. & Mrs. Place Settings.  I just wanted to get this out before Christmas was over.


Introducing Ruffled Muslin Trees


Super simple.  Super sweet.


And the best part is it can go with any decor theme.


I made these as a thank you gift for Maggie's therapists {occupational and speech}.  They spend so much time with her each week, making her feel so special, I didn't want them to go unrecognized.  I figured they could keep them on their desk or take them home.  I would have loved to get them a nice big gift card or something but it just wasn't in the budget.  So it was off to the craft room.

Want to make your own?  It's so easy, I promise.  Okay, here's how:

Supplies:
- Card stock paper {you can use a Styrofoam cone too but they can be expensive}
- Tape
- Muslin (about 1/8 - 1/4 yard) per tree {I just used scraps}
- scissors
- hot glue
- twine
- jingle bells

Directions:


Step 1:  Make a cone from the paper.  I have no special tricks, just twist the paper around until it forms a come that you like the shape of.  Tape it to secure it in place.

Step 2:  Prepare your fabric.  Tear your fabric into strips that about about 1 inch wide.  Tearing gives it a nice frayed edge and a shabby chic look.  To tear your fabric cut a small slit on the edge and then just rip. {no pic sorry}

Step 3:  Hot glue fabric to cone starting from the bottom and gradually spiraling all the way up, gathering and bunching the fabric as you go.  When you come to the end of a strip just add another one.  No need to do anything fancy.

Work with about an inch at a time.  This way your glue stays nice and hot and secure.
Step 4:  Once you've added all the ruffle, cut off the tip of the tree to make a tiny flat top.

Step 5:  Take a piece of twine {about 8-10 inches long) and tie a jingle bell to each end.

Step 6:  Take a long length of twine and wrap it around your fingers.  The length of twine will depend on how many loops you want your bow to have.

Step 7:  Take the twine off your fingers and hold it in the middle.  Take the twine with the jingle bells on it and tie it in a knot around the looped twine.  This will secure it in place.


Step 8:  Place a large blob of glue on the top and attach the bow.


Ta-da!

Told you it was simple.  The whole thing took me lass than two Modern Family episodes to complete so (a half hour or so).  A great last minute gift or decor idea.  The best part is its such a lovely color that it can stay up past Christmas as part of winter decor and not just for Christmas.  A nice gift for any denomination.

Well, I'm off to finish the rest of my projects, since I'm guessing my family would like to have Christmas presents and all.

Good luck to you with all you have going on as well!


Sunday, December 11, 2011

Mr. & Mrs. Place Settings

So I mentioned a few days ago that we went to a wonderful wedding reception for a beautiful couple.  Rebecca is such a cool girl and has such a fun personality.  I follow her every drool worthy pin on Pinterest with anticipation.  In fact my fist thought when I heard she was engaged was, "Oh all of her pins are going to come to life!!!!"

I really wanted to be able to do something for her from her Wish List on Pinterest and was in luck when I noticed THIS PIN where they painted silverware.  I also noticed on there that she had lots of pins in this gorgeous blue {I never know what to call it.  Teal?  Turquoise?  Robins Egg?  I'm only slightly better than boys when it comes to identifying colors.}  I knew I was going to paint her some silverware and when I got to the store the rest of the project just came to me.


My friend Amy went in on the project with me and helped talk me through it.

We ended up with a place setting for two.


{Pay no attention to the extreme patina that my deck table has.  Time for a new paint job.}


Anyone know what side the fork goes on?  I can never remember so I tried both.


Keep an eye out for a tutorial on how I did it all later this week.

Until then, I'll just give you the basics - the mats are bamboo mats spray painted in white.  I then used a stencil I made with my Cricut and dry brushed the blue to give it a worn look.  I did the same with the napkins.  As for the utensils I taped each of them off, sprayed them with primer and then dipped them in paint.


I really liked how they turned out {my ipod photos don't do it justice} and I hope the happy couple like it too.  Thanks Rebecca for inspiring me with all of your gorgeous pins!


May All Your Wildest Pins Come True!


And if you missed it HERE is the post about the card I made from their wedding announcement.


Have a Creative Day!!

- Alicia


__________________


Visit thecsiproject.com

Wednesday, December 7, 2011

Brown Paper Packages Tied Up With String...

I'm so happy today!!!  Through some generous trades with some very amazing people I now have a computer again!!  I can't even begin to tell you how sad it's been for me not to blog.  It's such a great hobby and release. So look forward to lots of random posts coming soon.

This past weekend we were able to attend another wedding reception for a wonderful couple, Brian and Rebecca.  I made them a gift that was different from what I've been giving and I really loved it.  I'll show it to you soon but today I wanted to show you the card I made.


I really love reusing materials so for weddings I like to cut up the bride and grooms announcement to make their card.  After all, I don't need it anymore and they picked it out so they must really love it.  Sometimes I'll use their engagement picture, or a monogram but for this one I used this awesome picture.

Rebecca has fantastic style and this darling jar was at the bottom of the announcement.  I simply cropped out the jar and sewed it to the cream colored paper.  I used a stamp to add the word LOVE.  I then glued that portion to a piece of brown card stock that matched the brown paper wrappings.  I wrote the message on the back of the card/tag, punched a hole in the corner and tied it to the package.


The whole thing took about 5 minutes to make and the bride loved it.

Can you imagine if everyone re-purposed your announcement as a card??  I would love to see all the different things that people would do with it!

Friday, November 25, 2011

Breaking Dawn Party

I do not apologize for what you are about to see.  Why?  Because this was the BEST.  NIGHT.  EVER.  I know there is some Twi-hate in the world but I will have none of it here.  So come visit our Breaking Dawn Pre-Party and enjoy the festivities.

This was our pre-party for the midnight showing of the latest Twilight movie.  A large group of us had been going to midnight showings all along but I really felt like this year we needed a little more.  So with the generosity of my friend Michelle who volunteered her house along with many other contributers we partied.


Edward here to welcome you to the festivities. 

I used my Halloween wreath, changed out the orange ribbon for some red and attached some chess pieces (to represent the book cover).  Behind the wreath I taped a picture of Edward.  Because the party was at night and the porch was dark, his creeptastic stare freaked eveyone out as they approached the door.  Bonus!


My friend, Amy from Indulge With Me executed my idea for Vampire Cupcakes perfectly.  White cake and white frosting with shimmery sprinkles.  They had to sparkle!  Amy found the cupcake wrappers at Hobby Lobby.  Aren't they perfect?


Oh yeah, and did I forget to mention that they were filled with blood!!?!?!!!  Who-wah-ha-ha!!

Okay so maybe not blood, maybe it was delicious raspberry filling.  You can get the recipes for the cupcakes HERE.

I know what you're thinking - How could we possibly forget Team Jacob?  Of course we didn't!


We had a whole plate of Werewolf Treats.

Way to save Bella once again!  Good  doggie!  Good boy! 

I used this ginger snap recipe (minus the pepper) and they turned out delicious.  People who weren't normally fans of ginger snaps loved them.  I'll definetly make this recipe again.  Amy found the cookie cutter at Hobby Lobby.  It wasn't as easy to cut out the ginger snaps with the cutter as I would have liked but we made it work.  I baked a whole flat sheet of the dough.  While it was still hot, I cut out the bones and then removed the excess cookie bits.  I then put the bones back in the oven for a few more minutes to firm them up a little more.

Now, now, calm down.  We didn't forget the humans either. 

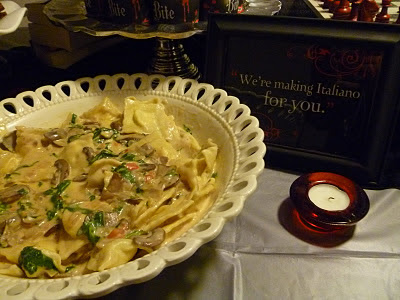
Introducing Porta"Bella" Mushroom Ravioli.


I made the raviolis from scratch and by scratch I mean, I rolled them out and filled them, so for reals scratch.  I then topped them with a portabella, spinach and garlic alfredo sauce.  Recipes and tutorials to come.


Michelle wowed us with the coolest drinks ever!  She printed out these fun wrappers she found and placed them on water bottles and hawaiian punch.

I made sure to drink my blood type, O negative.  It is the tastiest afterall.

There was lots more food.  Tons actually but I failed to get pictures of it all.


I really should have taken more pictures of the decorations too.  Michelle did such a great job!  She represented all 4 books perfectly by using the items from their covers placed around her house.  Here is her sons chess set.  He's quite the entrepreneur and charged her $1 to spray paint the pieces red! Ha ha!  She also had red ribbon draped, flowers, and red apples along with framed quotes from the movie and the books.  She also made yarn balls {you can see them in the background of the first cupcake pic} and repurposed some tissue paper hanging decorations {also in first pic} by spray painting them black, to hang from the ceiling.


Being the over achiever that I am I also brought my wedding dress to display.  Afterall, Breaking Dawn does feature the wedding of the century!


What's that you say?  Is that for reals a picture of Bella?


 Uhhh.... yeah.... I totally went there.  Bella looks pleased though don't you think?  Well, I know her expression never changes so you'll just have to take my word for it.  Very happy.

And I can't forget to mention this.  Not only did I pull my wedding dress out for the first time in almost 7 years but I also used the leftover red ribbon from our wedding.  Look very carefully... notice the brand of the ribbon?  Cooincidence?  I think not.  I always knew that John and I's love was perfect and timeless. 

Here's all my favorite girls at 2:30 am {about 10 or so didn't make it to the movie part}.  We all had a blast and can't wait for Breaking Dawn Pre-Party Part 2 and... Titanic Pre-Party and... Hunger Games Pre-Party and...

What can I say?  We like to party!


Related Posts Plugin for WordPress, Blogger...