Showing posts with label Paint. Show all posts

Saturday, October 19, 2013

Jake & Izzy Neverland Pirates Costumes {DIY No Sew Scalloped Tee Tutorial}

Remember back in the day when Halloween consisted of just one night when you went around your neighborhood and trick or treated your heart out?  Now, Halloween has turned into a month long extravaganza with parties, carnivals, parades, dances, events and a whole lot of candy.  I'm not really complaining since Halloween is one of my favorite holiday's but it does mean that I have to get an early start on the costumes.  Luckily the kids decided on what they wanted to be all the way back in May - Jake and Izzy from the Neverland Pirates.

And today I'm going to show you how I made the Izzy scalloped tee.  I know it seems weird for me to be on top of things and actually put out a holiday tutorial in an appropriate time frame in relation to the holiday but this year I shocked even myself and got 'er done!  Don't be fooled into thinking I have my act completely together though.  Just yesterday I found an uncashed check for my 25th birthday {I'm *ahem* 31.}  Also I went an entire day this summer running errands with my yoga pants on inside out.  There was even a little crotch panel and a tag on the back.  I died.  But I digress...  Let's get back to the costumes-


And just in case you don't know who Jake and Izzy are, it's these guys -


I'm sure you can guess by my lack of crafty posts lately that I have been not quite feelin' it in the creative department so I wanted to keep things as simple as possible and wanted to make these NO SEW!  Each costume consists of clothes they already have and a custom made-by-mom t-shirt. 
 
Each tee cost me $3.  The bandana was $1.99 and a $1 tube of puffy paint was all I needed.  The rest of the supplies (felt, fabric, buttons & ribbon) were from my stash. 


For Jackson's I mean Jake's tee I just hot glued pieces of felt onto the front.  I then glued on ribbon trim and buttons.  I chopped up the sleeves to give it that authentic tattered pirate look.  Or as Jackson would say, "Mom, I look like a pie-rick!"  If you're wondering about the face this is his "yargh!" face.


Maggie oops, Izzy, got the coveted pixie dust necklace.  I used hot glue to make a little pouch, filled it with a little fluff and tied it off with some ribbon.

But the great little scallops are what this tutorial is all about.


This scallop technique is a great no sew way to add a great detail to any costume.  I can see this working for a knight, or a fairy, a flower, you name it.

 
Are you ready for the world's easiest tutorial?
 
Step 1:  Cut off hem of shirt and turn it inside out.
 
Step 2:  Iron a strip of light weight iron on interfacing to the bottom of the shirt.  This will make sure the scallops on the cut t-shirt don't roll and keep their shape.


Step 3:  Draw scallops onto interfacing.  Tip - Start with a half scallop on the sides and work your way into the middle of the shirt so you have nice even scallops all the way around.

Step 4:  Cut.  I cut both layers at once so that the scallops were even on both sides.


Step 5:  Flip shirt right side out and add details with glitter puffy paint.  The glitter is important because for reasons unknown to man it makes girls feel pretty and fancy and it's just plain cute.


At this point I added my paint scallops to the arms, and neck as well.  After the 4 hours the bottle told me to let it all dry, I flipped it over and added the paint details to the backside of the shirt.

As far as tips for the bandana I would recommend putting it on your child and marking where the ear ends.  Do this for each side. 


Place your paint detail between those spots so that when you tie on the head band you don't get snagged up on paint and so none of the pattern gets lost in the tie.  It just makes for a cleaner look in my opinion.  Plus I didn't want to hear the freak out if the paint started to peel off from the friction of the tie because you know those kinds of things are the end of the world to a 5 year old.


And Booyah!  It was THAT easy! 
 

Costumes that require little time, little money and little skill and effort always get a big thumbs up from me!  Not to mention the joy they bring your kids.  Mine were so happy and grateful that not only did they hug me but they hugged each other.  It was a Halloween miracle.

 
So do tell, what are your munchkins going to be this year?? 
 
Feel free to link up any pics or posts you may have so we can all visit and give a great big collective "awe". 
 
Did I mention I just love Halloween? 
 
I love Halloween.

Wednesday, August 14, 2013

Dresser Before and After

I so wish I could take credit for this furniture transformation.  This past week I have been selling furniture online for a friend.  I posted a dresser and a woman named Liz snatched it up right away.  As a hobby and side gig she refinished old furniture.  She picked up the dresser Sunday afternoon and by Tuesday morning she sent me a picture of the after.
 
IT.  IS.  BEAUTIFUL.
 
 
RIGHT?!? 
 
I can't even believe how beautiful it turned out and how quickly she works!  Seriously impressive.  I knew you guys would be interested in a little furniture inspiration. 
 
It appears that she sanded the top and gave it a coat of beautiful stain to bring out those beautiful wood tones.  (The scroll part in the pic is actually another piece of furniture and isn't part of the dresser.) The brassy hardware all got a coat of paint.  The dresser itself was painted in white with a glaze over top.  I want it back now!!
 
If you're local to the Birmingham area you can sometimes find Liz's pieces posted on Facebook at Mountain Brook Trading and Resale 280.
 
Do you guys refinish furniture?  I'm really wanting to get into it.  What are your favorite techniques?  What do you use to paint - chalk paint, spray paint, glaze, stain?  I'd love to hear your tips and tricks!  Also feel free to link any before and afters you have in the comments.  I LOVE before and afters!
 
 
**UPDATE:  Liz shared with me her color selections in case you want to recreate the look.  It was a custom mix cream , and glazed with an aged bronze glaze. Hardware was painted in hammered bronze

Wednesday, January 2, 2013

The Mustache Bandana

Happy New Year!

It's been a while. Hope you had an excellent holiday season. Despite being sick for a month we still managed good times. Santa didn't bring me a new computer (so I'm still blogging from my iPod) but I'm working on it. So many things to show you!

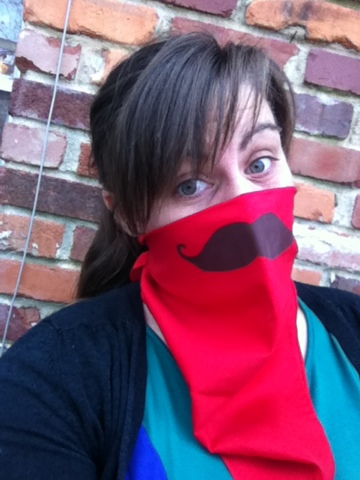
In the mean time, I thought I'd share the gift I made for my little brother. He rides a Harley so I thought a nice bandana would help keep the bugs out of his teeth when he rides. It's a bit of a gag gift but I figured every rider needs a nice full mustache.

To make your own simply fold a bandana in half (I bought mine at Hobby Lobby) and make a stencil of a mustache from freezer paper. Iron it on about an inch below the fold so that it sits right where your upper lip is. Paint inside the stencil and then peel off. Easy peasy!

It almost makes me want to take up bike riding. Too bad I'm a total chicken. I think I'll just stick to arts and crafts.


Thursday, August 9, 2012

Tribal Triangles - Potato Stamping Tutorial

I'll never understand why people say to never play with your food.  It's one our earliest creative outlets.  But I guess the last thing mom wants is the meal she just slaved over to become a work of art.  While mashed potato sculptures {anyone remember the movie UHF??} might not be welcome at the dinner table, you can use those potatoes in crafting! 


I had another neon tote on hand and decided that some tribal triangles were in order.  {I already did gold chevrons here.}  The only problem was that I didn't have a triangle stamp.  No worries, I just reached into my cupboard and pulled out a potato and made my own.


Supplies:

- colorful tote bag {similar totes can be found here}
-  craft paint
- potato
-  knife
- masking tape


TUTORIAL


Step 1:  Cut potato in half.  {My potato was fairly old and was feeling a little rubbery.  I used this one because it was on it's way out and I didn't want to waste a nice one.  However, I don't think it matters if your potato is old or new.}


Step 2:  Cut shape in potato.


Step 3:  Trim off the scraps from the sides.


You should have a nice little stamp now.


Step 4:  Tape off the lines you want your stamp to go in between.  This will serve as a guide to help you stamp in straight rows.


Step 5:  Did potato in paint.  I wanted my triangles to be a little worn so I rubbed the stamp on some cardboard to remove excess paint.  If you want your triangles to be more solid then just dip and stamp.


Step 6:  Using your tape as guides, stamp away!  I alternated the direction of the triangles in each row.


Step 7:  Let dry and remove tape.

And enjoy your new neon tribal triangle tote!


Tuesday, July 31, 2012

Gold Chevron Tote {tutorial}

Do you have one of those friends that you love to death but you never get to see them because you're both so busy?  Mine is Sabrina.  It just seems like the stars never align for us.  But this past Friday they did align and we spent the whole day crafting, and eating, and laughing and crying.  Love her.

Well, Sabrina has this habit of spoiling me and my children and one of the many things she brought were some fun neon canvas totes.  After a sewing fail, I got burned out and decided to switch to paint.  And that my dears is the story of how the Gold Chevron Tote was born. 


Now you may remember I tried painting a similar-ish type thing with my old door mat.  I didn't measure a dang thing and though it turned out okay, I vowed to measure things the next time so the pattern wasn't so off.

You can read about the herringbone mat HERE.

I vowed to change but I had to be true to myself and let's face it, I AM LAZY.  I'm also not a perfectionist.  So instead of getting out a ruler I devised this method -


First I put regular width masking tape town the middle and in a cross section.  I used these as my guides.  I then added chevrons with the wide masking tape.  At this point I then removed the regular masking tape by peeling it away and then cutting it where the two tapes overlapped.

 
I then filled in the spaces that were left with more wide masking tape.  This is where I should have pulled out my ruler because some of them weren't spaced out exactly perfect but "Meh.  What ya gonna' do now?"  It's a good thing I'm not a perfectionist.  Sorry to all my readers who are perfectionists, I know you're cringing in horror right now.


I then dabbed on some gold craft paint {similar to this here}and called it a day.  The whole project took maybe 5-10 minutes to complete and I now have a new great little tote that I have been carrying around all weekend.  You know me, if it's fashionable and functional I'm a happy girl!


If you're looking to find canvas bags I've found a bunch on Amazon in neon and plain.  On Amazon they sell them as singles or in packs.  I'm thinking I may just buy a pack of colorful bright canvas totes and make myself some cute grocery bags.  You need to look stylish while grocery shopping, right? 

Thanks Sabrina for the fun new tote!


Visit thecsiproject.com

Tuesday, July 24, 2012

Rubber Dipped Vases {Tutorial}

Are you guys ready for the simplest project ever?

Today I'm going to tell you how to make rubber dipped vases. 


I know it sounds weird.  Rubber?  Well... yeah.  From pictures, it looks like it could be dipped in paint but it's actually rubber.  The rubber gives a unique texture, feel and security.  It won't chip off, fade or crack like paint would and would also repel moisture.  Plus, it's just cool to work with new materials.


My dear friend Mary was cleaning house and gave me the teeny little vases and the rubber so I thought it was fitting to put them together.  I used them as part of my Ombre Ambiance table setting {though technically they aren't ombre} and I liked how they added to the table without overwhelming it. 

So here's how to make your own rubber dipped vases:

SUPPLIES:

- Vases
- Disposable bowl or cup
- Stir stick or plastic spoon

Plasti-Dip Create Your Color
First, let me explain what Plasti Dip is.  The men in your life have probably already heard of it.  It's rubber coating that is used for coating the handles of tools.  You can purchase it at most hardware stores in the paint section.  It comes in a mini paint can and costs between $10 - $20 a can though you certainly may find it for less.  A little goes a long way.  The most common color that it comes in is black {that's all they had at Lowe's.} but they have a new product called Create Your Color which Mary found here on Amazon.  The rubber in the can came clear and I simply mixed the supplied colors until I got the color I wanted.  The rubber is liquid in the can but firms up once dried.  I still have a lot of rubber left and can't wait to get started on more projects.   {P.S. this post isn't sponsored by Plasti Dip I just thought I would keep you informed on the product.}


TUTORIAL:

Step 1:  In a well ventilated area, open your can of Plasti Dip and pour desired amount into bowl.  Mix in colors until you reach your desired color.

Step 2:  Dip vase bottom into rubber mixture slowly according to instructions on can.

Step 3:  Allow any extra rubber to drip off and let dry.  Repeat process if you want additional coats.


I really love the charm these teeny glass vases now have.

Now it's time to scour the house for more things that should be rubberized!  Can you imagine the possibilities?


Monday, July 23, 2012

Ombre Ambiance

So if you've been following along these past few weeks you may be saying to yourself, "Where is Alicia's post about voting for So You Think You're Crafty this week?"

Well, I'm here to tell you... sad day... it's over.
Done-zo. Ka-putz.  I was voted off the island.  Whatever you call it, I was eliminated.

I'm left scratching my head on where I went so wrong this week.  I had no idea I had such a fail on my hands.  I really loved my project but to each her own I guess.  My mom suspects that it could be that the ombre dying of the table cloth didn't translate as well on camera.  It's entirely possible.  I guess I just have to chalk it up to the fact that I had fierce competition and someone had to go last week so why not me?  I'm sad to leave the competition and had a great time.  I'll enjoy following along and cheering on my fellow competitors.

The theme was ombre so I gussied up some of the things that were just blah and tried to give them a little wow factor.  Here's my entry but come back tomorrow and the next day for tutorials on the paint technique I used as well as the rubber dipped vases.

Using items I already had at home, I created a nice little ombre table scape.  Except for the bowls & forks, I made everything you see here, including the table.  But we can just focus on the ombre.  For the ombre theme I dyed some vintage fabric that I sewed into a table cloth and accented with some rubber dipped mini vases.  I spray painted a Chinese lantern left over from my wedding in two tones of blue and also painted the handles of my salad tongs to match. 


I used several shades of blue to create a nice, tranquil vibe.  Perfect for enjoying my beautiful backyard.

Thank you to all who supported me in this competition and continue to support me through this blog.  You guys make me feel like a winner!  {I fully recognize the cheesiness of that last statement but it's true.}

The good news is, now that I'm out I have lots more time to dedicate to The Creative Vault and re-opening my shop for the first time in 3 years.  That should be fun.  

Oh yeah... and I may have a fun Harry Potter Week in store too so stay tuned!

Tuesday, July 17, 2012

Neon & Navy Pool Bags

 Here is my project for SoYou Think You're Crafty's last weeks Summer Bounty theme.  I love these bags especially since they have been so useful at the pool.  I had some tough competition though and was nearly eliminated!  Let's hope that never happens again!  This weeks theme is Ombre.  So head on over and vote for your favorite.  Hope it's mine!

__________________________________________________________


Neon.  Navy.  Stripes.  Chevron.

The only thing hotter this summer is the weather!

Oh wait for it... all these pool bags only cost $2.  Now that's a HOT deal!


I picked up a navy striped canvas shower curtain from the thrift store for $2 and got to work on making essential pool bags for summer.  The result was 4 bags and a tag to keep all of our pool gear in check. All edges are surged for a finished look and hot pink thread accents the bags throughout.  With accents of neon green and shabby chic hot pink chevrons, simple bags become fun and fabulous!


Duffle:  A repurposed hot pink zipper closes the pleated bag.  On a strap are decorative chevron stitches in hot pink and 3 large chevrons line the front.

Tag:  A simple fabric tag tied with jute, hangs with a clear vinyl cover to keep our pool card within easy reach as we check in.

Clutch:  This clutch is closed using the elastic that comes when you buy a new pair of kids shoes and a bright green large button.

Large Duffle:  A large round bottomed bag.  Using the existing grommets from the shower curtain I strung through some neon green ribbon to use as the bag closure.  The bag also has a shoulder strap for easy carrying which is accented with hot pink chevron stitches all the way down.

Wet Suit Bag:  This bag is made with a piece of table cloth vinyl and uses a thinner version of the neon green ribbon as its drawstring enclosure.


While at the pool taking photos these fun bags had many admirers and offers to purchase the bags but no sale.  These babies are all mine and I know they're going to get lots of use this summer!  
It's nice when useful and fashionable meet!
  
Now...  who wants to go swimming?!?!
Related Posts Plugin for WordPress, Blogger...