Showing posts with label Recipes. Show all posts

Tuesday, August 27, 2013

Mediterranean Chickpea Salad

Just thought I would stop into the ol' blog today and share what I had for lunch with you.  I opened up the cupboards today, threw some foods together that I love and this tasty salad was born.  It is light and refreshing and filling at the same time.  The flavor combination was wonderful and the best news is it's only 152 calories per serving.  Yes.  Yes.  YES!


Ingredients:
  • 1 can chickpeas, drained
  • 1 cup spinach, chopped
  • 1 tomato, diced
  • 1/8 cup feta cheese
  • olive oil, drizzle or about 1 TB
  • balsamic vinegar, drizzle or about 1 TB
  • 1/2 tsp dried basil, or fresh to taste
  • lemon pepper to taste
Directions:
  1.  Place all ingredients in a bowl and give it a good stir.  Eat right away or allow salad to marinate.

Serves: 4

This salad could not be easier and it's super good for you too!  Check out the nutritional information below - hello protein and vitamins! 


The nutritional information was determined through the app MyFitnessPal which I have on my iPod.  It's a great app to track your dietary intake, exercise and progress as well as communicate and get encouragement from your friends.  It also lets you put in your own recipes.  I love it.  I need to use it more often.  You'd be surprised at how many calories you actually eat in a day.  My sister-in-law lost a good amount of weight from using it and it has started her on a pathway to healthy living (which she chronicles over at Lemon Living).  I'm not paid to brag about the app.  I just think it's a really good resource for those trying to improve their health habits. If you have the app you can locate this recipe by searching for Mediterranean Chickpea Salad - The Creative Vault.

Wednesday, April 10, 2013

Crockpot Chicken Chili

Looking for something inexpensive, easy and delicious for dinner?  Don't worry - I gotcha.


I made this dish for a freezer meal group I'm a part of.  You can read more about how it works HERE.  I ended up making seven meals which I put together in gallon sized Ziploc's and froze flat.  Nice and compact for storing in the freezer.

This chili is really flavorful and has just the right amount of spices that everyone will love.  It's great as a chili but also works well in tortillas as tacos.  It would make a good chili to put on top hot dogs or nachos.  Assembling the meal is simple and cooking it is even easier.  Flick a switch on your crockpot and walk away.  What's easier than that?!?

Here's how it's done -

Ingredients
  • 1 large chicken breast
  • 1 c. salsa (I used Pace )
  • 1 onion chopped
  • 1 cup water
  • 2 cans chili beans in sauce
  • 1 Tb. oregano
  • 1 tsp. onion powder
  • 1 tsp. cumin
  • 1/4 tsp. cayenne pepper
Directions

If making freezer meals - place all ingredients into Ziploc bag and freeze.  When ready to cook remove from bag and place in crockpot (frozen or thawed).  Cook on high for 4 hours until chicken easily shreds with a fork.


Enjoy!


Saturday, March 9, 2013

Cinderella Cupcakes

Maggie turned 5.
 
It feels like it should be a crime to grow up so fast.  Am I the only mom that wants to freeze time?
 
Last year all she wanted was Shaun the Sheep cupcakes, but her speech delay has improved so much that this year she actually had several requests for her party.
 
1.  Cinderella themed
2.  A long list of boy and girl guests
3.  Cinderella cupcakes with glass "swippas"
 
All three wishes were granted.  

We ended up having a Cinderella Ball.  With actual dancing and turning our house into a ballroom kind of ball.  It was the real deal.  It was basically kid prom and it was amazing.  I have lots of photos to sort through but while I work on that, how about I show you her third wish?
 
 
Cinderella Cupcakes With Glass Slippers!
 

My dear friend Amy helped me make them.  She's pretty amazing when it comes to cupcakes and cute treats.  She can do anything.  Check out her blog, Indulge With Me when you have time because you will get lost over there for days.  These cupcakes were nothing for her, she tackles much more difficult tasks but they were exactly what Maggie wanted so in my mind these were her best work.


I created the slippers from melted almond bark and a candy shoe mold.  I purchased my mold at a local candy supply store for $1.99.  If you don't have one near you, you can find the same one on Amazon HERE and HERE.  If you've never used a candy mold before the process is simple.
 
First you melt your chocolate, melting candy chips or in this case almond bark.  There are several ways to melt them but I just took a few pieces and placed them in a Ziploc bag.  I then microwaved them in 15 second increments, squishing the bag between each increment, until the almond bark was good and melted.  I then cut off a tip of the baggie and squished the melted bark into the mold.  The chocolate settles nicely into the mold and to get a nice clean back I scrape the mold with the back of a butter knife to get any excess chocolate off.
 
The cupcakes themselves are just boxed white cake.  Amy has tricks to make boxed cake incredible on her blog but for these were were going super simple because the kids are only interested in the frosting anyways.  Amy stirred the heck out the the batter which gave it a really light nice texture.  Much better than how mine usually turn out.  The frosting was made with a combination of butter and cream cheese and the dye was 10 drops of neon blue.  Maggie approved the color as Cinderella's so we stopped there.
 
To frost, Amy used a large star tip and gave each one a nice swirl.  If you have never frosted a cupcake using a pastry bag before you are missing out because it is the simplest, fastes, cleanest and prettiest way to do it.  I got THIS set a long time ago and I use it all the time.
 
Once the frosting was on, we topped the big ones with some glittery sprinkles and a slipper and the mini cupcakes were decorated with sugar pearls.


 The cupcakes really were SO simple to make and made my little princess' dreams come true.
 
Happy Birthday Maggie!


Monday, November 19, 2012

Slow Cooker Herb Bread and Butternut Squash Soup


Isn't Fall the best?

It's a season that brings new weather, new clothes, new sights and smells and my favorite, new food!


Today I'm excited to share with you some of my Thanksgiving favorites.  Many people like to stick with the same old tried and true recipes for Thanksgiving dinner and I'll admit that I love the feeling of a familiar dish, but sometimes it really makes the meal when you try something new.

When I was in culinary arts school I declared Thanksgiving that year to be "Fancy Thanksgiving".  I made my family a five course meal made entirely of dishes we had never tried before.  It was adventerous and delicious and we all enjoyed it.  That was the year I created this tasty Butternut Squash Soup.

Just because it was part of "Fancy Thanksgiving" doesn't mean it was difficult to make.  In fact, this is one of the easiest, most flavorful and healthy soups I've ever made.


 Butternut Squash Soup

Ingredients:

- 2 Tb Country Crock
- 1 medium butternut squash, peeled, seeded and diced
- 2 medium carrots, diced
- 1 medium onion, diced
- 1 clove garlic, minced
- 6 cups chicken or vegetable stock
- 1 Tb brown sugar
- 1 tsp salt
- 1/2 tsp pumpkin pie spice
- Optional garnish: cream, parsley, roasted squash seeds


Instructions:

1.  Over medium heat, melt Country Crock in large pot.
2.  Add carrots, onion, garlic and cook until soft but not brown.
3.  Add squash, stock, sugar, salt and pumpkin pie spice to pot.
4.  Turn soup to high heat and bring to a boil.  Once it is boiling, turn down to medium and cook until squash is soft enough to put a fork in and have it come out easily, about 20 minutes.
5.  Blend soup mixture completly with a food processor or blender.  **Be very careful because the soup will be hot.  Allowing soup to cool before hand is a good idea to avoid burns.
6.  Reheat soup of necessary and garnish with a swirl of cream, parsley or roasted squash seeds.


Over the years, Thanksgiving dinner has evolved to fit our growing family.  With a bread loving husband and two bread loving children, on the menu this year is a new one for us, Slow Cooker Herb Bread.  With all the things I have going on it will be nice to whip up this simple bread in my slow cooker and save the room in my oven for more important things like turkey.


This bread is dense and chewy but also has a nice crunchy crust.  Making it in the slow cooker eliminates all the time and hassle of homemade bread but doesn't comprimise the taste.


Slow Cooker Herb Bread 

Ingredients:


- 3/4 cup warm water
- 1 package active dry yeast
- 1 1/2 Tb sugar
- 1 Tb melted Country Crock
- 1/2 cup milk
- 3-5 cups flour
- chopped fresh herbs; basil, chive rosemary etc.
- additional Country Crock and cornmeal for greasing the slow cooker


Instructions:

1.  Place water and yeast in mixer.  Stir until yeast is disolved.
2.  Add sugar, salt, Country Crock, milk and herbs and stir.  Depending on the amount of herb you want in your bread should determine how much you use.  The herb will shrink up in the bread so the more the merrier.
3.  Add the flour a 1/2 cup at a time until bread pulls away from the sides of mixer and is no longer sticky.
4.  Using a paper towel take about a tablesoon of Country Crock and grease the bottom and sides of the slow cooker.  Sprinkle cornmeal on top of the greased dish.  This will prevent the bread from sticking.  You can also use parchment paper.  See image below.


5.  Place round ball of dough in slow cooker and cook on low for about 2 hours or on high for 1 hour.  The dough will spread out and rise to fit the slow cooker.  For a taller bread than pictured here, use a smaller slow cooker.
6.  The bread will look like it is not cooked but it is.  To determine if your bread is done, remove the slow cooker lid and thump the top of the bread.  It should make a thumping sound and be firm to the thouch.
7.  Remove the bread from the slow cooker and place on a cookie sheet.  Put on the bottom rack of the oven and cook under the broiler for about 5 minutes.  This will firm up the crust and give it a nice golden, crunchy texture.


To serve with your soup, slice a thin piece of bread and spead Country Crock on both sides.  Over meduim heat, place bread in frying pan and heat until crunchy and golden.


So there you have it!  Two new delicious Fall dishes and two new reasons to use Country Crock. 


Wishing you and your family a Happy Thanksgiving!


Thank you to Good to Know & Unilever Spreads for being a sponsor. I was selected for this opportunity as a member of Clever Girls Collective. All opinions expressed here are my own.

Saturday, October 20, 2012

Freezer Quesadillas & Recipe for Crock Pot Veggie Black Beans

Yesterday I told you all about our Freezer Meal Club.  Today I'm going to share with you a little about the freezer quesadillas that I contributed.

These aren't just any ol' quesadilla.  Inside each little tortilla sandwich is a generous portion of beef brisket, veggies, black beans and cheese.


The brisket I seasoned with lemon pepper and cooked in my crock pot until it was tender and falling apart.  I then chooped it up in small little bits.  The cheese is shredded four cheese Mexican blend and I'll give you my Veggie Black Bean recipe in just a minute.

First let me explain how I made these for the freezer.  I assembled the quesidillas just like I normally would in this order - tortilla, cheese, beef, beans, more cheese, tortilla.  I then attempted to flash freeze them by putting them on a baking pan and letting them freeze for a bit before putting them in bags.  Since I was making 49 of these I just wasn't able to so I stacked the quesadillas on top of each other and put them in freezer bags.  It turns out they didn't stick together like I thought they would so I will skip the flash freeze step next time. 

To reheat I simply take out a quesidalla and microwave for about 3 minutes or I bake in the oven at 350F for about 7.  I prefer the oven method because the tortilla is crispy but both work well.

I really enjoyed having hearty quesadillas on hand and plan to make a few every time I have leftover meat.  It's been great having a go to meal that that the whole family enjoys.  I also love that I can make it however I want.  This particular batch also has spinach, carrot and onion which gives it a little bit more of a healthy factor and since the kids can't tell, mom wins!


Crock Pot Veggie Black Beans
 
 
Ingredients:
 
- 1 lb bag of dried black beans, rinsed
- 7 cups water
- 1 chicken bullion cube
- 1 onion, finely chopped
- 1 box frozen chopped spinach
- 2 carrots, very finely chopped
- 2-3 cloves garlic, minced
- oregano, cumin, chili powder, cayenne pepper, cilantro, salt
 
Instructions:
 
1.  In large crock pot add black beans, bullion and water. {You don't need to soak them overnight}  Cook on low for 5-6 hours.
2.  Add veggies {I used the veggies above because that's what I had on hand.  Any veggies you have will work.} and cook for an additional 2-3 hours until beans and veggies are tender.
3.  Add seasoning according to taste.  I uase about 1-3 tsp of each. 


Hope you enjoy these very flavorful and very healthy black beans!  I know we do!  The veggies blend so perfectly with the beans and seasonings your kids will never even know they're there!


Friday, October 19, 2012

Freezer Meal Club

It's been a while since I mentioned food on here.  I can assure you it's not for lack of eating.
 
I am I really excited to tell you about a new group some friends of mine started.  The idea is brilliant (I wish I'd thought of it myself) and I want to share it with you in case you want to start one too.
 
Several weeks ago, a good friend of mine came to me asked if I was interested in being in a freezer meal group.  It would consist of several friends that would create freezer meals and then get together and share them with each other.  The idea is to have a variety of meals available in the freezer so dinner time is easier.  Plus it's just fun to get together.
 
Here's how it worked:
 
We had a group of 7 women.  Each of those women made 7 meals that were able to feed at least 7 people for a total of 49 total servings.  That way we would have a meal for each day of the week.  The reason for the portion size was because some families had 3 people and some had 7 so at least 7 portions was most ideal.  For my family of 4 it meant that we would have dinner and then leftovers the next day.  The meals would be a main dish and would just have the main components {for example if you bring Asian stir fry you don't need to provide the rice, etc.}. 

 
We picked a trade day and met together at lunch time.  For lunch we each brought our prepared freezer meals and some of our freezer meal cooked and ready to eat.  We sampled each of the dishes and talked about what we brought and gave our advice for reheating and possible side dishes.  I was wonderful to share great food together and then leave with a weeks worth of meals.


I am not very experienced in the world of freezer meals and I have only made a casserole once in my life {true story} so I was very nervous and wasn't sure what to bring so I went with what I know and that is Mexican food.  I made 49 beef brisket, black bean and veggie quesadillas.  I liked the idea of something that you could pull out one at a time and heat up for lunches or quick meals on the go.

The other meals were:  Lasagna, chili, creamy chicken enchiladas, creamy basil and chicken pasta and poppy seed ham & cheese melts.  {One friend wasn't able to make it at the last minute so we were short a meal but that just meant that we got double of what we brought so we were still covered for the full week}.

So basically I made 49 beef black bean and veggie quesadillas.  I portioned them out so that each bag had 7 quesadillas.  On swap day I brought 6 bags of quesadillas {I left the 7th bag, my bag, at home} and a plate of cooked quesadillas.  We tasted each others food over a nice lunch and at the end I left with a pan or bag of each of the dishes I listed above. 

Over the past month I have been pulling out the dishes to cook for dinner.  Most just required reheating in the oven or even microwave.  For our family size most dishes provided us with a dinner, lunch for my husband the next day and then dinner again the next night.  The ham & cheese melts and my own quesadillas were packaged in a such a way that my husband would pull one out and take it to work for his lunches.

Before the swap I was stressed out and nervous.  I didn't know what to bring and I was worried about making so many portions of food, but afterward I was so happy we did it.  It was very simple to make a large amount of freezer meals since the meals were all the same.  It wasn't like some crazy freezer cooking day where you make a million different meals and have a billion different ingredients.  I'd guess that the time I invested in it {minus actual cooking time} would be about 2-3 hours and I've gotten nearly 2 weeks worth of food in return.  I felt like there was a wonderful variety of delicious foods and I of course loved the social aspect of the whole thing.  It's been fun to call my friends and say, "We had your chili tonight!  It was wonderful!"

We haven't discussed yet if we will continue with the group {we wanted to test it out first} but I have to say, I really enjoyed it and am working hard at finding more great recipes that I can use if we do it again.  Either way I am totally on the freezer meal train.  My life has been so much simpler this month.  I haven't even called my mom crying once!  Haha! 

You can check out my Food Inspiration board on Pinterest to see some of the recipes I've been looking at for the future as well as my Stuff I've Actually Made from Pinterest board {complete with reviews}.  Tomorrow I'll be back with my recipe for Crock Pot Black Beans and Veggies and tell you how I prepped the quesidillas for the freezer.

So I have to know - what do you think?  Have you done a Freezer Meal Club before?  How did it work for you?  Do you do freezer meal days or are you cooking a whole meal every night?  Feel free to link some of your favorite freezer meal recipes and share your tips on making dinner work for you and your family.  I'd love to learn more!


Saturday, March 3, 2012

Shaun the Sheep Cupcakes {tutorial}


Happy Baaaah-lated Leap Day!!

Leap Day is kind of a big deal around here.  HUGE in fact because this year Maggie got to celebrate her 1st birthday!  That's right, she's a Leap Day baby!


In February 2008 we were expecting her.  Her due date was at the beginning of the month but part way through my pregnancy they pushed her due date back two weeks.  Then something happened that I wasn't expecting she was 12 days late.  Not that's not a typo - TWELVE.  I felt like I was pregnant for 11 months. After about a week over due, the doctor wanted to schedule an induction.  I asked if we could do the 29th because heck I've waited this long might as well get the girl a cool birthday while I'm at it.  Well, I checked into the hospital the night before and they were going to induce me at 6 AM.  Turns out I didn't need an induction afterall because I went into labor that night.  It was meant to be!  A unique birthday for a very unique little girl.  She was the only one born in our hospital (which is a big one) that day.  So special!  

Since I get asked this a lot I'll tell you that we celebrate her birthday on non-leap years on February 28th.  Though I tend to get carried away and celebrate all week.  Also, we have so far not had any problems with her birthday being on Leap Day.  On non-leap years she still gets birthday rewards from stores and I've never had paper work or official document problems with it either.  It's just a super fun day to have a birthday!

Okay - now back to the cupcakes.

It's Shaun the Sheep!!!  


For those who don't know Shaun the Sheep is a clay-mation TV show by the same people that do Wallace & Grommit.  You can watch it on Netflix or buy it on Amazon.  It's actually a very funny cute show. 

Shaun the Sheep is Maggie's favorite everything.  This is her getting ready for bed wearing the Shaun hat her Nonie made for her (more on that one later) and holding the little Shaun from her G&G Cutts.  All while watching Shaun the Sheep on the DS.  At night she asks me to sing her the theme song before she goes to sleep.  Spoiled.


This year the only thing she asked for for her birthday was Shaun the Sheep cupcakes.  When your child who has problems with communicating with speech, never asks for anything, and has a birthday only every four years asks for Shaun the Sheep cupcakes you better get that girl Shaun the Sheep cupcakes!

Here's what I came up with.


Want to make your own?  They are a lot easier than they look.  I promise.


Supplies:

Cupcakes
White frosting
Mini-Marshmallows
Mini-chocolate chips
Wax or parchment paper
Piece of paper
Cookie Sheet
Sandwich bags or piping bags


 Step 1: 

Draw the shape of the Shaun head on a piece of paper.  I practiced a couple of times before I settled on one.


Step 2:

Melt about 1/4 to 1/3 cup of chocolate chips in a sandwich bag.  Place chips in bag and place in microwave for 20 seconds.  Take out and lightly squish the chips to mash/mix them.  Continue this process of heating for 20 second intervals until chocolate is melted.  Slice off a tiny corner of the baggie when done.


Step 3:

Place wax or parchment paper on top of drawing.  Pipe chocolate onto wax paper to fill in the shape.  Don't worry if it's lumpy.  The lumpy part is the back of Shaun's head.  You won't be seeing it.


Step 4:

Repeat as many times as you want and place Shaun heads on a baking sheet and place in the fridge or freezer to harden.


Step 5:

Once hardened, peel off the heads and flip them over.  Use the icing to create two dots for eyes.  Inside each white dot place an upside down mini chip for the dark center of the eye.  And you're done with your Shaun head!


Step 6:  

Frost your cupcake.

Step 7:

Cover cupcake in mini-marshmallows.

Step 8:

Use a dollop of frosting to attach the Shaun head to the cupcake body.


These sheep are so cute and so yummy.  The girls loved them but most importantly Maggie loved them.  The joy on her face was priceless.  So happy to make a little girls birthday wish come true!


{P.S.  You can find Season 1 and Season 2 of the show at Amazon.  Along with several short movies that we've never even knew existed.  Also, here is the Shaun the Sheep plushie that she got.}

Wednesday, February 1, 2012

Cinnamon Rolls in the Waffle Maker

My husband turned 31 this week.  Happy Birthday John!  For one of his gifts I got him a waffle iron.  Like the nice kind.  That flips.  And is 1 1/2 inches thick.  He was so happy.

I never make breakfast but he loves it.  I've never really cared for it.  So it surprised me that I am more obsessed with this thing than he is and he's the waffle lover.

I've been throwing everything I can think of into the thing.  My favorite so far??

Cinnamon Rolls!!!

Best cinnamon rolls of my life.  Perfectly and evenly cooked in minutes.  They still pull apart and the waffle tops keep that gooey frosting on so well. 


I posted these pics on Facebook and had lots of requests for directions so here's all you need to know.

Step 1:  Open up a can of cinnamon rolls.  I used Pillsbury Cinnabon rolls.
Step 2:  Preheat iron and spray with pan spray if necessary.
Step 3:  Place a roll in each section.
Step 4:  Cook like you would a waffle.  I cook mine on medium heat and then watch the done light to come on.  Im guessing each machine is different.
Step 5:  Top with frosting and try not to eat the whole batch by yourself.


So easy right?!?

Okay, I won't keep you any longer.  I know you're dying to run to the kitchen to make some...


Thursday, December 29, 2011

Cran-Apple Spinach Salad

I want you to taste this salad.  It's so yummy.  I've had something similar to this before and I did my best to recreate it and it was a success.  The rich dressing, crunchy spiced nuts, salty feta and sweet apples and cranberries combine to create a delicious flavorful salad.  Perfect for any occasion.


Ingredients:

1 bag spinach
1 cup Craisins
1-2 Galla Apples, diced
1/2 cup feta cheese crumbles
1/2 cup cinnamon and sugar spiced pecans
1/3 bottle Briannas Poppy Seed dressing


Directions:
  1. Place spinach, Craisins, and apple in bowl
  2. Toss with salad dressing.
  3. Top with feta cheese and pecans.
  4. Serve right away.


Friday, November 25, 2011

Breaking Dawn Party

I do not apologize for what you are about to see.  Why?  Because this was the BEST.  NIGHT.  EVER.  I know there is some Twi-hate in the world but I will have none of it here.  So come visit our Breaking Dawn Pre-Party and enjoy the festivities.

This was our pre-party for the midnight showing of the latest Twilight movie.  A large group of us had been going to midnight showings all along but I really felt like this year we needed a little more.  So with the generosity of my friend Michelle who volunteered her house along with many other contributers we partied.


Edward here to welcome you to the festivities. 

I used my Halloween wreath, changed out the orange ribbon for some red and attached some chess pieces (to represent the book cover).  Behind the wreath I taped a picture of Edward.  Because the party was at night and the porch was dark, his creeptastic stare freaked eveyone out as they approached the door.  Bonus!


My friend, Amy from Indulge With Me executed my idea for Vampire Cupcakes perfectly.  White cake and white frosting with shimmery sprinkles.  They had to sparkle!  Amy found the cupcake wrappers at Hobby Lobby.  Aren't they perfect?


Oh yeah, and did I forget to mention that they were filled with blood!!?!?!!!  Who-wah-ha-ha!!

Okay so maybe not blood, maybe it was delicious raspberry filling.  You can get the recipes for the cupcakes HERE.

I know what you're thinking - How could we possibly forget Team Jacob?  Of course we didn't!


We had a whole plate of Werewolf Treats.

Way to save Bella once again!  Good  doggie!  Good boy! 

I used this ginger snap recipe (minus the pepper) and they turned out delicious.  People who weren't normally fans of ginger snaps loved them.  I'll definetly make this recipe again.  Amy found the cookie cutter at Hobby Lobby.  It wasn't as easy to cut out the ginger snaps with the cutter as I would have liked but we made it work.  I baked a whole flat sheet of the dough.  While it was still hot, I cut out the bones and then removed the excess cookie bits.  I then put the bones back in the oven for a few more minutes to firm them up a little more.

Now, now, calm down.  We didn't forget the humans either. 

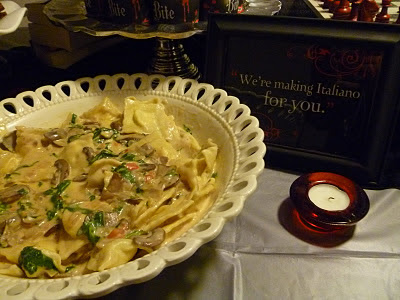
Introducing Porta"Bella" Mushroom Ravioli.


I made the raviolis from scratch and by scratch I mean, I rolled them out and filled them, so for reals scratch.  I then topped them with a portabella, spinach and garlic alfredo sauce.  Recipes and tutorials to come.


Michelle wowed us with the coolest drinks ever!  She printed out these fun wrappers she found and placed them on water bottles and hawaiian punch.

I made sure to drink my blood type, O negative.  It is the tastiest afterall.

There was lots more food.  Tons actually but I failed to get pictures of it all.


I really should have taken more pictures of the decorations too.  Michelle did such a great job!  She represented all 4 books perfectly by using the items from their covers placed around her house.  Here is her sons chess set.  He's quite the entrepreneur and charged her $1 to spray paint the pieces red! Ha ha!  She also had red ribbon draped, flowers, and red apples along with framed quotes from the movie and the books.  She also made yarn balls {you can see them in the background of the first cupcake pic} and repurposed some tissue paper hanging decorations {also in first pic} by spray painting them black, to hang from the ceiling.


Being the over achiever that I am I also brought my wedding dress to display.  Afterall, Breaking Dawn does feature the wedding of the century!


What's that you say?  Is that for reals a picture of Bella?


 Uhhh.... yeah.... I totally went there.  Bella looks pleased though don't you think?  Well, I know her expression never changes so you'll just have to take my word for it.  Very happy.

And I can't forget to mention this.  Not only did I pull my wedding dress out for the first time in almost 7 years but I also used the leftover red ribbon from our wedding.  Look very carefully... notice the brand of the ribbon?  Cooincidence?  I think not.  I always knew that John and I's love was perfect and timeless. 

Here's all my favorite girls at 2:30 am {about 10 or so didn't make it to the movie part}.  We all had a blast and can't wait for Breaking Dawn Pre-Party Part 2 and... Titanic Pre-Party and... Hunger Games Pre-Party and...

What can I say?  We like to party!


Related Posts Plugin for WordPress, Blogger...