Tuesday, December 18, 2012

I need to share their story

This is something that has been hard for me to write about but I need to tell you because not only do I think you will be strengthened by their story but I'm also in need of your help.

On Thanksgiving day I was at the dinner table talking and relaxing with my family.  We chatted about this and that and were having a great time.  I glanced down at my iPod and then heard the news, a friend of ours who we met here in Birmingham had just passed away in her husbands arms.  She was 28.


Let me back up a bit - toward the end of 2011 Janette started to feel tired.  Don't we all?  But she also noticed other things that seemed off too.  In November she was diagnosed with leukemia.  We were all scared.  How could this be?  She was a mom.  I am a mom.  This sort of thing is impossible right?  Right?!  It didn't feel real.  We were all so devastated but we knew that Janette was strong, positive and determined and that if anyone could fight this it would be her.  And fight hard she did.

Her journey to fight leukemia began here in Birmingham.  Her husband, Marc was just weeks away from graduation and their life was turned upside down.  She began her treatment here and Marc became her permanent caretaker but soon it was too much and they moved to Utah to be close to family that could help take care of her little boys, Connor (6) and Brayden (4).  So we followed her journey from afar through her blog, Janette's Journey

She would tell us about the 3 bone marrow transplants, about the troubles her organs would face, she talked about the hallucinations, the isolation, the pain, the fatigue, the nightmares, the time she went blind, the fevers, the endless waiting for results.  But there were good days too.  The days she got to hold her boys, the days she got to go home, the days she felt like she could take on the world, the closeness she got to feel with her husband and the days that made her see the world and life in a whole new way.  She was strong.  She was inspiring.

She fought hard and did things that seemed impossible.  In her final post before she passed she wrote, "I hope I am home for Thanksgiving!"  My heart broke at those words but I also felt comforted because she was home.  It wasn't the home she was hoping for with her little boys but it was her heavenly home where she can watch over her family and wait for their reunion, free from the pains of this world.

In the weeks since her passing I have been strengthened by her husband and boys.  Although Marc is devastated he has strength and grace.  You can read his thoughts after her passing here.  And just the other day his little boy said to him, "We miss mom now, but we don't have to miss her forever, we will be with her in heaven someday!  We will always love her!"  Oh the faith of a child!

I mentioned at the beginning of this post that you could help.  Popular San Francisco wedding photographer, Marielle Hayes, has generously selected this family for her annual fundraiser.  For any donation amount given she will give you a digital file of this beautiful print of hers.  It is a mother with her child and to me it signifies the strength and power that mothers have. 


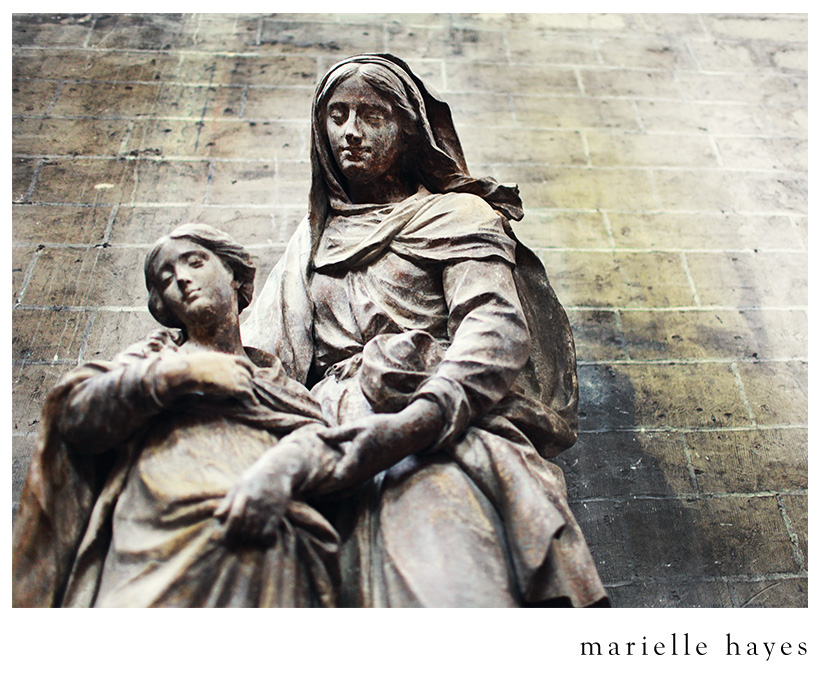
So please take a moment to check out Marielle's post about this great family and the needs they now face and consider a donation (in any amount) to bless a family that has fought so much and still has a long journey ahead as they try to heal.  100% of the donations will go to Marc and his boys.

This holiday season I hope we can all be a little more grateful for the things we have in our lives.  May we hug our kids a little tighter and speak kinder to our spouses.  May we call our parents and tell them we love them and may we all draw closer to God and be inspired to do great things.

Thursday, November 22, 2012

Black Friday Deals Without Leaving Home

 Hope y'all had a happy Thanksgiving!  We sure did!  Are turkey comas real because I feel like that's where I'm headed.

I just wanted to stop by the ol' blog to make sure you guys knew about the great deals on Amazon.  There are too many to list here but we discovered that they have matched nearly every deal that you see in the stores and then some.  

My husband is the worlds best gift giver and he always buys my gifts from Amazon and for great deals too.  That's where he got my Cricut, Serger, iPod and nearly everything we own.  {Our family is obsessed with Amazon, can you tell?}

So if you're interested in good deals without fighting crazy people at the store feel free to click on the link below which will take you to Amazon and you can get all your shopping done at once.


Have a wonderful relaxing holiday with the ones you love!!


Monday, November 19, 2012

Slow Cooker Herb Bread and Butternut Squash Soup


Isn't Fall the best?

It's a season that brings new weather, new clothes, new sights and smells and my favorite, new food!


Today I'm excited to share with you some of my Thanksgiving favorites.  Many people like to stick with the same old tried and true recipes for Thanksgiving dinner and I'll admit that I love the feeling of a familiar dish, but sometimes it really makes the meal when you try something new.

When I was in culinary arts school I declared Thanksgiving that year to be "Fancy Thanksgiving".  I made my family a five course meal made entirely of dishes we had never tried before.  It was adventerous and delicious and we all enjoyed it.  That was the year I created this tasty Butternut Squash Soup.

Just because it was part of "Fancy Thanksgiving" doesn't mean it was difficult to make.  In fact, this is one of the easiest, most flavorful and healthy soups I've ever made.


 Butternut Squash Soup

Ingredients:

- 2 Tb Country Crock
- 1 medium butternut squash, peeled, seeded and diced
- 2 medium carrots, diced
- 1 medium onion, diced
- 1 clove garlic, minced
- 6 cups chicken or vegetable stock
- 1 Tb brown sugar
- 1 tsp salt
- 1/2 tsp pumpkin pie spice
- Optional garnish: cream, parsley, roasted squash seeds


Instructions:

1.  Over medium heat, melt Country Crock in large pot.
2.  Add carrots, onion, garlic and cook until soft but not brown.
3.  Add squash, stock, sugar, salt and pumpkin pie spice to pot.
4.  Turn soup to high heat and bring to a boil.  Once it is boiling, turn down to medium and cook until squash is soft enough to put a fork in and have it come out easily, about 20 minutes.
5.  Blend soup mixture completly with a food processor or blender.  **Be very careful because the soup will be hot.  Allowing soup to cool before hand is a good idea to avoid burns.
6.  Reheat soup of necessary and garnish with a swirl of cream, parsley or roasted squash seeds.


Over the years, Thanksgiving dinner has evolved to fit our growing family.  With a bread loving husband and two bread loving children, on the menu this year is a new one for us, Slow Cooker Herb Bread.  With all the things I have going on it will be nice to whip up this simple bread in my slow cooker and save the room in my oven for more important things like turkey.


This bread is dense and chewy but also has a nice crunchy crust.  Making it in the slow cooker eliminates all the time and hassle of homemade bread but doesn't comprimise the taste.


Slow Cooker Herb Bread 

Ingredients:


- 3/4 cup warm water
- 1 package active dry yeast
- 1 1/2 Tb sugar
- 1 Tb melted Country Crock
- 1/2 cup milk
- 3-5 cups flour
- chopped fresh herbs; basil, chive rosemary etc.
- additional Country Crock and cornmeal for greasing the slow cooker


Instructions:

1.  Place water and yeast in mixer.  Stir until yeast is disolved.
2.  Add sugar, salt, Country Crock, milk and herbs and stir.  Depending on the amount of herb you want in your bread should determine how much you use.  The herb will shrink up in the bread so the more the merrier.
3.  Add the flour a 1/2 cup at a time until bread pulls away from the sides of mixer and is no longer sticky.
4.  Using a paper towel take about a tablesoon of Country Crock and grease the bottom and sides of the slow cooker.  Sprinkle cornmeal on top of the greased dish.  This will prevent the bread from sticking.  You can also use parchment paper.  See image below.


5.  Place round ball of dough in slow cooker and cook on low for about 2 hours or on high for 1 hour.  The dough will spread out and rise to fit the slow cooker.  For a taller bread than pictured here, use a smaller slow cooker.
6.  The bread will look like it is not cooked but it is.  To determine if your bread is done, remove the slow cooker lid and thump the top of the bread.  It should make a thumping sound and be firm to the thouch.
7.  Remove the bread from the slow cooker and place on a cookie sheet.  Put on the bottom rack of the oven and cook under the broiler for about 5 minutes.  This will firm up the crust and give it a nice golden, crunchy texture.


To serve with your soup, slice a thin piece of bread and spead Country Crock on both sides.  Over meduim heat, place bread in frying pan and heat until crunchy and golden.


So there you have it!  Two new delicious Fall dishes and two new reasons to use Country Crock. 


Wishing you and your family a Happy Thanksgiving!


Thank you to Good to Know & Unilever Spreads for being a sponsor. I was selected for this opportunity as a member of Clever Girls Collective. All opinions expressed here are my own.

Thursday, October 25, 2012

Candy Corn Door Wreath

Hey all! Are you ready for Halloween? I'm not but we're getting there. Since I'm basically the worst blogger when it comes to holiday decorating and crafting I thought I would at least show you a few DIY things I have laying about.

This is a super cute door wreath {does it count as a wreath if it's not round?} that my mom made for me several years ago. I love it and even if I never get any other crafts up I always have this to welcome guests.

How it's made:

3 candy corn shapes are cut from wood using a jig saw. She painted each one to resemble a candy corn and wrote "Trick or Treat". For added dimension and cuteness she used a toothbrush dipped in black paint to flick little spots of black on the candy corn. They are then attached to a piece of rope using a staple gun {see 2nd to last picture for optimal hanging technique} and then added a raffia bow to the top.

Didn't she do a great job?!? I love it! Thanks momma!

P.S. Sorry about the crazy format of the post. It's what happens when I blog from my iPod. :)

Have a Creative Day!
❤, Alicia

Tuesday, October 23, 2012

COURAGE


When asked about a time that I needed Kleenex while watching my little athlete, I didn't need to think twice.  I had put my very hyperactive little girl in ballet several months beforehand and had gradually watched her change from a wild woman into a disciplined little lady.  She practiced and practiced for her big day and was so excited but also very nervous.  There was a lot of pressure.

We miraculously got all of her crazy hair into the perfect ballerina bun and she even got to wear a little make-up.  We hurriedly got her ready in the bathroom with all of the other girls but before we left I made her stop and look at her beautiful self in the mirror.  I wanted her to see that I thought she was the prettiest girl in the world and that I was so proud of her and all that she had accomplished and that no matter what we loved her so much.


She took her seat with all of her friends and before I took my seat to watch the show, I snapped this picture.  Her big beautiful eyes give away her fears, but that day she showed me what it meant to be brave.  She was scared but she stood up and danced and it was so beautiful, I cried and cried and cried.
 
I think she learned a lot that day about courage and strength.  Now that she knows how to face her fears she helps her little brother to overcome his as well.
 
 
The kids started gymnastics this year and Jackson loved the idea of doing "fwips" but he was scared.  It was his first time doing sports since he is just barely two and the support of his big sis was essential.  He looks up to her so much.  She knew how he felt and was there for him to show him that he could be brave and strong too.  I was so happy that I was there to capture this magical moment.  Not gonna' lie, I cried a little bit.
 
I think we can all learn a lot from the little athletes in our lives.  I know these two teach me something new every day!  I'm so proud of them and their courage!!
 
Do you have a little athlete you're proud of?  Do they show you how to be courageous?  Do they make you tear up or in my case bawl like a baby?  I just can't help it!!


Get a Kleenex custom oval BOGO until 11/15/12, just use the code PLAYOFFS at checkout on the Kleenex site.
 
I was selected for this opportunity as a member of Clever Girls Collective, and the content and opinions expressed here are all my own.

Saturday, October 20, 2012

Freezer Quesadillas & Recipe for Crock Pot Veggie Black Beans

Yesterday I told you all about our Freezer Meal Club.  Today I'm going to share with you a little about the freezer quesadillas that I contributed.

These aren't just any ol' quesadilla.  Inside each little tortilla sandwich is a generous portion of beef brisket, veggies, black beans and cheese.


The brisket I seasoned with lemon pepper and cooked in my crock pot until it was tender and falling apart.  I then chooped it up in small little bits.  The cheese is shredded four cheese Mexican blend and I'll give you my Veggie Black Bean recipe in just a minute.

First let me explain how I made these for the freezer.  I assembled the quesidillas just like I normally would in this order - tortilla, cheese, beef, beans, more cheese, tortilla.  I then attempted to flash freeze them by putting them on a baking pan and letting them freeze for a bit before putting them in bags.  Since I was making 49 of these I just wasn't able to so I stacked the quesadillas on top of each other and put them in freezer bags.  It turns out they didn't stick together like I thought they would so I will skip the flash freeze step next time. 

To reheat I simply take out a quesidalla and microwave for about 3 minutes or I bake in the oven at 350F for about 7.  I prefer the oven method because the tortilla is crispy but both work well.

I really enjoyed having hearty quesadillas on hand and plan to make a few every time I have leftover meat.  It's been great having a go to meal that that the whole family enjoys.  I also love that I can make it however I want.  This particular batch also has spinach, carrot and onion which gives it a little bit more of a healthy factor and since the kids can't tell, mom wins!


Crock Pot Veggie Black Beans
 
 
Ingredients:
 
- 1 lb bag of dried black beans, rinsed
- 7 cups water
- 1 chicken bullion cube
- 1 onion, finely chopped
- 1 box frozen chopped spinach
- 2 carrots, very finely chopped
- 2-3 cloves garlic, minced
- oregano, cumin, chili powder, cayenne pepper, cilantro, salt
 
Instructions:
 
1.  In large crock pot add black beans, bullion and water. {You don't need to soak them overnight}  Cook on low for 5-6 hours.
2.  Add veggies {I used the veggies above because that's what I had on hand.  Any veggies you have will work.} and cook for an additional 2-3 hours until beans and veggies are tender.
3.  Add seasoning according to taste.  I uase about 1-3 tsp of each. 


Hope you enjoy these very flavorful and very healthy black beans!  I know we do!  The veggies blend so perfectly with the beans and seasonings your kids will never even know they're there!


Friday, October 19, 2012

Freezer Meal Club

It's been a while since I mentioned food on here.  I can assure you it's not for lack of eating.
 
I am I really excited to tell you about a new group some friends of mine started.  The idea is brilliant (I wish I'd thought of it myself) and I want to share it with you in case you want to start one too.
 
Several weeks ago, a good friend of mine came to me asked if I was interested in being in a freezer meal group.  It would consist of several friends that would create freezer meals and then get together and share them with each other.  The idea is to have a variety of meals available in the freezer so dinner time is easier.  Plus it's just fun to get together.
 
Here's how it worked:
 
We had a group of 7 women.  Each of those women made 7 meals that were able to feed at least 7 people for a total of 49 total servings.  That way we would have a meal for each day of the week.  The reason for the portion size was because some families had 3 people and some had 7 so at least 7 portions was most ideal.  For my family of 4 it meant that we would have dinner and then leftovers the next day.  The meals would be a main dish and would just have the main components {for example if you bring Asian stir fry you don't need to provide the rice, etc.}. 

 
We picked a trade day and met together at lunch time.  For lunch we each brought our prepared freezer meals and some of our freezer meal cooked and ready to eat.  We sampled each of the dishes and talked about what we brought and gave our advice for reheating and possible side dishes.  I was wonderful to share great food together and then leave with a weeks worth of meals.


I am not very experienced in the world of freezer meals and I have only made a casserole once in my life {true story} so I was very nervous and wasn't sure what to bring so I went with what I know and that is Mexican food.  I made 49 beef brisket, black bean and veggie quesadillas.  I liked the idea of something that you could pull out one at a time and heat up for lunches or quick meals on the go.

The other meals were:  Lasagna, chili, creamy chicken enchiladas, creamy basil and chicken pasta and poppy seed ham & cheese melts.  {One friend wasn't able to make it at the last minute so we were short a meal but that just meant that we got double of what we brought so we were still covered for the full week}.

So basically I made 49 beef black bean and veggie quesadillas.  I portioned them out so that each bag had 7 quesadillas.  On swap day I brought 6 bags of quesadillas {I left the 7th bag, my bag, at home} and a plate of cooked quesadillas.  We tasted each others food over a nice lunch and at the end I left with a pan or bag of each of the dishes I listed above. 

Over the past month I have been pulling out the dishes to cook for dinner.  Most just required reheating in the oven or even microwave.  For our family size most dishes provided us with a dinner, lunch for my husband the next day and then dinner again the next night.  The ham & cheese melts and my own quesadillas were packaged in a such a way that my husband would pull one out and take it to work for his lunches.

Before the swap I was stressed out and nervous.  I didn't know what to bring and I was worried about making so many portions of food, but afterward I was so happy we did it.  It was very simple to make a large amount of freezer meals since the meals were all the same.  It wasn't like some crazy freezer cooking day where you make a million different meals and have a billion different ingredients.  I'd guess that the time I invested in it {minus actual cooking time} would be about 2-3 hours and I've gotten nearly 2 weeks worth of food in return.  I felt like there was a wonderful variety of delicious foods and I of course loved the social aspect of the whole thing.  It's been fun to call my friends and say, "We had your chili tonight!  It was wonderful!"

We haven't discussed yet if we will continue with the group {we wanted to test it out first} but I have to say, I really enjoyed it and am working hard at finding more great recipes that I can use if we do it again.  Either way I am totally on the freezer meal train.  My life has been so much simpler this month.  I haven't even called my mom crying once!  Haha! 

You can check out my Food Inspiration board on Pinterest to see some of the recipes I've been looking at for the future as well as my Stuff I've Actually Made from Pinterest board {complete with reviews}.  Tomorrow I'll be back with my recipe for Crock Pot Black Beans and Veggies and tell you how I prepped the quesidillas for the freezer.

So I have to know - what do you think?  Have you done a Freezer Meal Club before?  How did it work for you?  Do you do freezer meal days or are you cooking a whole meal every night?  Feel free to link some of your favorite freezer meal recipes and share your tips on making dinner work for you and your family.  I'd love to learn more!


Friday, October 12, 2012

The 7 Layer Ruffle Skirt

Fun fact you probably don't know about me - my computer and my camera are broken and have been for some time, so until I can save up for new ones I've been blogging from my iPod and my husbands laptop late at night when he's asleep and not using it for his Phd.

I have a million projects that I want to show you but it's been hard.  So thanks for sticking with me through these iPod days.  Y'all are the best.

So I'm going through the pictures that I have that didn't get lost on the broken computer and thought I'd show some projects that are old for me but ones that you haven't seen before so

Bah da da bah.....  The 7 Layer Skirt!


I kind of love these sassy colors and prints.  I wish it was easier to photograph - the ruffles don't want to lay flat.  The skirt is 2T and the only 2T kid living in this house is Jackson and he was not interested in posing for photos in it.  In fact, when I went to try it on him to test out the size he screamed and cried, "Nooooo!  Noooo!  I'm a boy!  I'm a boy!"  So yeah, sorry little buddy but that's just the price of being a craft bloggers son.  The skirt lasted on him a total of 10 seconds - he put up an excellent fight.  No model pictures but I'll tell you it just poofs out so cute on his little chubby booty. 


Details:  The skirt has an encased elastic waistband and the ruffles alternate between cotton and two layers of tulle under each patterned layer.  The edges of the ruffle are surged in black.
 
I'm not quite sure yet what I plan to do with the skirt as it is for a smaller girl than Mags {PS we started to shop in the "big girl" section this week and I cried.  What business do they have growing up so fast?!}.  I may decide to sell it, gift it or have another baby {John is over here shaking his head no} but either way some little girl is gonna' look super cute wearing it.  I mean baby ruffle butts?!?  Nothing cuter than that!
 

Sunday, October 7, 2012

Happy Canadian Thanksgiving

I would just like to take a minute to wish all my North border readers a Happy Canadian Thanksgiving!!!

If you're looking for an extra reason to stuff your face, just marry a Canadian. Two Thanksgivings!! We celebrated a day early this year and had quite the family feast.

On the menu: Roasted chicken, mashed potatoes, gravy, stuffing, green salad, cranberry sauce, rolls and pumpkin pie. {Surprisingly, no one asked for ketchup or maple syrup.}

Hope you have a great holiday!!!

And if you're not Canadian go ahead, eat a nice big meal anyway, you can call it "showing your international respect". I won't tell. ;)

Saturday, October 6, 2012

No nonsense talk about fashion

This is a Sponsored post written by me on behalf of No nonsense. All opinions are 100% mine.
 
 
I struggle with fashion.  Don't get me wrong, I love it but it's more like a love/hate relationship.  I love a style but hate that it's so expensive or I want to wear a cute new trend but my body type just can't pull it off.  And right now I really hate my post two children body.  I also struggle with pinning down my style.  In the past I have been all over the place.  Over the years my clothing has reflected punk {complete with shaved head, I'll tell you all about it later}, skater girl, conservative, preppy, hipster, mom {that's a style right?}, sophisticated, boho, you name it I have an outfit to reflect it.  After 30 years, I'm still trying to figure out what style is "ME".
I really feel like Pinterest has helped me pin {pun definitely intended} down a style that is really me.  You can view my clothing inspiration board HERE.  I think having all the clothing that I like in one place let's me take a look at it an see a commonality and really shows me what pieces I really want in my closet as opposed to what was on sale that day.  Am I the only one that does this? 
But despite my struggle with fashion there are a few things I know for sure about my style -
  • High heels, sandals and shoes that require no socks.  I hate socks.
  • You will never see me wear athletic shoes with jeans.  I've only worn this combo hiking and it is probably the reason I hate hiking.
  • Cardigans and granny sweaters make me happy.
  • Flowy tops.
  • I don't wear shapeless t-shirts in public, like sports shirts etc.  And I don't wear them with jeans.
  • I love skinny jeans and I don't care what anyone says.
  • Layers, layers, layers.
  • I love bold colors but also neutrals.
  • I love wearing something unexpected with every outfit like a bright pop of color or a crazy pattern, heels with jeans or a random piece of jewelry.  Sometimes it ends up a little wacka-do but I try to own my quirky style rock what I got.
I've been wanting so badly to take the things I've been learning about fashion and myself and apply them to my real life closet and this week the folks at No nonsense helped me with my goals.  I was surprised by an awesome package in the mail from No nonsense.  Inside were No nonsense tights and leggings.
Both fit perfectly into my style.  I put together two looks from clothes in my closet and I even made a few pieces that were inspired by them.
First, here are the leggings.  I loved that these were corduroy leggings.  What?!  I've never heard of such a thing but I love them.  It totally fits with my love of the unexpected.  Plus I think they up the style factor because they don't just look like leggings you threw on to work out in.  This is an outfit I would wear basically anywhere.  And yes, I would wear those heels to the park.  I know, I'm crazy.


Leggings - No nonsense tights and leggings, Shirt - handmade from vintage linen {tutorial to come}, Cardigan - Target, Shoes -  Payless, Belt - Z Outlet

I love these tights because they are feminine but also a little foxy.  They have these sweet flowers on them but also give a hint of fishnet without going overboard.  I also love that the toe is so sheer that I can wear them with an open toed sandal.  This would be an outfit I would wear on a Sunday or a dress up occasion.
 
Tights - No nonsense tights and leggings, Shirt - handmade from vintage poly blend {tutorial to come}, Skirt - repurposed from skirt I've had since high school {tutorial to come}, Shoes - Payless, Belt - Z Outlet, Necklace - Z Outlet
Jill Martin has recently partnered with No nonsense and shows you some more ways to wear their tights and leggings in this short little video.

I really am planning on buying more of these now that I know they are so comfortable and cute.
If you're interested in getting some yourself you can get them at food & drug stores as well as mass retailers.  And the best part is they are super affordable and who doesn't love that?!  You can also visit No nonsense on Facebook to check out all of their fun colors and styles.
So tell me - -What is your fashion style?  What do you love to wear?  What won't you be caught dead in?  What makes you happy and feel most relaxed in your body?  Are you a jeans and t-shirt kind of girl or are you like me and a pair of heels just makes you smile?

Visit Sponsor's Site

Wednesday, October 3, 2012

Garden Fails and Hope for the Future

This is a Sponsored post written by me on behalf of Miracle-Gro. All opinions are 100% mine.


Ever since we bought our house in 2007 my husband has taken great care of our yard.  He's created a small little garden that he works on with the kids and has been in charge of keeping things pretty.  Except for this year.  He's trying to graduate with his PhD this year and has been at work non-stop.  So that leaves me to pick up the pieces.  The horrible, ugly, weedy, overgrown pieces of our once beautiful yard.
Keeping up with my yard is no easy task and let me tell you - I.  Am.  Terrible.
 
EXHIBIT A

 
Clearly I cannot be trusted with hedge clippers.
 
The saddest part is I tried.  I really tried.
 
I can't even look my neighbors in the eye.  It's too humiliating.
 
 
I think my biggest problem, besides chasing two kids while gardening, was that I had no idea what I was doing.  Gardening isn't particularly hard to do but you really need some knowledge to make things work.  So I was really excited to recently learn about Gardenieres.
 
(1) Miracle-Gro
 
Gardenieres is a really cool website where professional gardeners from different regions give you tips and show you instructional videos on basically every gardening topic.  Clearly from my *ahem* gorgeous shrub pruning job, I need to be spending a lot of time over there.
 
I've officially decided that my husband has to fix the shrub that I hacked to death because I just can't look at it anymore, but I haven't given up on gardening yet.  My grandmother used to have the most gorgeous rose garden in Berkeley, California and people would drive past her house on Hopkins Street just to see it.  I have one rose bush that gives me beautiful flowers randomly but lately it is a mess.  The bush is being choked out by Poison Ivy and I have never once pruned it for fear of destroying it like I did my shrub.  So my first gardening project form Gardenieres is to learn how to fix my poor rose bush and make my Nonie proud. 
 
Gardenier, Gina Ilipoulous has a great video detailing just what I need to do to get started. 


It looks like all I really need are leather gloves, pruners and Miracle-Gro LiquaFeed to help revitalize the poor sad bush.  Luckily it is still very warm here in Alabama so this will be a good Fall outdoor project for me.  Hopefully implementing these few tips will encourage my roses to bloom bigger and better than they ever have before.  Who knows?  Maybe I'll have a famous front yard like my Nonie did.  Baby steps...
Are any of you working on any fall garden projects?  If so be sure to check out Gardenieres for tips and follow the Miracle-Gro Facebook page where you can chat with other home gardeners from your region and around the world.
I'll be back in a few weeks to show you what I accomplish with my new knowledge!  In the mean time I must know, have any of you ever had any epic gardening fails like my shrub pruning?  Do tell.  I need to feel less sad and reading other horror stories will definitely put a smile on my face.
 
Advertisement
Visit Sponsor's Site

Plants vs Zombies Completed Zen Gardens (PvZ)

First of all I'd like to start off by acknowledging the randomness of this post.  No, my blog did not get hacked by a teenage boy.  I really am a grown woman who plays video games.  Let me explain - I have the game Plants vs. Zombies on my iPod touch.  It's my go to boredom buster game.  Also, it's super addicting.  Just play it.  You'll see.  It's fun puzzles with zombies and dancing sunflowers.  It's great.

For a while now, I've been trying to get the achievement on the Zen Garden portion by getting one of each plant.  The only problem is I've been driven to near insanity trying to figure out exactly which plants I needed for complete gardens because there are more spots than plants and not all plants are part of the Zen Garden portion. 

Long story short - This is the one time Google has failed me because NO WHERE have I been able to find screen shots of completed garden for the iPod and iPhone version of this game.  The interwebs needed this post that apparently only I can provide.

So for all those teenage boys and 30 year old moms like me out there who have been searching and searching I can finally say I've achieved a full Zen Garden and here my dears are your screen shots!!!


You're Welcome.
 
 
Now, for you non PvZ people, I hope we can still be friends now that you know I'm a nerd.


Tuesday, September 25, 2012

The Marguerite Ribbon Tied Dress {Tutorial}

I've been kind of MIA lately haven't I?  How 'bout I make it up to you with a new dress tutorial?? 


Am I forgiven?


I wish the picture quality was better but all I had to work with was my iPod.  So please push past the overexposed parts to see the cuteness which is this dress.  And the fabric... that's my favorite part!  So pretty!
 

 The dress has ribbon straps that are fed through button holes in the back and then tied into a pretty bow. 
 
 
I originally posted this tutorial over at The Ribbon Retreat.
The fabric is from the new Marguerite line by Cynthia Walker for Riley Blake.  It's so feminine and gorgeous.


A simple dress with a lot of sweetness and it's easy to make too!


Let's get started.  Here's what you'll need:


Supplies:
 
For size 5-6T I used...
 
-  1 1/2 yards Marguerite Red Main
-  1/2 yard white muslin
-  1/4 yard Marguerite Blue Dot
-  Bodice pattern {see below}


Step 1:  Create pattern pieces.


Trace a shirt onto paper as you see above {I guess I can't list digital drawing as one of my special skills.  I hope you can still get the gist of it. You'll of course make your lines much more straight than you see here}.  You will want to add at least 1/4 inch seam allowance.  This is your front piece.


For the back piece you will cut out a replica of the front except for this piece you will mark approx. 1 1/2 inches in on each side {This measurement may vary depending on the size of the dress.  Just go with what looks right}.  From that mark you will then draw a curved line to the top of the armpit.


You'll now have two pattern pieces.  A front bodice piece and a back bodice piece.


Step 2:  Cut out your pieces.
 
You will need the following to complete your dress.
 
- 1 front piece out of main fabric
- 1 front piece out of muslin
- 1 back piece out of main fabric
- 1 back piece out of muslin
- 1 rectangle for the skirt that is approx 2x's the size of your waist out of main fabric
- 1 rectangle the width of your main skirt by about 6 inches out of accent fabric
- 2, 1 yard pieces of ribbon


Step 3:  Sew together bodice.


Take the two front pieces and lay them right sides together.  Between the layers pin the ribbon on the inside approx 1/4 inch from the sides of the top.  Stitch where you see the blue line.

Now take the two back pieces and place them together, right sides facing, and stitch just the same as above.  *Note:  you will NOT place ribbon between the back pieces.


Trim the pieces.  Cut off excess ribbon.  Cut the corners off.  Cut slits at the curves to so the curves will lay flat.


Now, open the back and front piece and pin together, right sides facing, like in the photo above.  Sew up the sides.


Flip bodice out and iron flat.


Top stitch around the top of the bodice.


On the back piece, sew two button holes spaced evenly apart.

You are now done with the bodice.  It's easy peasy from here.  You're almost done!


Step 4:  Sew skirt.
 
 
Fold the accent fabric in half so that the long rectangle is about 3 inches wide.  Sew accent fabric to pain piece.  Sew up side seams until you get one large tube.  This is your skirt.


At the top of the skirt use a ruffle foot or setting on your machine to ruffle or gather the top of the skirt.


Step 5:  Attach the pieces.


Right sides together, pin your skirt top to the open bottom of the bodice.  Stitch together.


Top stitch the seam by the hem on the bottom of the skirt.


Step 6:  Trim up your ribbon.


Try the dress on and slip the ribbon over the shoulders and through the button holes.  Tie a bow and trim them to your desired length.  Use fray check to secure the fibers on the ends so it will not fray.


Step 7:  Enjoy watching your sweetie pie in her new beautiful dress!
 
 
If you make the dress be sure to stop by and show me a picture of your darling and her new dress!


P.S.  I thought I should mention that I didn't win the Ultimate Room Makeover.  Super bummer.  But I did want to say how much I appreciated all of your support and love.  I have the best readers and really appreciate you.  So even though I don't get an awesome room makeover I still feel blessed to have y'all, so thank you!
 
______________________
 
Related Posts Plugin for WordPress, Blogger...