Monday, June 24, 2013

The Snitch Tee

What is the best book series in the whole entire world?  If you answered Harry Potter you are correct.  100 points to Gryffindor!

I'm always looking for new t-shirt ideas for Jackson and when I can throw a little Harry Potter in the mix it's just a great big golden bonus.  Speaking of golden, here is Jackson's golden snitch tee.


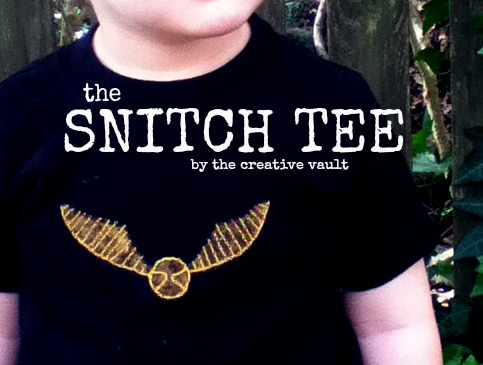
This is a hard shirt to photograph {mostly because it's always covered in dirt from a messy little boy who won't stand still}.  It's just a plain black tee, a painted snitch and hand embroidered detail and if you keep reading I'll tell you exactly how to make one of your own.


A few weeks ago the school age son of a friend of mine saw this shirt and begged his mom to go to the store to buy him one that very instant.  It was nice to know that the shirt was "cool" and that he recognized it as a snitch.

Jackson usually wears it with his mustard skinny cords.

 
Want to make your own??
 
ACCIO TUTORIAL!!!!!
 
Supplies:
  • t-shirt
  • interfacing
  • gold craft paint
  • gold embroidery thread
  • needle
  • iron
  • freezer paper stencil
Directions:
 
Step 1:  Cut out an image of a snitch onto freezer paper.  You can trace a snitch onto paper and cut it out or you can print it directly onto the freezer paper and cut it out from there.  This makes your stencil.  You don't need any detail with the stencil just the outlined image.
 
Step 2:  Iron on a small rectangle of interfacing to the inside of the shirt in the area that you want the design.  This acts as a stabilizer for your embroidery.  Without it your image will come out wonky and will not hold shape over time {for reference the shirt you see in the picture has been washed dozens of times and still holds it's shape}.
 
Step 3:  Iron the freezer paper stencil onto the front of the shirt and use the gold paint to paint inside the stencil.  * You'll probably want to put a piece of card board inside the shirt before you paint to keep the paint from bleeding through to the back.
 
Step 4:  After the snitch is dry, add detail using embroidery thread.  There are many ways you can do this.  I didn't do anything technical, I just free hand stitched.  I really don't know anything about hand embroidery but according to this pin the technique I used looks similar to the "threaded running stitch".
 
And that's it!  The whole project took me about an hour to create while I watched Downton Abby for the millionth time.  You really can do so many things with this painting and embroidery technique you're only limited to your imagination.


This shirt and this boy are just so cool that the crazy Mamarazzi just can't stop taking pictures of them!


Alright, I'm off to go dig up my old Harry Potter books and read them all again! 
 
Are you as obsessed as I am? 

Tuesday, June 11, 2013

Father's Day Ideas From The Creative Vault

So Father's Day is coming up. I wish I had some new tutorials for you but it has snuck up on me.  If you're feeling the same I thought I'd share with you a few things I've done in the past so maybe you can feel inspired to make dad something before the big day.

Here's the Grilling Apron I made for my dad one year.
 {click HERE or on pic for more info}
 
And here's the really simple Father's Day Treats Done Two Ways:
 
{click HERE or on pic for more info}
 
 
And I didn't make these cupcakes but my talented friend Amy at Indulge With Me did.  She did these for her husband one year for Father's Day and I just adore them.  I mean, tiny BBQ's!!  Adorable.
 
{click HERE or on pic for more info}
 
I may try and tackle making these cupcakes for John.  So far all the direction the kids have given me is that dad should have some orange juice.  I guess it's a start.
 
What are you doing for dad this year?  Feel free to leave a comment or links in the comment section and share what you have planned.  I need some inspiration!
So grateful for all the great dads I know!

Thursday, May 30, 2013

Graduation Crafts! Diploma Cover Scrapbook

Hey, hey, hey! It's graduation time!  There's nothing like the feeling of letting all those school burdens go and feeling that sense of accomplishment.  Plus, it makes me want to sing School's Out by Alice Cooper and who doesn't love that song?  Nobody, that's who, because that song is awesome.

Johnny Boy and I got married our Junior year of college so we spent our Senior year and our first year of marriage enjoying date nights at the library.  Oh yeah, keepin' the romance alive.  Nothing says love like a 1,000 page science textbook.  We graduated Spring of 2006 from BYU-Idaho, John with a bachelor degree in Chemistry and me with a bachelor degree in Geology and Earth Science.  Nerds.  You can say it.  We know. 

John's parents were generous and bought us nice frames for our diplomas which left us with these empty diploma covers.  You know I wasn't going to let that go to waste.


The cover is a nice pleather and satin bound cover with our university stamped in silver on the front.  This isn't a piece of junk {I mean I paid thousands of dollars and years of my life to get it} and it had a greater purpose than just tossing it.

So I added a few scrapbook stickers and pictures from our big day and The Diploma Cover Scrapbook was born.


This scrapbook is John's.  Mine is basically the same.  Just with a few more pictures of my parents.


I also had these cute little diplomas that I stuck in there.  You can buy a similar one HERE.  If you don't frame your original diploma you could still keep it in the cover and just scrapbook the left cover.  Lot's of options here.

 
The scrapbook is nice and compact and fits on my bookshelf but I can also take it out every spring to remember the accomplishments that we achieved and look at how cute we look in black robes and cardboard hats pre-children.
 
 
Happy Graduation to All You Grads! 


Feel free to turn this post into a little graduation brag board - Did your baby graduate Kindergarden, High School, College?  Give a shout out to your High School {Reed High class of 2000!} or did you finally pass all your classes and get that higher degree?  Whatever it is, y'all have worked hard so be sure to brag about it below in the comments!  


Saturday, May 18, 2013

Personalized Paper Doll Quiet Books

I was going through old posts on my family blog today and discovered this fun project I did for Maggie a few years ago.  It's a personalized paper doll quiet book.  This book was very easy to make and could be used not only for entertainment but would be a great way to help with speech therapy, or even learning how to match and dress oneself.


How I made my book:

1.  I used my Cricut cartridge, Paper Doll Dress Up to create all of the images, however you could always just cut out pieces by hand if you do not have a Cricut.

2.  I created the main doll by cutting out a doll and trying to make it look as much like Mags as possible, long brown hair, blue eyes etc.  I also used different outfits on the cartridge to make an undershirt and underpants.  {The fewer naked dolls we have around here the better.  Why are there always so many naked Barbies at my house??}  I also decorated the background page by cutting out grass and flowers.

3.  I then used patterned paper and cut out a few dresses.  You could also cut out shoes, socks, pants, shirts, hats, headbands, wands etc.  This cartridge basically has everything.

4.  I then used my personal laminator to laminate all the pieces.  I laminated the entire page of the main doll and each dress individually.

5.  Glued the main page into a cheapy file folder.

6.  On the back of each of the dresses is a piece of sticky tack.  This allows for the pieces to be placed on the doll and stay in place.


Super simple little book that can provide lots of entertainment for your little one!

If you're looking for more ideas for paper dolls be sure to check out my tutorial for


Monday, May 13, 2013

Beach Fun and a WINNER!

Hope y'all had a lovely Mother's Day, celebrating moms or even yourself. I've told you how much I love my momma so you know I was sad to not be with her in Nevada this year but the kids and John made up for it and took me to the beach for the weekend!!

We stayed at the Holiday Inn Express on the beach in Orange Beach, Alabama. The gulf is perfect and I highly recommend this hotel. It was wonderful.

We saw wild dolphins, built sand castles, swam, relaxed, collected shells (project coming soon!) and had a great time. The kids even got to touch a dead fish. Exciting!

At the end of the first day Maggie said, "I love me!" I loved hearing that and by the end of the trip I declared that I loved me too. I hope y'all take the chance to love yourselves as well.

P.S. Today, we wrap up the doTerra giveaway from Lemon Living! Thanks so much to them for proving such a great giveaway. The winner was #10 Mary. Thanks to everyone who entered!


Monday, May 6, 2013

CLOSED- doTerra essential oils from Lemon Living

THIS GIVEAWAY IS NOW CLOSED. CONGRATULATIONS TO THE WINNER #10 MARY! THANK YOU TO ALL WHO ENTERED!

For over a year now, my sister-in-law, Jill Lemon, has been on a journey for better health.  She's focused on fitness, diet and enhancing her lifestyle.  She's worked hard and it has paid off.  Jill looks amazing but more importantly she feels amazing. 

She's started a new blog called Lemon Living, full of tips and tricks that she has used in her journey to better health and I'm happy to introduce you to that blog, Lemon Living.


In addition to exercise and better eating she has also discovered essential oils as a way to improve her health even more and has become a consultant for doTERRA oils.  Now you need to understand something about Jill, she is not a person who wastes her time and money.  She researches every purchase she makes and doesn't spend time doing things just for the sake of doing them or because it's the next best thing.  So when she told me that she loved these oils and wanted to share them with others I sat up and took notice.  These must be for reals because Jill wouldn't mess around with them if they weren't.

I was skeptical but she sent me a few samples which to my surprise I actually have enjoyed a lot.  There are lots of ways that you can use these oils and they can help with a variety of ailments.  Here are the samples she gave me and my experiences with them -

  • Lavender:  I used this on a patch of poison ivy I had on my arm.  My ivy burn was close to healed when I started using the oil so I can't say that it "cured" my burn but it did make that patch's scar clear up a bit quicker than the other patches I had.  My friend Mary also uses this as aroma when she cleans the floors and I plan to put a few drops in my carpet cleaner solution the next time I clean.
  • Lemon:  My husband had a major stomach ache a few days ago.  He was complaining about being sick like only a man can do.  I put two drops of lemon oil in a glass of water and made him take a sip.  After only 5 minutes he was back to normal and even he had to admit that it really did make him feel better.  I also plan to add this scent to my homemade cleaning supplies.
  • Peppermint:  Jill used to get migraines every day and since she started putting peppermint behind her ears every day.  She hasn't had a migraine since she started doing this.  I had a headache one day and I used the peppermint instead of Advil.  I felt like it worked well.  My daughter also complained of a headache one night.  I put a drop on her forehead and she stopped complaining about the pain and started asking for candy because is smelled so good.  Haha!
  • Deep Blue:  This is like a lotion with a mixture of a few different oils in it.  It's supposed to help with things like sore muscles, bruises etc.  I slept funny one night and my shoulder and neck were in so much pain I couldn't move them.  I tried the Deep Blue and the pain was gone and I had mobility within minutes.

These are just a few examples of the uses for these oils there are hundreds more but these are the ones that have helped me in the past few weeks.  I was skeptical at first but I really did like them and will be buying more in the future. You can find what oils are available and their uses HERE.


Now... who wants some free stuff???  I can sense you raising your hands behind those computer screens so let's get on with it.

Jill from Lemon Living is offering one lucky reader a doTERRA Introduction to Essential Oils Kit valued at $26.67.  The giveaway is open to anyone in the US or Canada.

The doTERRA Introduction to Essential Oils Kit includes:

- an introductory audio CD and booklet
- 5 ml of Lavender
- 5 ml of Lemon
- 5 ml of Peppermint


Here's how you enter to win:


The giveaway will be open for one week and a winner will be announced on Monday the 13th.

Thanks Jill for the awesome prize!  Don't forget to visit her blog, Lemon Living and say hello!


Wednesday, April 10, 2013

Crockpot Chicken Chili

Looking for something inexpensive, easy and delicious for dinner?  Don't worry - I gotcha.


I made this dish for a freezer meal group I'm a part of.  You can read more about how it works HERE.  I ended up making seven meals which I put together in gallon sized Ziploc's and froze flat.  Nice and compact for storing in the freezer.

This chili is really flavorful and has just the right amount of spices that everyone will love.  It's great as a chili but also works well in tortillas as tacos.  It would make a good chili to put on top hot dogs or nachos.  Assembling the meal is simple and cooking it is even easier.  Flick a switch on your crockpot and walk away.  What's easier than that?!?

Here's how it's done -

Ingredients
  • 1 large chicken breast
  • 1 c. salsa (I used Pace )
  • 1 onion chopped
  • 1 cup water
  • 2 cans chili beans in sauce
  • 1 Tb. oregano
  • 1 tsp. onion powder
  • 1 tsp. cumin
  • 1/4 tsp. cayenne pepper
Directions

If making freezer meals - place all ingredients into Ziploc bag and freeze.  When ready to cook remove from bag and place in crockpot (frozen or thawed).  Cook on high for 4 hours until chicken easily shreds with a fork.


Enjoy!


Monday, April 8, 2013

Updating the Deck - Phase 1

It's spring so naturally I've been gradually emerging from the cave which is my house and getting out into the sun to work on some house projects.  Plus, I'm tired of being fat and I've been looking for ways to "work out" without actually working out.  Saturday's project was to tackle the deck.

When we bought the house in 2007 the deck pretty much looked exactly like this.


Outdated lattice and dead dry looking wood.  I never had a deck growing up and I just figured that the deck was old and that's just what they looked like.  I did not learn the magic of a pressure washer until recently.  My neighbor just built a beautiful brand new deck which I have been enviously staring at for the last couple of months.  I thought I was just doomed to have the crappy deck.  But last week he had his deck stained and a man came out and pressure washed the stairs that we share at the same time {you can see them in the background}.  They were new again!  What?!?  Seriously?!  My deck isn't old and dried out!  It's just dirty!  It was like a tiny little flicker of hope burning inside me. 

I could do this.  I could make this baby awesome again.  Sweetness.

The man who did the neighbors deck quoted me $1,000 to revamp mine.  Uhhh.... no dude.  That's cool.  I think I can tackle this baby on my own.

So today was phase one.  REMOVE THE LATTICE.

Wanna see how it looks now???

 
Booyah!
 
Gone baby!
 
I did it mostly by myself {Jackson always had a tool in hand and Maggie helped me haul stuff to the curb}.  But all it took was a hammer and a chair to stand on to reach all the tall parts.

Let's look again shall we?


So much better right?!?

To remove it I just used a hammer to remove the rusty nails and to act as a crow bar.  The lattice came off fairly easily after that.  I listed the large lattice pieces on Craigslist for free {maybe someone could use them in their garden} but I'm pretty sure most of it will just be picked up by the garbage company.


It only took about 2 1/2 hours from tear down to clean up and a portion of that time was dedicated to screaming, and jumping and waiting for the big scary lizard to relocate.  He just stared at me with his creepy dead eyes, daring me to move him but there was no way in hell that was going to happen so I waited patiently for him to move on on his own.  Can you imagine if he had jumped on my face and attacked?  The horror.  Just my luck though he'll have relocated into my house now that I've torn his down.  *shudders*

Okay let's think of some happy thoughts like this cute helper -
 
 
Ahh.... that's better.  He was so determined.  He thinks he's Fix It Felix.  He kept hitting himself in the head with the hammer {I guess that's how you learn} so I eventually moved him to pliers duty.  No more accidents after that.

The deck looks better but it's a far cry from done.

Next on the deck to do list:
  •  Clean out the leaves and junk from underneath
  • Pressure wash the deck
  • Repair loose railings
  • Stain and seal the deck {I may try to match my neighbors deck but I may go with a nice dark stain.  Thoughts?}
And if you're like my mom and are wondering about that one beam that looks a little bendy, don't worry, that beam is mostly to support the lattice.  There is nothing wrong with the structure of the deck.  The three large beam are the main support beams.  I don't know yet if I'll remove those extra beams yet.  Who knows?  Probably not though. 

Hope you feel inspired to get out there and tackle a project at your house that you've been putting off.  Even if it means getting out there and doing something that looks tough all by yourself, I'm here to testify that YOU CAN DO IT!

Saturday, April 6, 2013

Easter Bunny Egg Cozies & Owl

Did you have a nice Easter?  I hope you did!

Ours was very nice and relaxing.  Church and the bunny stuff and dinner with friends.  What could be better than that?!

A few days later we were surprised with a great big box of even more Easter stuff from Nonie and Grandpa.  Inside were the cutest little bunnies I ever saw.  My mom had knit these adorable Easter Bunny Egg Cozies.  I died.  Inside each one was a little Cadbury egg that I did not let the kids touch because I did not want them messing with the bunnies.  I declared them MINE!


I've showed you other great stuff that my mom has knit or crocheted before HERE and HERE.  She's just so talented.  I can't get enough.  If you're on Ravelry (a social network for yarn enthusiasts) you can check out her page and even more of her projects.  Her user name is MOBOYLE.

The pattern she used is called Huggie Bunnies and is available for free download from Ravelry by Sandra Paul.

{P.S. If you're wondering about the background fabric, it's a clothing cotton I found recently at JoAnn Fabrics.  There's a whole line that goes with it.  Super cute.  It will soon be a dress so keep an eye out for that post in the future.}


Mom put a Cadburry egg in each one but they could easily fit a regular sized egg too.  Such a cute little project that I can't wait to save and pull out for next years Easter baskets.  Maybe by then I'll be more generous and share with the kids.  Maybe.

But the bunnies weren't all that Nonie knitted up for the kids.  She also included this adorable little Owl Puff.  I thought the eyes were especially neat.  It's little rounds of felt attached with rounded safety buttons.


The pattern for the Owl Puffs is available for free on Ravelry by Jenna Krupar.


Hope you feel inspired by my talented mom and all these adorable patterns! 

Kisses from the Cutts Family!  xoxo


Saturday, March 9, 2013

Cinderella Cupcakes

Maggie turned 5.
 
It feels like it should be a crime to grow up so fast.  Am I the only mom that wants to freeze time?
 
Last year all she wanted was Shaun the Sheep cupcakes, but her speech delay has improved so much that this year she actually had several requests for her party.
 
1.  Cinderella themed
2.  A long list of boy and girl guests
3.  Cinderella cupcakes with glass "swippas"
 
All three wishes were granted.  

We ended up having a Cinderella Ball.  With actual dancing and turning our house into a ballroom kind of ball.  It was the real deal.  It was basically kid prom and it was amazing.  I have lots of photos to sort through but while I work on that, how about I show you her third wish?
 
 
Cinderella Cupcakes With Glass Slippers!
 

My dear friend Amy helped me make them.  She's pretty amazing when it comes to cupcakes and cute treats.  She can do anything.  Check out her blog, Indulge With Me when you have time because you will get lost over there for days.  These cupcakes were nothing for her, she tackles much more difficult tasks but they were exactly what Maggie wanted so in my mind these were her best work.


I created the slippers from melted almond bark and a candy shoe mold.  I purchased my mold at a local candy supply store for $1.99.  If you don't have one near you, you can find the same one on Amazon HERE and HERE.  If you've never used a candy mold before the process is simple.
 
First you melt your chocolate, melting candy chips or in this case almond bark.  There are several ways to melt them but I just took a few pieces and placed them in a Ziploc bag.  I then microwaved them in 15 second increments, squishing the bag between each increment, until the almond bark was good and melted.  I then cut off a tip of the baggie and squished the melted bark into the mold.  The chocolate settles nicely into the mold and to get a nice clean back I scrape the mold with the back of a butter knife to get any excess chocolate off.
 
The cupcakes themselves are just boxed white cake.  Amy has tricks to make boxed cake incredible on her blog but for these were were going super simple because the kids are only interested in the frosting anyways.  Amy stirred the heck out the the batter which gave it a really light nice texture.  Much better than how mine usually turn out.  The frosting was made with a combination of butter and cream cheese and the dye was 10 drops of neon blue.  Maggie approved the color as Cinderella's so we stopped there.
 
To frost, Amy used a large star tip and gave each one a nice swirl.  If you have never frosted a cupcake using a pastry bag before you are missing out because it is the simplest, fastes, cleanest and prettiest way to do it.  I got THIS set a long time ago and I use it all the time.
 
Once the frosting was on, we topped the big ones with some glittery sprinkles and a slipper and the mini cupcakes were decorated with sugar pearls.


 The cupcakes really were SO simple to make and made my little princess' dreams come true.
 
Happy Birthday Maggie!
 
 
Related Posts Plugin for WordPress, Blogger...