Monday, November 14, 2011

Fall Fabric Hoops

Elizabeth finally called in a missing persons report on me.  I can NOT believe I haven't blogged in a month!  There was so much Halloween insanity on the Internet I'm sure y'all survived without me.  But I'm back!  Well, kind of.  You see my computer is broken.  Like, broken broken and I've had to share the lap top with my husband.  Between the Phd and Fantasy Football I don't get to use it much and when it's available I just want to nap.  I'm sure you'll forgive me.

I'll be doing lots of random catching up for a little while - just because the computer is broken doesn't mean I haven't been crafting away!


Today I want to show you my super simple fall decor.  The whole project took about 20 minutes to do.  It will take you 5 if you skip the applique.


Fall Fabric Hoops


I took a bunch of wooden embroidery hoops that my mom gave me and filled them with different fabrics from my scrap bins.  The whole project was free.  Yay.


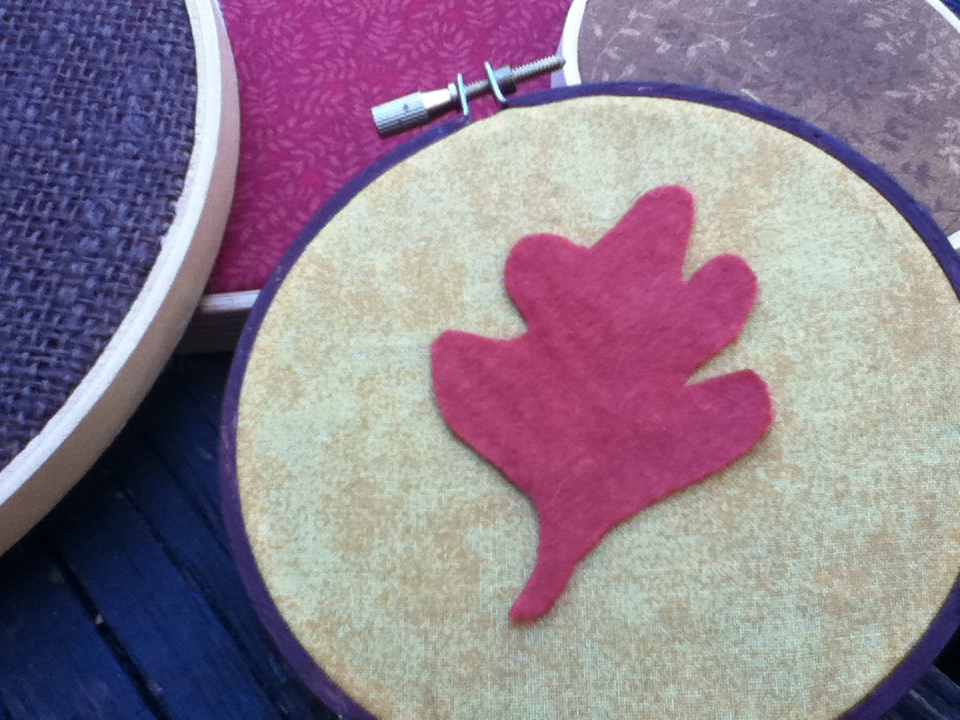
The leaf is cut from a rust colored piece of wool felt.  I used the leaf pattern on the Disney character Cricut cartridge as a template.


The fall is an applique cut using the Plaintain School Book font cartridge.  I know that my machine can cut fabric but I am in the habbit of cutting out the letter/shape tracing it onto the Heat and Bond and then cutting it out by hand bedore I iron it on.

Here is a crummy picture of how I arranged them on my wall.  Nothing fancy, just simple hoops to remind me it's fall.


Here's how to make your own:

Step 1:  Pick out your fabrics and your hoops.  I used quilters cotton, burlap and wool felt.

Step 2:  Place the fabric in hoop.  For a permanent fix line the outside of the inner circle with a thin layer of glue.  I may have other plans for these hoops after fall is over so I did not add glue.


Step 3: Trim off excess.  And you're done.  Told you it was simple.


*If you plan of adding applique iron-ons, add the letter to the fabric first then place fabric in hoop.


Wednesday, October 5, 2011

Paper Bag Cowboy Costumes

If you're looking for Halloween costume ideas and you're as cheap and lazy as I am then here is the costume for you!

Introducing -

Paper Bag Cowboy Costumes


Me and Johnny boy rockin' it pre-kids {I'm 6 mo. pregnant here}


Would you like to know how much these costumes cost? 

$0 dollars

How long did it take me to make both costumes?

less than 30 minutes

I really feel like Halloween costumes should be free or almost free, repurposed from something else  or they need to serve a year round purpose.  I've never seen any point in expensive, elaborate costumes that you'll never touch again.  That's what wedding dresses are for.

These paper bag costumes are something I've done several times and they always are a hit {I've probably done this costume 3 or 4 times}.  People think they are hilarious and I've usually made them last minute.  One time a little girl even came up to my husband and said, "Hi Woody.  Hi other girl."  Ha ha! They are super simple.  These would also make for great play clothes for the kiddies anytime.  This is also an easy way to make an Indian costume.


For the vest:
  1. Lay paper bag flat and draw a design of a vest and cut it out.  If you're making one for an adult use as much of the bag as you can.
  2. Crumple up the vest and then uncrumple it and smooth it out.  If you take the time {unlike us} to do this a few times you can really get it to look like leather.
  3. Turn the paper bag inside out {so the store logo is on the inside} and decorate however you want.  You can draw on detail, cow print, sheriff badges, etc.
For the chaps:
  1. Cut out 2 pieces 1 for each chap.
  2. Crumple up the chaps just like in #2 for the vest {above}.
  3. Use scissors to cut fringe along the outside of each chap.
  4. Punch holes in the top of the chaps and string yarn through the holes.  Tie around waist.
For the belt buckle:
  1. Cut out an oval from cardboard.
  2. Cut out your initial from cardboard and attach to oval.
  3. Cover the whole thing in tinfoil.
  4. Attach to the yarn on the chaps with duct tape.

I've also made guns before by cutting out a gun shape from cardboard while leaving room for a barrel.  For the barrel I use part of a toilet paper roll and attach it with tape.  Then I covered the whole thing in tin foil.  If I have time I'll also make a tiny cowboy hat from the scraps that I keep on my head with a yarn tie.  I wish I had a picture to show you.  Oh well.


So get creative and have fun!  That's what Halloween is all about!


Monday, October 3, 2011

A Life Lesson from Monster Cupcakes

Well, Halloween season is upon us and it's time to get Halloweeny.  Probably the crafters best time of year.  Halloween crafts are so fun that it's hard not to go overboard.  One Halloween I learned a valuable lesson about going overboard that has changed me forever.  {Okay, maybe that's a little dramatic, but I did learn something.}

Several years ago, before I had kids I signed up to bring cupcakes for our Church's Halloween carnival cake walk.  I was so excited.  I had seen these fabulous monster cupcakes online {probably from Martha} and I knew they would be perfect.  They were funky/spooky/creepy/awesome and they were topped with tons of candy!  The kids would like them.  No - they would LOVE them.  I was sure of it.  How could they not?


I spent extra time trying to match every detail from my inspiration and ran to several stores trying to find the perfect green candy for the Quasimodo eye.  It was all going to be worth it because the kids were going to love them. 

I brought them to the carnival set them on the table with dozens of other treats {many of which were store bought - what were people thinking? BORING!} and went off to help with the carnival games.  By the end of the night I visited the cake tables to help clean up and was devastated.  Every single cake and treat was gone except for my cupcakes.  Not ONE was touched!  They were the only rejects left.  I was shocked.  I was devastated.

Fighting back tears, I offered the rejected little monsters to the missionaries who happened to walk by at that moment.  They gladly took them but let's face it - 19 year old boys will eat anything.  My husband had a theory and I think he was right.  I split up the cupcakes on to smaller plates and there was my fatal flaw.  The kids didn't care about getting 4 homemade monster cupcakes when they could have had a giant store bought cake.  They didn't care about the time and love and thought I put into them.  They just wanted cake and in as large of quantities as possible.  They aren't greedy.  No, they just like to eat themselves sick at Halloween and if a big box of sugar cookies will get them there well, that's what they want.

So the moral of the story for me is:

Don't waste your time or money, going all out on things like this.

Just buy that discounted box of cupcakes with the extra frosting, sprinkles and plastic spider rings and save yourself the trouble. 

Because less stress and more sugar is what everyone wants anyway.   


P.S.  If you want to make the monster cupcakes you use large marshmallows, small marshmallows, melted chocolate for the center of the eyes and fruit by the foot for the Quasimodo eye.  Good luck.


Saturday, October 1, 2011

Personalized Nursery Frame

A few weeks ago I got a brand new nephew.  He is the absolute cutest {as all my nieces and nephews are}.  I want to kiss him and hold him all day.  Since he lives on the other side of the country I'll just have to settle for making stuff for him.

His nursery is blue, brown and zoo animals so I decided to make a frame to go along with the decor.


The best part?  It only cost a dollar. 

{Shhh... don't tell Blake's mommy.  She doesn't know yet that I'm a cheapskate.}


Want to make your own?

Here's what you'll need:


  • Wooden frame (Michael's $1)
  • Chipboard letters (got mine in a big pack from the dollar store a long time ago)
  • Brown paint ( craft paint it fine I just had some leftover house paint I used)
  • Blue paint
  • Candle
  • Glue
  • Paint brush
  • Sand paper (optional)
Step 1:  Paint frame brown.  Let dry.
Step 2:  Glue chipboard letters to frame.

Step 3:  Rub candle wax along edges of frame.


Step 4:  Paint the entire frame blue.  Let dry.

Step 5:  Around the edges that you waxed you can scratch off the blue paint and the brown will show through.  If you have a light sandpaper you can also sand off the top layer of paint.  The brown will now show through.

Step 6:  Add a picture or other image.  I used a giraffe stamp that I colored in and attached it with foam dots to a piece of scrapbook paper.  Blake's mommy can either leave the giraffe in or as he grows and decor changes she can put a picture of him in it.


Thursday, September 29, 2011

The Birthday Badge

My baby turned 1 yesterday. I can't believe it.  It was a great day.  We took extra care to make him feel as special as he most surely is.


One thing I've done every year is to create what I call a "birthday badge" for my kids on their birthday.  I like the idea of the birthday shirt but I don't like that it's an entire shirt that you can't wear but one day a year.  No, the birthday badge is a much better solution.

The badge is made from fabric scraps and ric rack.  It has a pin on the back that I can easily attach to his shirt.  My kids love their badges because its makes them feel extra special on their extra special day.


Happy Birthday Little Buddy!


Monday, September 26, 2011

$2 DIY Cake Stand

I've been loving all the cake stands I've been seeing on the internet lately.  And I've been drooling over painted glass.  So darling. 

The only thing better than cake is cake on a fun stand. 


I call this the $2 cake stand because the main supplies cost exactly $2.  The plate and the martini glass came from the Dollar Store.  All the other supplies I had on hand.  If you carft ever you will probably have these supplies.


Step 1:  Clean glass using glass cleaner and remove any stickers.


Step 2:  Lay plate face down on table.  Place fabric on top and trace around the edge to determine size of fabric.  I did it this way because the plate had a lip and I wanted to make sure I had the exact size of fabric.

Step 3:  Coat entire bottom of plate in Mod Podge.  The more the merrier.  If there is a spot you missed with the Mod Podge it will show up so coat that sucker good!

Step 4:  Lay fabric (right side down) on plate and smooth out any bubbles.

Step 5:  Coat the entire bottom of plate again with Mod Podge to seal the fabric.  Let dry.  It may looks splochy for a little while but once the glue dries completly it will all look great.


Step 6:  Trim any excess fabric with scissors.


Step 7:  Pour paint into martini glass and coat the inside generously.  Let dry.  {You can leave it like this or you can cover the paint with Mod Podge too to give it an extral seal}

Step 8:  Turn martini glass over and put your strong glue on the bottom.  Place plate on top and let dry.  *** This step is optional.  You don't need to glue it for it to stay in place.  I chose not to glue mine together to make it easier to store.


The top of the platter is completly food safe since you only added stuff to the bottom.  Wipe top to clean.  Do not soak.


Simple as that.  Can you imagine all the posibilites?

Now, who's ready for a doughnut????

Saturday, September 24, 2011

Little Abner Winner

I've randomly selected a winner (via random.org) for the Little Abner Giveaway!

Thanks to all who visited and entered.

A big huge thank you as well to Little Abner for supplying the prize!
Be sure to visit Little Abner whenever you need gorgeous cards. 
{Christmas is coming up.  I'm just sayin'.}


drum roll please....

The winner is

Kim-the-Girl

{who said} "My Favorite is the brilliant green clover cluster..."


Congratulations Kim you've won a $20 shop credit from Little Abner!  I'll be contacting you shortly with instructions for claiming your prize.


Thursday, September 22, 2011

Grilling Apron

As I mentioned before we went to Reno for a week.  While I was there I was able to deliver Christmas presents.  If you're thinking I'm amazing for getting my Christmas presents all sent out early this year you are wrong.  These are Christmas presents from LAST YEAR.  I have no idea what is wrong with me.  Nine months late.  I am ashamed.  I vow to do better this year.

Here is my dad's present.  A new grilling apron with his nickname on it "Meat Man".  I've never called him this {I guess his friends do} but I can attest to the fact that my dad is in love with the grill.  He always has to be the grill master even when it's not his party.  I know that whenever I'm talking to him on the phone and I'm at the grill he is just dying to reach right through the phone and take over.

Using my Sure Cuts A Lot program along with my Cricut I was able to fashion a freezer paper stencil with the words "Meat Man" as well as a superman symbol with a t-bone steak in the middle.  I also made the apron.

I hope he likes it because we sure do like him.  He's pretty much the best.


I mean for goodness sakes he even got the grouchy, 3 year old anti-picture taker to look into the camera and smile.  Now, it takes a special person to make that happen!


Wednesday, September 21, 2011

Homemade Rock Candy

When I was a little girl one of my favorite things was to visit fun little family attractions and their gift shops.  Every good gift shop is filled with kitsch.  There are always a endless supply of junk with your name on it (if you're lucky enough to have a popular name) and there is always ALWAYS and generous amount of rock candy.  Beautiful, colorful, delicious rock candy.

You can imagine my excitement when I discovered that you can make your own!  Pinterest has opened my eyes to so much! I found THIS pin and used it as my guide.


Want to make your own?  Here's how -

Supplies:
  • 2 C water
  • 6 C sugar (give or take)
  • Food coloring (or Kool Aid packets)
  • Wooden sticks (I used BBQ skewers and sanded down the pointy end but you can purchase actual candy sticks HERE)
  • Tall glasses
  • Plastic wrap
  • Clothes pins


Directions:

  1. In pot bring water to a boil adding sugar 1/2 c at a time until it no longer disolves in the water.
  2. Pour syrup into glass and add food coloring.  If I were to do this again I will use a Kool Aid packet as dye because it will also add a fun flavor.
  3. Cover with plastic wrap (this part is probably optional but since I live in the south I didn't need anymore bugs comming around than usual so I covered it up).
  4. Push wooden sick through the plastic wrap and clip each stick with a clothes pin to help hold stick upright.
  5. Wait a few days and watch the crystals form.  Should take about a week.  Don't be alarmed if you don't see crystals right away we didn't have any until after day 2.
Maggie and I enjoyed making these, looked forward to observing its progress everyday and LOVED eating them.  A great activity to do with your kids!


Sunday, September 18, 2011

Little Abner GIVEAWAY! $20 value!

THIS GIVEAWAY IS NOW CLOSED


Today is your lucky day because today Little Abner is giving away a $20 gift card to one lucky Creative Vault reader!

Little Abner is a darling little stationary shop featuring gorgeous prints by artist, Elizabeth Moon.  Her shop is filled with stunning high quality shots of seemingly ordinary items that are made extraordinary by the vision and talent of Elizabeth. 

Just look at some of these beautiful cards!


Each card is paired with a colorful envelope and the whole thing is packaged in a clear envelope sealed with washi tape.  This girl thinks of everything!  This stationary would make an excellent gift.


Gorgeous.  Simply gorgeous.

I want to frame them all.


One lucky Creative Vault reader will win a $20 shop credit to Little Abner.


Here's How to Enter:

Visit Little Abner's Shop and take a look around.

Then come back here and leave a comment telling me which card(s) you love the most.

Be sure to leave your email address so I can let you know you've won.

The giveaway closes Friday at 10pm central.  Winner will be randomly drawn and announced Saturday.


Once you're done visiting Little Abner, be sure to also check out Elizabeth's blog, The Moonlit Nest.  Elizabeth not only takes beautiful pictures but everything she touches somehow just exudes simple beauty.  I drool over her classic ethereal style not to mention the fantastic places you get to visit with her and her family as they discover all there is to do in Virginia and the DC area.  She's also a fashionista with excellent taste and will keep up up to date with all the latest trends.   Here are just a few of my favorite posts of hers.

Strawberry Themed Birthday Party
Zig Zag Table Redo
Grown Up Girl Pajama Party

Good Luck! I hope you win!


{If you are interested in sponsoring a giveaway on The Creative Vault please contact me at thecreativevaut(at)hotmail(dot)com for more information}
Related Posts Plugin for WordPress, Blogger...