Showing posts with label Baby. Show all posts

Tuesday, September 25, 2012

The Marguerite Ribbon Tied Dress {Tutorial}

I've been kind of MIA lately haven't I?  How 'bout I make it up to you with a new dress tutorial?? 


Am I forgiven?


I wish the picture quality was better but all I had to work with was my iPod.  So please push past the overexposed parts to see the cuteness which is this dress.  And the fabric... that's my favorite part!  So pretty!
 

 The dress has ribbon straps that are fed through button holes in the back and then tied into a pretty bow. 
 
 
I originally posted this tutorial over at The Ribbon Retreat.
The fabric is from the new Marguerite line by Cynthia Walker for Riley Blake.  It's so feminine and gorgeous.


A simple dress with a lot of sweetness and it's easy to make too!


Let's get started.  Here's what you'll need:


Supplies:
 
For size 5-6T I used...
 
-  1 1/2 yards Marguerite Red Main
-  1/2 yard white muslin
-  1/4 yard Marguerite Blue Dot
-  Bodice pattern {see below}


Step 1:  Create pattern pieces.


Trace a shirt onto paper as you see above {I guess I can't list digital drawing as one of my special skills.  I hope you can still get the gist of it. You'll of course make your lines much more straight than you see here}.  You will want to add at least 1/4 inch seam allowance.  This is your front piece.


For the back piece you will cut out a replica of the front except for this piece you will mark approx. 1 1/2 inches in on each side {This measurement may vary depending on the size of the dress.  Just go with what looks right}.  From that mark you will then draw a curved line to the top of the armpit.


You'll now have two pattern pieces.  A front bodice piece and a back bodice piece.


Step 2:  Cut out your pieces.
 
You will need the following to complete your dress.
 
- 1 front piece out of main fabric
- 1 front piece out of muslin
- 1 back piece out of main fabric
- 1 back piece out of muslin
- 1 rectangle for the skirt that is approx 2x's the size of your waist out of main fabric
- 1 rectangle the width of your main skirt by about 6 inches out of accent fabric
- 2, 1 yard pieces of ribbon


Step 3:  Sew together bodice.


Take the two front pieces and lay them right sides together.  Between the layers pin the ribbon on the inside approx 1/4 inch from the sides of the top.  Stitch where you see the blue line.

Now take the two back pieces and place them together, right sides facing, and stitch just the same as above.  *Note:  you will NOT place ribbon between the back pieces.


Trim the pieces.  Cut off excess ribbon.  Cut the corners off.  Cut slits at the curves to so the curves will lay flat.


Now, open the back and front piece and pin together, right sides facing, like in the photo above.  Sew up the sides.


Flip bodice out and iron flat.


Top stitch around the top of the bodice.


On the back piece, sew two button holes spaced evenly apart.

You are now done with the bodice.  It's easy peasy from here.  You're almost done!


Step 4:  Sew skirt.
 
 
Fold the accent fabric in half so that the long rectangle is about 3 inches wide.  Sew accent fabric to pain piece.  Sew up side seams until you get one large tube.  This is your skirt.


At the top of the skirt use a ruffle foot or setting on your machine to ruffle or gather the top of the skirt.


Step 5:  Attach the pieces.


Right sides together, pin your skirt top to the open bottom of the bodice.  Stitch together.


Top stitch the seam by the hem on the bottom of the skirt.


Step 6:  Trim up your ribbon.


Try the dress on and slip the ribbon over the shoulders and through the button holes.  Tie a bow and trim them to your desired length.  Use fray check to secure the fibers on the ends so it will not fray.


Step 7:  Enjoy watching your sweetie pie in her new beautiful dress!
 
 
If you make the dress be sure to stop by and show me a picture of your darling and her new dress!


P.S.  I thought I should mention that I didn't win the Ultimate Room Makeover.  Super bummer.  But I did want to say how much I appreciated all of your support and love.  I have the best readers and really appreciate you.  So even though I don't get an awesome room makeover I still feel blessed to have y'all, so thank you!
 
______________________
 

Sunday, September 9, 2012

One Seam Pajama Pants Tutorial

I have a really fun tutorial for you today but I just have one order of business before I begin.  Remember when I showed you my sad, sad living room?  Well voting is happening right now so if you can hop on over and vote for #69 (yours truly) I'd love you forever.  Just click on the star below #69 and that's it.  You can vote once a day.  Thanks for your votes in advance!


Today I show you how to make single seam cuffed pajama pants.  Y'all, these are so easy and you can make them in any size or style you want.  You will not find an easier pants tutorial.


Most pants you see will have an inseam and and outer seam that runs down the sides of the pants.  One seam pants have just an inner seam which means less work, more comfort.  This one seam technique is perfect for comfy pj's and lounge pants.

You can make these in any size, adult to kids, and once you have your pattern it takes less than 30 minutes to put it together.  Great for gifts for the upcoming holidays.  {Yikes!  Did I just say it was almost Christmas!?!}


I also wanted to highlight The Ribbon Retreats Licensed Fabric and how great it is for boys.  What little man doesn't imagine himself as Batman or Superman?  The fabric is awesome enough for boys to want to wear and it gives us an excuse to craft for the guys in our life because let's face it, crafting for them can be so hard!  There is also licensed fabric for girls too so be sure to check it out.

Let's get started!

Supplies:


- Main Fabric, Batman Blue Logo
- Coordinating Fabric, Batman Black Brick
Thread
-  Pants Pattern (see below)


Step 1:  Create your pattern.  

Lay a pair of pants onto craft paper.  I buy my paper at the dollar store but you can also use the back of wrapping paper.  


Trace your pants by adding half an inch to the sides.  Add about an inch and a half to the top and 1-2 inches to the hem.  You'll see that I made the waist and the hem line as straight as possible.

You can make adjustments according to how your starter pants fit your child.  I wanted my pants to be looser than the jeans I measured from so I added a little room.

For the cuff you will mark 1-2 inches above the original hem.


Now you have two pattern pieces - a pant leg and a cuff.


Step 2:  Cut out your pieces.  

Lay your pant pattern on the fold of your main fabric.  Cut 2.


For the cuff, fold your coordinating fabric horizontally and then once over vertically (see photo below).  Lay your pattern piece on top, lining it up where the folds are and cut 2. 


You should now have a total of 4 pieces.


Step 3:  Lay the pants right side together and stitch the sections indicated in the picture.

{Don't let the different fabric throw you off.  I just forgot to take a picture of this step in the Batman fabric.  Sorry.}

Step 4:  Keeping right sides together open the pants up and stitch the entire curve of the inseam.


If you don't want a cuff to your pants you're basically done.  After this step you would just need to add an elastic casing and hem the bottom.  If you're wanting a cuff, read on...

Step 5:  Prepare the cuff. 


Sew the short sides of the cuff together, right sides together. 


 Fold the cuff in half with the seam on the inside. 


Attach the cuff to the outside of the pant (while they are still inside out) and stitch.  When you attach the cuff this way the raw or serged edge will be on the outside of the pant.  When you roll up the cuff you won't see it at all.  I like it this way because it creates a smoother inside and is more comfortable but if you'd rather the edge be on the inside of the pant than you would just attach in the same way with the pants right side out. 

Step 6:  Create a casing for the elastic.

 Fold over the waistband and stitch, leaving about a one inch opening.  Pull your elastic through and stitch it together.  Sew the opening closed.


I find that the best way to sew the elastic together is to lay one piece on top of the other and stitch together.
 
 
Step 7:  {Optional} 

The cuff should stay nicely when you flip it up but if you wish you can tack it in place with a few hand stitches on the side.  I didn't do this to mine.


   See how easy they are to make?  You'll have a dozen done before you know it.
 
If you make these jams I'd love to see a picture!
 
 
{This tutorial was originally posted at The Ribbon Retreat be sure to stop by and check out their awesome blog and shop.}


Friday, July 13, 2012

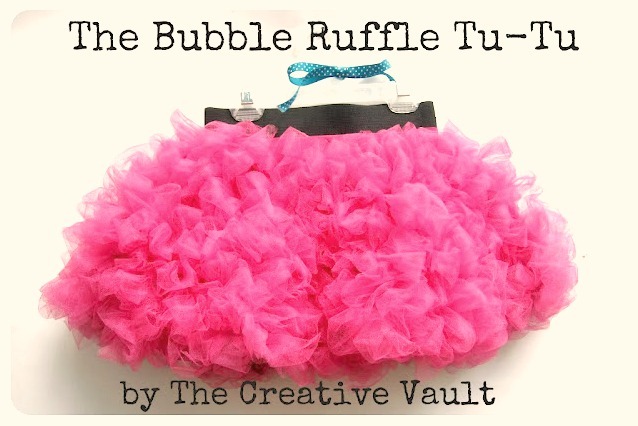
Bubble Ruffle Tu-Tu Tutorial

Last month I shared this tutorial over at UCreate.  It was so much fun being over there and it was so nice to hear all of the bubble ruffle tu-tu love.  When I created the bubble ruffle tu-tu I never expected it to get the reaction that it did!  I thought it was time I brought it home so here it is -


This is a little skirt that you can make to look very sophisticated or super fun.  It has everything a girl needs - fluffy, frilly, twirly, sassy, chic, you name it!  I can't help but think of how amazing bubble ruffles in white chiffon would look on the bottom of a wedding dress.  There are just so many possibilities.  The best part?  ANYONE CAN MAKE THIS SKIRT.

This skirt looks like it might be complicated and requires a lot of sewing skill but it doesn't.  Even a beginner can do this.  You technically don't even need to know how to sew a straight line.  And because the bubble ruffles are so fluffy it easily will hide any mistakes you might make.


You can complete this skirt in 4 basic steps.


I know, you're thinking, "That was technically only 3 steps."  But trust me, step #4 is the most important and most fun part.


Let's get started.  Here's what you'll need.


For the black skirt I cut up an older lady style nightgown to make the skirt.  The skirt base was made from a slip and the ruffles were made from a nylon chiffon.  Neither of which needed to be hemmed.  For the pink skirt I used quilters cotton and tulle.  If you use cotton like this you will need to hem your skirt to keep it from fraying.  Do your best to pick colors that match each other so it will all flow together.

For my 4 year old I used 1 yard of cotton and 4+ yards of tulle.  You of course would need to determine the amount you'd need for the size you create but you can use this as a guide.

You can purchase 2 inch wide black elastic HERE.


STEP 1
Make a modified circle skirt.


To create your circle skirt pattern, measure A & B.  To create the curve you can tie a string to a pencil and hold it the length that you need.  Simply move it up and down on your paper to create the nice curve.

If you look closely at the picture above you can see that the fabric is folded in half on the bottom and then folded over again and there is a fold on the left hand side.  When you fold it this way you will cut out one continuous circle.


Now that you have your nice circle you need to modify it a bit.  As a true circle skirt it is too bulky with the ruffles, but using this modification you cut down on the bulk while still keeping the twirl factor alive.

Cut a pie shape out of the skirt like the picture above shows. You don't need to get too technical about how much you cut out.  Like I said, this is a very forgiving skirt.  Sew up that now open seam.

If you are using a material that will fray, now is the time to secure those edges so they look nice and clean.  For mine I serged the edges then folded it under and top stitched, but you can use any number of hemming techniques you are familiar with.  If you're using a material that won't fray you don't need to hem the skirt.


STEP 2
Sew Bubble Ruffles All Over Skirt


First things first - cut your tulle in 2-3 inch wide strips.  It's ok if its not perfect.


Take a strip of tulle, bunch it up a little and stitch onto your skirt.  Then about 2 inches later, bunch up your fabric again and stitch again.  Repeat this step in a random pattern until you've covered the entire skirt.


This is what it looks like after one strip of tulle has been sewn on.  As you can see you'll need a lot of tulle.


Although you'll be sewing in a random pattern there is no need to sew and stop, sew and stop. If you look at the back of my skirt you can see that I just made one continuous line.


A faster way to make the ruffles is to lay your tulle strip in a zig zag pattern and sew down the middle.  It works faster but you really have to make sure you fill in all the spaces next to it to get that full bubble look.

After you make a few bubble ruffles you'll get in the swing of things and the work will go much faster.

Leave about an inch or two at the waist free of ruffles so you can attach your elastic.


STEP 3
Attach Elastic


When you sew the elastic together and then stitch down the edges it creates a nice flat round of elastic and a finished look.  When you attach they elastic you'll need to make sure you stretch out the elastic to line up smoothly with the waistband as you sew to ensure it has the give it needs to fit over your little girls tum.


Step 4
Rock it!


The best part about creating is creating smiles!


I hope you create a bubble ruffle tu-tu for the girls in your life.  If you do be sure to stop by The Creative Vault and show me.  I'd love to see it!

Thank you Kari for noticing my little tu-tu and inviting me here today.  It is such an honor and a ton of fun!  

Thank you!  Thank you!  Thank you!

Related Posts Plugin for WordPress, Blogger...