Showing posts with label Scrap Fabric. Show all posts

Saturday, October 19, 2013

Jake & Izzy Neverland Pirates Costumes {DIY No Sew Scalloped Tee Tutorial}

Remember back in the day when Halloween consisted of just one night when you went around your neighborhood and trick or treated your heart out?  Now, Halloween has turned into a month long extravaganza with parties, carnivals, parades, dances, events and a whole lot of candy.  I'm not really complaining since Halloween is one of my favorite holiday's but it does mean that I have to get an early start on the costumes.  Luckily the kids decided on what they wanted to be all the way back in May - Jake and Izzy from the Neverland Pirates.

And today I'm going to show you how I made the Izzy scalloped tee.  I know it seems weird for me to be on top of things and actually put out a holiday tutorial in an appropriate time frame in relation to the holiday but this year I shocked even myself and got 'er done!  Don't be fooled into thinking I have my act completely together though.  Just yesterday I found an uncashed check for my 25th birthday {I'm *ahem* 31.}  Also I went an entire day this summer running errands with my yoga pants on inside out.  There was even a little crotch panel and a tag on the back.  I died.  But I digress...  Let's get back to the costumes-


And just in case you don't know who Jake and Izzy are, it's these guys -


I'm sure you can guess by my lack of crafty posts lately that I have been not quite feelin' it in the creative department so I wanted to keep things as simple as possible and wanted to make these NO SEW!  Each costume consists of clothes they already have and a custom made-by-mom t-shirt. 
 
Each tee cost me $3.  The bandana was $1.99 and a $1 tube of puffy paint was all I needed.  The rest of the supplies (felt, fabric, buttons & ribbon) were from my stash. 


For Jackson's I mean Jake's tee I just hot glued pieces of felt onto the front.  I then glued on ribbon trim and buttons.  I chopped up the sleeves to give it that authentic tattered pirate look.  Or as Jackson would say, "Mom, I look like a pie-rick!"  If you're wondering about the face this is his "yargh!" face.


Maggie oops, Izzy, got the coveted pixie dust necklace.  I used hot glue to make a little pouch, filled it with a little fluff and tied it off with some ribbon.

But the great little scallops are what this tutorial is all about.


This scallop technique is a great no sew way to add a great detail to any costume.  I can see this working for a knight, or a fairy, a flower, you name it.

 
Are you ready for the world's easiest tutorial?
 
Step 1:  Cut off hem of shirt and turn it inside out.
 
Step 2:  Iron a strip of light weight iron on interfacing to the bottom of the shirt.  This will make sure the scallops on the cut t-shirt don't roll and keep their shape.


Step 3:  Draw scallops onto interfacing.  Tip - Start with a half scallop on the sides and work your way into the middle of the shirt so you have nice even scallops all the way around.

Step 4:  Cut.  I cut both layers at once so that the scallops were even on both sides.


Step 5:  Flip shirt right side out and add details with glitter puffy paint.  The glitter is important because for reasons unknown to man it makes girls feel pretty and fancy and it's just plain cute.


At this point I added my paint scallops to the arms, and neck as well.  After the 4 hours the bottle told me to let it all dry, I flipped it over and added the paint details to the backside of the shirt.

As far as tips for the bandana I would recommend putting it on your child and marking where the ear ends.  Do this for each side. 


Place your paint detail between those spots so that when you tie on the head band you don't get snagged up on paint and so none of the pattern gets lost in the tie.  It just makes for a cleaner look in my opinion.  Plus I didn't want to hear the freak out if the paint started to peel off from the friction of the tie because you know those kinds of things are the end of the world to a 5 year old.


And Booyah!  It was THAT easy! 
 

Costumes that require little time, little money and little skill and effort always get a big thumbs up from me!  Not to mention the joy they bring your kids.  Mine were so happy and grateful that not only did they hug me but they hugged each other.  It was a Halloween miracle.

 
So do tell, what are your munchkins going to be this year?? 
 
Feel free to link up any pics or posts you may have so we can all visit and give a great big collective "awe". 
 
Did I mention I just love Halloween? 
 
I love Halloween.

Wednesday, January 2, 2013

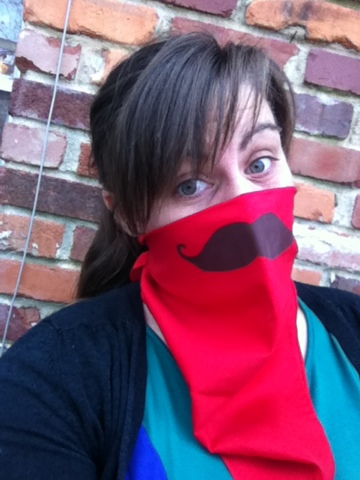
The Mustache Bandana

Happy New Year!

It's been a while. Hope you had an excellent holiday season. Despite being sick for a month we still managed good times. Santa didn't bring me a new computer (so I'm still blogging from my iPod) but I'm working on it. So many things to show you!

In the mean time, I thought I'd share the gift I made for my little brother. He rides a Harley so I thought a nice bandana would help keep the bugs out of his teeth when he rides. It's a bit of a gag gift but I figured every rider needs a nice full mustache.

To make your own simply fold a bandana in half (I bought mine at Hobby Lobby) and make a stencil of a mustache from freezer paper. Iron it on about an inch below the fold so that it sits right where your upper lip is. Paint inside the stencil and then peel off. Easy peasy!

It almost makes me want to take up bike riding. Too bad I'm a total chicken. I think I'll just stick to arts and crafts.


Tuesday, August 28, 2012

From Sack to Sweet - shirt refashion

Want to know why my kids are so smiley???


Because mommy just made them new shirts and they are so excited!


Just kidding.
They couldn't care less. 

I told them that if they smiled I'd take them out to lunch.
A mom's gotta' to what a mom's gotta' do.


Even though they are not excited about clothing refashions it doesn't mean mom isn't!

I got this fabric gift bag from a friend a while ago.  It was what inspired me to make reusable gift bags like the one I did HERE.  I always loved the fabric and it was too hard for me to give it away.  So.... I did the only thing I know how, and I refashioned it into a cute new top for the Magster.


See?  Not interested in taking pictures at all. 
Why would she be, when there are bugs to look at?


"Ugh.  Mom!  Enough already!"

Anyone else have a 4 year old teenager?


How it was done:

The insides had French seams so I left those alone.  I cut off the bottom of the bag to give it a straight edge.  This gave me a nice little tube of fabric.


 I then cut a curve for the sleeves.  I was just guessing at this point and I made the sleeve scoop a little too severe.  I ended up cutting off about an inch from the top.  Using a shirt or tank top to guide you may help make sure proportions are right the first time around.

I then folded down the top of the shirt and sewed a casing for the ribbon to go. 


For the bottom, I attached a red ruffle from some scraps in my bin.

This was a great repurposing project for me but you certainly could do this with just regular fabric and ribbon.  It's just a shorter version of a pillowcase dress with a ruffle on the bottom.

Go check out your stash and repurpose something today!  It's a lot of fun!


Monday, July 9, 2012

DIY Play Parachute

It's another week of voting over at So You Think You're Crafty.  The theme this week is Summer Bounty.  Feel free to head on over and vote for your favorite!

In the mean time - here's my project from last week.

A  PARACHUTE!!!!!

Do you remember how awesome these things are?


It's pretty common knowledge that the two best days in Elementary School were:

1.  Pizza Friday's.
2.  When the teacher pulled out the parachute.


So let's time warp back to the good ol' days with a little basic math...


That's right... 1+1= 1 super fun new 7 foot wide parachute to play with anytime we want!  No more waiting for Presidential Physical Fitness Day to parachute to our hearts content!


The kids think it's mom's best repurposed project ever. 


And THAT is how fun is born.


Monday, July 2, 2012

Quilted Stationary


Today starts a new week of voting at So You Think You're Crafty.  The theme this week is rpurposed crafts.  So head on over and vote for yours truly {or whichever you like best}.  I can't tell which is mine just know that it's awesome.  Haha! 

Last weeks theme for the competition was scraps so I dug into my scrap hoard and came up with some

Quilted Stationary!

I really love to sew on paper and fabric gives a quality and texture that even the cutest scrapbook paper paper can't.  Before sewing, I secured the fabric to the paper with a gule stick so really this can be a no sew project as well.


Quilt Block Card:  This was an extra quilt block that never got used so I stitched it to a square card.  For the envelope I attached some of the leftover fabric from the block to the inside.  It's complimentary to the card and adds a nice little surprise.


Nautical/Americana:  For these I dug into my fabric, notions and paper scrap bins as well as the recycle.  The anchor card design is made from a fabric background with a fabric anchor appliqued with gold thread.  The flag card is a combination of fabric, red ribbon, white trim and a paper star.  The "freedom" card uses a combination of fabric, trim, paper and even uses the red plastic cover that they use to cover the tray of Cuties oranges at the grocery store.


Bright & Bold Birthday: For the balloon cards I used some black and white gingham fabric and attached it to bright cards by playing around with the different fun and decorative stitches on my machine with hot pink thread.  I then cut out a stencil in vinyl and painted a neon balloon on each one.  For the bunting cards I made teeny tiny flags and attached the tops using a straight stitch and added a birthday greeting.


So there you have it.  A fun and useful way to use up those scraps you've been hoarding!

Monday, June 11, 2012

Car Play Mat & Storage Bag

I said I needed to show you more boy stuff so here's a fun one!

I wanted to show you something that had it all - Sewing, scraps, BOYS {and Girls!}, play, Imagination, DETAILS,  repurposed, STORAGE, cute fabric, Bright Colors... you get the point.  I hope I didn't disappoint!

Introducing.... The Car Play Mat & Storage Bag!


Each piece was drawn and cut by hand and appliqued onto the mat.  With a park, zoo, speedway, beach, neighborhood and church there is a whole town full of imaginative adventure waiting to happen.  Each piece of fabric was chosen to look authentic, waves for the ocean, brick for the zoo wall, florals for the bushes and trees, cobblestones and sand, even the stained glass windows on the church, etc.  Let's just say, I have a lot of random scraps around the house!


The kids love to play with the mat but the fact that the mat is easily cinched into a bag to store all those little cars is what gets momma REALLY excited!  We can easily carry the bag with us to appointments and activities to keep us entertained during those long waits.  And when we are done, one tug of the cord and "bloop!" all cleaned up.


I think everyone needs a Car Play Mat & Storage Bag.  I hope you agree!

Tuesday, May 29, 2012

Harry Potter Doll

I have lots and lots of projects and tutorials to show you but life got a little crazy (but fun) around here. So in the meantime how about I show you one of my favorite projects about one of my favorite things??

Harry Potter!!

Now as I explain the rest it's important for you to hum the theme song in your mind. You know, for effect. (dum duh da dum da dah dum...)

For Christmas I designed this doll for my niece Macy. Her mommy is a super fan of Potter. I slacked for 6 months on sending it so little Macy came to Alabama all the way from Canada to claim it this weekend. (Okay so it wasn't the only reason, but it was a bonus) Macy loved it but I think her mommy loved it a little more. :)

How I Did It:

I hand drew the pieces. Besides the glasses and the hair it's basically a bunch of rectangles pieced together. All parts of the doll are made with fabric and pieces were appliquéd together and machine stitched for security. For his scar I used a red permanent marker. I stuffed the whole thing with fluff and whip stitched his side together.

Try it out! It's a fun little doll to make. Plus, everyone needs a little more Potter in their lives right!?!

Thursday, April 12, 2012

The Bubble Ruffle Tu-Tu

UPDATE - The tutorial is here!  You can get the tutorial HERE.


A few weeks ago I auditioned to be a contestant on Project Run and Play, a competition blog for children's designs. Sadly, I did not make the cut but there were many kind people who offered me their shock, kind words and condolences. It was seriously so nice. I know many of those kind people are now followers of The Creative Vault and I just want to say thank you for making me feel special.

Those same kind people also encouraged me to participate in Project Run & Play's Sew Along. The sew along is the same challenge for the week as the designers but it's a separate sew at home competition. There's a prize for each weeks winner but mostly it's just fun to rise to a challenge.

This weeks challenge was to take Made's Circle Skirt Tutorial and mix it up and make it your own.

I can't promise I'll do every weeks sew along but I did play along this week and this is what I came up with.


The Bubble Ruffle Tu-Tu for my baby ballerina!


Okay, I'm embarrassed to tell you {but I will anyway} that this is repurposed from and older lady style {ahem} "nightgown".  It just had so much beautiful {free}chiffon that I just couldn't pass up.

To make the bubble ruffles, I just kind of bunched up the fabric and sewed it on randomly until it achieved the look I was going for.

I love when my random experiments work out.  Maggie loves her new "bow-wa-weena dwess" so win or lose in the competition I'd say that makes it a WIN right there.

Here's one more look -


I'd love it if you'd join the fun and Sew Along with me next week too.  Everything's more fun with a friend!


P.S.  You can go HERE to see the other skirts in the Sew Along competition.  It's so fun to see how different everyone's interpretations are.  Lot's of great talent!
Related Posts Plugin for WordPress, Blogger...