Showing posts with label Boy. Show all posts

Saturday, October 19, 2013

Jake & Izzy Neverland Pirates Costumes {DIY No Sew Scalloped Tee Tutorial}

Remember back in the day when Halloween consisted of just one night when you went around your neighborhood and trick or treated your heart out?  Now, Halloween has turned into a month long extravaganza with parties, carnivals, parades, dances, events and a whole lot of candy.  I'm not really complaining since Halloween is one of my favorite holiday's but it does mean that I have to get an early start on the costumes.  Luckily the kids decided on what they wanted to be all the way back in May - Jake and Izzy from the Neverland Pirates.

And today I'm going to show you how I made the Izzy scalloped tee.  I know it seems weird for me to be on top of things and actually put out a holiday tutorial in an appropriate time frame in relation to the holiday but this year I shocked even myself and got 'er done!  Don't be fooled into thinking I have my act completely together though.  Just yesterday I found an uncashed check for my 25th birthday {I'm *ahem* 31.}  Also I went an entire day this summer running errands with my yoga pants on inside out.  There was even a little crotch panel and a tag on the back.  I died.  But I digress...  Let's get back to the costumes-


And just in case you don't know who Jake and Izzy are, it's these guys -


I'm sure you can guess by my lack of crafty posts lately that I have been not quite feelin' it in the creative department so I wanted to keep things as simple as possible and wanted to make these NO SEW!  Each costume consists of clothes they already have and a custom made-by-mom t-shirt. 
 
Each tee cost me $3.  The bandana was $1.99 and a $1 tube of puffy paint was all I needed.  The rest of the supplies (felt, fabric, buttons & ribbon) were from my stash. 


For Jackson's I mean Jake's tee I just hot glued pieces of felt onto the front.  I then glued on ribbon trim and buttons.  I chopped up the sleeves to give it that authentic tattered pirate look.  Or as Jackson would say, "Mom, I look like a pie-rick!"  If you're wondering about the face this is his "yargh!" face.


Maggie oops, Izzy, got the coveted pixie dust necklace.  I used hot glue to make a little pouch, filled it with a little fluff and tied it off with some ribbon.

But the great little scallops are what this tutorial is all about.


This scallop technique is a great no sew way to add a great detail to any costume.  I can see this working for a knight, or a fairy, a flower, you name it.

 
Are you ready for the world's easiest tutorial?
 
Step 1:  Cut off hem of shirt and turn it inside out.
 
Step 2:  Iron a strip of light weight iron on interfacing to the bottom of the shirt.  This will make sure the scallops on the cut t-shirt don't roll and keep their shape.


Step 3:  Draw scallops onto interfacing.  Tip - Start with a half scallop on the sides and work your way into the middle of the shirt so you have nice even scallops all the way around.

Step 4:  Cut.  I cut both layers at once so that the scallops were even on both sides.


Step 5:  Flip shirt right side out and add details with glitter puffy paint.  The glitter is important because for reasons unknown to man it makes girls feel pretty and fancy and it's just plain cute.


At this point I added my paint scallops to the arms, and neck as well.  After the 4 hours the bottle told me to let it all dry, I flipped it over and added the paint details to the backside of the shirt.

As far as tips for the bandana I would recommend putting it on your child and marking where the ear ends.  Do this for each side. 


Place your paint detail between those spots so that when you tie on the head band you don't get snagged up on paint and so none of the pattern gets lost in the tie.  It just makes for a cleaner look in my opinion.  Plus I didn't want to hear the freak out if the paint started to peel off from the friction of the tie because you know those kinds of things are the end of the world to a 5 year old.


And Booyah!  It was THAT easy! 
 

Costumes that require little time, little money and little skill and effort always get a big thumbs up from me!  Not to mention the joy they bring your kids.  Mine were so happy and grateful that not only did they hug me but they hugged each other.  It was a Halloween miracle.

 
So do tell, what are your munchkins going to be this year?? 
 
Feel free to link up any pics or posts you may have so we can all visit and give a great big collective "awe". 
 
Did I mention I just love Halloween? 
 
I love Halloween.

Monday, June 24, 2013

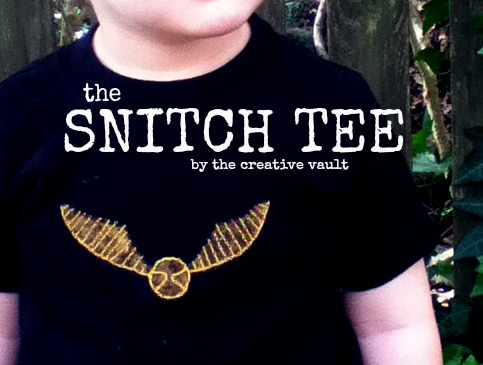
The Snitch Tee

What is the best book series in the whole entire world?  If you answered Harry Potter you are correct.  100 points to Gryffindor!

I'm always looking for new t-shirt ideas for Jackson and when I can throw a little Harry Potter in the mix it's just a great big golden bonus.  Speaking of golden, here is Jackson's golden snitch tee.


This is a hard shirt to photograph {mostly because it's always covered in dirt from a messy little boy who won't stand still}.  It's just a plain black tee, a painted snitch and hand embroidered detail and if you keep reading I'll tell you exactly how to make one of your own.


A few weeks ago the school age son of a friend of mine saw this shirt and begged his mom to go to the store to buy him one that very instant.  It was nice to know that the shirt was "cool" and that he recognized it as a snitch.

Jackson usually wears it with his mustard skinny cords.

 
Want to make your own??
 
ACCIO TUTORIAL!!!!!
 
Supplies:
  • t-shirt
  • interfacing
  • gold craft paint
  • gold embroidery thread
  • needle
  • iron
  • freezer paper stencil
Directions:
 
Step 1:  Cut out an image of a snitch onto freezer paper.  You can trace a snitch onto paper and cut it out or you can print it directly onto the freezer paper and cut it out from there.  This makes your stencil.  You don't need any detail with the stencil just the outlined image.
 
Step 2:  Iron on a small rectangle of interfacing to the inside of the shirt in the area that you want the design.  This acts as a stabilizer for your embroidery.  Without it your image will come out wonky and will not hold shape over time {for reference the shirt you see in the picture has been washed dozens of times and still holds it's shape}.
 
Step 3:  Iron the freezer paper stencil onto the front of the shirt and use the gold paint to paint inside the stencil.  * You'll probably want to put a piece of card board inside the shirt before you paint to keep the paint from bleeding through to the back.
 
Step 4:  After the snitch is dry, add detail using embroidery thread.  There are many ways you can do this.  I didn't do anything technical, I just free hand stitched.  I really don't know anything about hand embroidery but according to this pin the technique I used looks similar to the "threaded running stitch".
 
And that's it!  The whole project took me about an hour to create while I watched Downton Abby for the millionth time.  You really can do so many things with this painting and embroidery technique you're only limited to your imagination.


This shirt and this boy are just so cool that the crazy Mamarazzi just can't stop taking pictures of them!


Alright, I'm off to go dig up my old Harry Potter books and read them all again! 
 
Are you as obsessed as I am? 

Thursday, January 17, 2013

Frosty Potter - The Snowman Who Lived

Y'all.

Things went crazy today in Alabama. It snowed! It's snowed here a couple of times before {less than once a year} but you Northerners would probably call it frost or a dusting of snow.

No, today was serious snow. When it snows down here everything shuts down completely. No one dares to drive because there are so many hills and no one knows what to do. So Southerners do what we always do when "severe weather" strikes - stock up on bread and milk and hole up in our homes until it goes away and gets warm again.

But I was brave and I tried to find winter clothes for us {I ended up in canvas shoes with no socks} and Maggie and I got creative and built the world's greatest snowman.

So without further ado, I'd like to offer you greetings from Alabama, The Cutts Family and Frosty Potter - The Snowman Who Lived!!


Wednesday, January 2, 2013

The Mustache Bandana

Happy New Year!

It's been a while. Hope you had an excellent holiday season. Despite being sick for a month we still managed good times. Santa didn't bring me a new computer (so I'm still blogging from my iPod) but I'm working on it. So many things to show you!

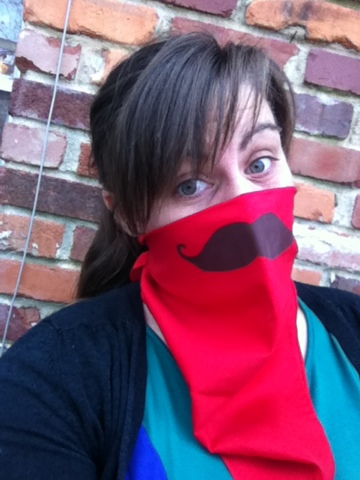
In the mean time, I thought I'd share the gift I made for my little brother. He rides a Harley so I thought a nice bandana would help keep the bugs out of his teeth when he rides. It's a bit of a gag gift but I figured every rider needs a nice full mustache.

To make your own simply fold a bandana in half (I bought mine at Hobby Lobby) and make a stencil of a mustache from freezer paper. Iron it on about an inch below the fold so that it sits right where your upper lip is. Paint inside the stencil and then peel off. Easy peasy!

It almost makes me want to take up bike riding. Too bad I'm a total chicken. I think I'll just stick to arts and crafts.


Sunday, September 9, 2012

One Seam Pajama Pants Tutorial

I have a really fun tutorial for you today but I just have one order of business before I begin.  Remember when I showed you my sad, sad living room?  Well voting is happening right now so if you can hop on over and vote for #69 (yours truly) I'd love you forever.  Just click on the star below #69 and that's it.  You can vote once a day.  Thanks for your votes in advance!


Today I show you how to make single seam cuffed pajama pants.  Y'all, these are so easy and you can make them in any size or style you want.  You will not find an easier pants tutorial.


Most pants you see will have an inseam and and outer seam that runs down the sides of the pants.  One seam pants have just an inner seam which means less work, more comfort.  This one seam technique is perfect for comfy pj's and lounge pants.

You can make these in any size, adult to kids, and once you have your pattern it takes less than 30 minutes to put it together.  Great for gifts for the upcoming holidays.  {Yikes!  Did I just say it was almost Christmas!?!}


I also wanted to highlight The Ribbon Retreats Licensed Fabric and how great it is for boys.  What little man doesn't imagine himself as Batman or Superman?  The fabric is awesome enough for boys to want to wear and it gives us an excuse to craft for the guys in our life because let's face it, crafting for them can be so hard!  There is also licensed fabric for girls too so be sure to check it out.

Let's get started!

Supplies:


- Main Fabric, Batman Blue Logo
- Coordinating Fabric, Batman Black Brick
Thread
-  Pants Pattern (see below)


Step 1:  Create your pattern.  

Lay a pair of pants onto craft paper.  I buy my paper at the dollar store but you can also use the back of wrapping paper.  


Trace your pants by adding half an inch to the sides.  Add about an inch and a half to the top and 1-2 inches to the hem.  You'll see that I made the waist and the hem line as straight as possible.

You can make adjustments according to how your starter pants fit your child.  I wanted my pants to be looser than the jeans I measured from so I added a little room.

For the cuff you will mark 1-2 inches above the original hem.


Now you have two pattern pieces - a pant leg and a cuff.


Step 2:  Cut out your pieces.  

Lay your pant pattern on the fold of your main fabric.  Cut 2.


For the cuff, fold your coordinating fabric horizontally and then once over vertically (see photo below).  Lay your pattern piece on top, lining it up where the folds are and cut 2. 


You should now have a total of 4 pieces.


Step 3:  Lay the pants right side together and stitch the sections indicated in the picture.

{Don't let the different fabric throw you off.  I just forgot to take a picture of this step in the Batman fabric.  Sorry.}

Step 4:  Keeping right sides together open the pants up and stitch the entire curve of the inseam.


If you don't want a cuff to your pants you're basically done.  After this step you would just need to add an elastic casing and hem the bottom.  If you're wanting a cuff, read on...

Step 5:  Prepare the cuff. 


Sew the short sides of the cuff together, right sides together. 


 Fold the cuff in half with the seam on the inside. 


Attach the cuff to the outside of the pant (while they are still inside out) and stitch.  When you attach the cuff this way the raw or serged edge will be on the outside of the pant.  When you roll up the cuff you won't see it at all.  I like it this way because it creates a smoother inside and is more comfortable but if you'd rather the edge be on the inside of the pant than you would just attach in the same way with the pants right side out. 

Step 6:  Create a casing for the elastic.

 Fold over the waistband and stitch, leaving about a one inch opening.  Pull your elastic through and stitch it together.  Sew the opening closed.


I find that the best way to sew the elastic together is to lay one piece on top of the other and stitch together.
 
 
Step 7:  {Optional} 

The cuff should stay nicely when you flip it up but if you wish you can tack it in place with a few hand stitches on the side.  I didn't do this to mine.


   See how easy they are to make?  You'll have a dozen done before you know it.
 
If you make these jams I'd love to see a picture!
 
 
{This tutorial was originally posted at The Ribbon Retreat be sure to stop by and check out their awesome blog and shop.}


Wednesday, June 20, 2012

The School Tee

Here's another fun t-shirt idea for kids {or even grown up kids too!} The School Tee.


I've seen this idea floating around the internet for a while so this Christmas I made one for Mags.  It was REALLY easy.

I painted blue stripes every inch or so across the whole shirt.  I left it streaky because that was always the lined paper I liked but if you want yours more solid a paint pen would work really nicely.  I then added a more solid red line down the side.  For the holes I just colored them in with a permanent marker.


Now I don't know about you but I wasn't always the most studious or focused.  My former school mates can testify.  So instead of notes on my papers they were most definitely filled with scribbles.  This tee needed scribbles.  Using a fine tipped permanent marker I drew a few little scribbles to make this tee a little more personalized.

Sadly, Miss Mags got to wear her special tee in public only once, on New Years Eve.  After a nice family outing to a UAB basketball game she cut the palm of her hand.  8 hours and 3 stitches later, we rang in the New Year in the ER.  Yay.  Let's just say, the shirt got a little ruined in all the excitement.  Guess that just means I have an excuse to make another one!


To view details on other tees from The Creative Vault click on the picture


Visit thecsiproject.com
Related Posts Plugin for WordPress, Blogger...