Showing posts with label Girl. Show all posts

Saturday, October 19, 2013

Jake & Izzy Neverland Pirates Costumes {DIY No Sew Scalloped Tee Tutorial}

Remember back in the day when Halloween consisted of just one night when you went around your neighborhood and trick or treated your heart out?  Now, Halloween has turned into a month long extravaganza with parties, carnivals, parades, dances, events and a whole lot of candy.  I'm not really complaining since Halloween is one of my favorite holiday's but it does mean that I have to get an early start on the costumes.  Luckily the kids decided on what they wanted to be all the way back in May - Jake and Izzy from the Neverland Pirates.

And today I'm going to show you how I made the Izzy scalloped tee.  I know it seems weird for me to be on top of things and actually put out a holiday tutorial in an appropriate time frame in relation to the holiday but this year I shocked even myself and got 'er done!  Don't be fooled into thinking I have my act completely together though.  Just yesterday I found an uncashed check for my 25th birthday {I'm *ahem* 31.}  Also I went an entire day this summer running errands with my yoga pants on inside out.  There was even a little crotch panel and a tag on the back.  I died.  But I digress...  Let's get back to the costumes-


And just in case you don't know who Jake and Izzy are, it's these guys -


I'm sure you can guess by my lack of crafty posts lately that I have been not quite feelin' it in the creative department so I wanted to keep things as simple as possible and wanted to make these NO SEW!  Each costume consists of clothes they already have and a custom made-by-mom t-shirt. 
 
Each tee cost me $3.  The bandana was $1.99 and a $1 tube of puffy paint was all I needed.  The rest of the supplies (felt, fabric, buttons & ribbon) were from my stash. 


For Jackson's I mean Jake's tee I just hot glued pieces of felt onto the front.  I then glued on ribbon trim and buttons.  I chopped up the sleeves to give it that authentic tattered pirate look.  Or as Jackson would say, "Mom, I look like a pie-rick!"  If you're wondering about the face this is his "yargh!" face.


Maggie oops, Izzy, got the coveted pixie dust necklace.  I used hot glue to make a little pouch, filled it with a little fluff and tied it off with some ribbon.

But the great little scallops are what this tutorial is all about.


This scallop technique is a great no sew way to add a great detail to any costume.  I can see this working for a knight, or a fairy, a flower, you name it.

 
Are you ready for the world's easiest tutorial?
 
Step 1:  Cut off hem of shirt and turn it inside out.
 
Step 2:  Iron a strip of light weight iron on interfacing to the bottom of the shirt.  This will make sure the scallops on the cut t-shirt don't roll and keep their shape.


Step 3:  Draw scallops onto interfacing.  Tip - Start with a half scallop on the sides and work your way into the middle of the shirt so you have nice even scallops all the way around.

Step 4:  Cut.  I cut both layers at once so that the scallops were even on both sides.


Step 5:  Flip shirt right side out and add details with glitter puffy paint.  The glitter is important because for reasons unknown to man it makes girls feel pretty and fancy and it's just plain cute.


At this point I added my paint scallops to the arms, and neck as well.  After the 4 hours the bottle told me to let it all dry, I flipped it over and added the paint details to the backside of the shirt.

As far as tips for the bandana I would recommend putting it on your child and marking where the ear ends.  Do this for each side. 


Place your paint detail between those spots so that when you tie on the head band you don't get snagged up on paint and so none of the pattern gets lost in the tie.  It just makes for a cleaner look in my opinion.  Plus I didn't want to hear the freak out if the paint started to peel off from the friction of the tie because you know those kinds of things are the end of the world to a 5 year old.


And Booyah!  It was THAT easy! 
 

Costumes that require little time, little money and little skill and effort always get a big thumbs up from me!  Not to mention the joy they bring your kids.  Mine were so happy and grateful that not only did they hug me but they hugged each other.  It was a Halloween miracle.

 
So do tell, what are your munchkins going to be this year?? 
 
Feel free to link up any pics or posts you may have so we can all visit and give a great big collective "awe". 
 
Did I mention I just love Halloween? 
 
I love Halloween.

Monday, June 24, 2013

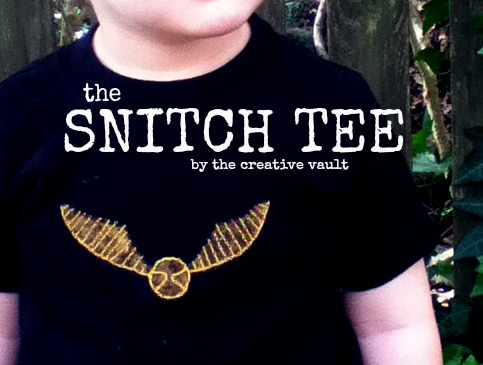
The Snitch Tee

What is the best book series in the whole entire world?  If you answered Harry Potter you are correct.  100 points to Gryffindor!

I'm always looking for new t-shirt ideas for Jackson and when I can throw a little Harry Potter in the mix it's just a great big golden bonus.  Speaking of golden, here is Jackson's golden snitch tee.


This is a hard shirt to photograph {mostly because it's always covered in dirt from a messy little boy who won't stand still}.  It's just a plain black tee, a painted snitch and hand embroidered detail and if you keep reading I'll tell you exactly how to make one of your own.


A few weeks ago the school age son of a friend of mine saw this shirt and begged his mom to go to the store to buy him one that very instant.  It was nice to know that the shirt was "cool" and that he recognized it as a snitch.

Jackson usually wears it with his mustard skinny cords.

 
Want to make your own??
 
ACCIO TUTORIAL!!!!!
 
Supplies:
  • t-shirt
  • interfacing
  • gold craft paint
  • gold embroidery thread
  • needle
  • iron
  • freezer paper stencil
Directions:
 
Step 1:  Cut out an image of a snitch onto freezer paper.  You can trace a snitch onto paper and cut it out or you can print it directly onto the freezer paper and cut it out from there.  This makes your stencil.  You don't need any detail with the stencil just the outlined image.
 
Step 2:  Iron on a small rectangle of interfacing to the inside of the shirt in the area that you want the design.  This acts as a stabilizer for your embroidery.  Without it your image will come out wonky and will not hold shape over time {for reference the shirt you see in the picture has been washed dozens of times and still holds it's shape}.
 
Step 3:  Iron the freezer paper stencil onto the front of the shirt and use the gold paint to paint inside the stencil.  * You'll probably want to put a piece of card board inside the shirt before you paint to keep the paint from bleeding through to the back.
 
Step 4:  After the snitch is dry, add detail using embroidery thread.  There are many ways you can do this.  I didn't do anything technical, I just free hand stitched.  I really don't know anything about hand embroidery but according to this pin the technique I used looks similar to the "threaded running stitch".
 
And that's it!  The whole project took me about an hour to create while I watched Downton Abby for the millionth time.  You really can do so many things with this painting and embroidery technique you're only limited to your imagination.


This shirt and this boy are just so cool that the crazy Mamarazzi just can't stop taking pictures of them!


Alright, I'm off to go dig up my old Harry Potter books and read them all again! 
 
Are you as obsessed as I am? 

Saturday, May 18, 2013

Personalized Paper Doll Quiet Books

I was going through old posts on my family blog today and discovered this fun project I did for Maggie a few years ago.  It's a personalized paper doll quiet book.  This book was very easy to make and could be used not only for entertainment but would be a great way to help with speech therapy, or even learning how to match and dress oneself.


How I made my book:

1.  I used my Cricut cartridge, Paper Doll Dress Up to create all of the images, however you could always just cut out pieces by hand if you do not have a Cricut.

2.  I created the main doll by cutting out a doll and trying to make it look as much like Mags as possible, long brown hair, blue eyes etc.  I also used different outfits on the cartridge to make an undershirt and underpants.  {The fewer naked dolls we have around here the better.  Why are there always so many naked Barbies at my house??}  I also decorated the background page by cutting out grass and flowers.

3.  I then used patterned paper and cut out a few dresses.  You could also cut out shoes, socks, pants, shirts, hats, headbands, wands etc.  This cartridge basically has everything.

4.  I then used my personal laminator to laminate all the pieces.  I laminated the entire page of the main doll and each dress individually.

5.  Glued the main page into a cheapy file folder.

6.  On the back of each of the dresses is a piece of sticky tack.  This allows for the pieces to be placed on the doll and stay in place.


Super simple little book that can provide lots of entertainment for your little one!

If you're looking for more ideas for paper dolls be sure to check out my tutorial for


Saturday, March 9, 2013

Cinderella Cupcakes

Maggie turned 5.
 
It feels like it should be a crime to grow up so fast.  Am I the only mom that wants to freeze time?
 
Last year all she wanted was Shaun the Sheep cupcakes, but her speech delay has improved so much that this year she actually had several requests for her party.
 
1.  Cinderella themed
2.  A long list of boy and girl guests
3.  Cinderella cupcakes with glass "swippas"
 
All three wishes were granted.  

We ended up having a Cinderella Ball.  With actual dancing and turning our house into a ballroom kind of ball.  It was the real deal.  It was basically kid prom and it was amazing.  I have lots of photos to sort through but while I work on that, how about I show you her third wish?
 
 
Cinderella Cupcakes With Glass Slippers!
 

My dear friend Amy helped me make them.  She's pretty amazing when it comes to cupcakes and cute treats.  She can do anything.  Check out her blog, Indulge With Me when you have time because you will get lost over there for days.  These cupcakes were nothing for her, she tackles much more difficult tasks but they were exactly what Maggie wanted so in my mind these were her best work.


I created the slippers from melted almond bark and a candy shoe mold.  I purchased my mold at a local candy supply store for $1.99.  If you don't have one near you, you can find the same one on Amazon HERE and HERE.  If you've never used a candy mold before the process is simple.
 
First you melt your chocolate, melting candy chips or in this case almond bark.  There are several ways to melt them but I just took a few pieces and placed them in a Ziploc bag.  I then microwaved them in 15 second increments, squishing the bag between each increment, until the almond bark was good and melted.  I then cut off a tip of the baggie and squished the melted bark into the mold.  The chocolate settles nicely into the mold and to get a nice clean back I scrape the mold with the back of a butter knife to get any excess chocolate off.
 
The cupcakes themselves are just boxed white cake.  Amy has tricks to make boxed cake incredible on her blog but for these were were going super simple because the kids are only interested in the frosting anyways.  Amy stirred the heck out the the batter which gave it a really light nice texture.  Much better than how mine usually turn out.  The frosting was made with a combination of butter and cream cheese and the dye was 10 drops of neon blue.  Maggie approved the color as Cinderella's so we stopped there.
 
To frost, Amy used a large star tip and gave each one a nice swirl.  If you have never frosted a cupcake using a pastry bag before you are missing out because it is the simplest, fastes, cleanest and prettiest way to do it.  I got THIS set a long time ago and I use it all the time.
 
Once the frosting was on, we topped the big ones with some glittery sprinkles and a slipper and the mini cupcakes were decorated with sugar pearls.


 The cupcakes really were SO simple to make and made my little princess' dreams come true.
 
Happy Birthday Maggie!


Thursday, January 17, 2013

Frosty Potter - The Snowman Who Lived

Y'all.

Things went crazy today in Alabama. It snowed! It's snowed here a couple of times before {less than once a year} but you Northerners would probably call it frost or a dusting of snow.

No, today was serious snow. When it snows down here everything shuts down completely. No one dares to drive because there are so many hills and no one knows what to do. So Southerners do what we always do when "severe weather" strikes - stock up on bread and milk and hole up in our homes until it goes away and gets warm again.

But I was brave and I tried to find winter clothes for us {I ended up in canvas shoes with no socks} and Maggie and I got creative and built the world's greatest snowman.

So without further ado, I'd like to offer you greetings from Alabama, The Cutts Family and Frosty Potter - The Snowman Who Lived!!


Friday, October 12, 2012

The 7 Layer Ruffle Skirt

Fun fact you probably don't know about me - my computer and my camera are broken and have been for some time, so until I can save up for new ones I've been blogging from my iPod and my husbands laptop late at night when he's asleep and not using it for his Phd.

I have a million projects that I want to show you but it's been hard.  So thanks for sticking with me through these iPod days.  Y'all are the best.

So I'm going through the pictures that I have that didn't get lost on the broken computer and thought I'd show some projects that are old for me but ones that you haven't seen before so

Bah da da bah.....  The 7 Layer Skirt!


I kind of love these sassy colors and prints.  I wish it was easier to photograph - the ruffles don't want to lay flat.  The skirt is 2T and the only 2T kid living in this house is Jackson and he was not interested in posing for photos in it.  In fact, when I went to try it on him to test out the size he screamed and cried, "Nooooo!  Noooo!  I'm a boy!  I'm a boy!"  So yeah, sorry little buddy but that's just the price of being a craft bloggers son.  The skirt lasted on him a total of 10 seconds - he put up an excellent fight.  No model pictures but I'll tell you it just poofs out so cute on his little chubby booty. 


Details:  The skirt has an encased elastic waistband and the ruffles alternate between cotton and two layers of tulle under each patterned layer.  The edges of the ruffle are surged in black.
 
I'm not quite sure yet what I plan to do with the skirt as it is for a smaller girl than Mags {PS we started to shop in the "big girl" section this week and I cried.  What business do they have growing up so fast?!}.  I may decide to sell it, gift it or have another baby {John is over here shaking his head no} but either way some little girl is gonna' look super cute wearing it.  I mean baby ruffle butts?!?  Nothing cuter than that!
 

Saturday, October 6, 2012

No nonsense talk about fashion

This is a Sponsored post written by me on behalf of No nonsense. All opinions are 100% mine.
 
 
I struggle with fashion.  Don't get me wrong, I love it but it's more like a love/hate relationship.  I love a style but hate that it's so expensive or I want to wear a cute new trend but my body type just can't pull it off.  And right now I really hate my post two children body.  I also struggle with pinning down my style.  In the past I have been all over the place.  Over the years my clothing has reflected punk {complete with shaved head, I'll tell you all about it later}, skater girl, conservative, preppy, hipster, mom {that's a style right?}, sophisticated, boho, you name it I have an outfit to reflect it.  After 30 years, I'm still trying to figure out what style is "ME".
I really feel like Pinterest has helped me pin {pun definitely intended} down a style that is really me.  You can view my clothing inspiration board HERE.  I think having all the clothing that I like in one place let's me take a look at it an see a commonality and really shows me what pieces I really want in my closet as opposed to what was on sale that day.  Am I the only one that does this? 
But despite my struggle with fashion there are a few things I know for sure about my style -
  • High heels, sandals and shoes that require no socks.  I hate socks.
  • You will never see me wear athletic shoes with jeans.  I've only worn this combo hiking and it is probably the reason I hate hiking.
  • Cardigans and granny sweaters make me happy.
  • Flowy tops.
  • I don't wear shapeless t-shirts in public, like sports shirts etc.  And I don't wear them with jeans.
  • I love skinny jeans and I don't care what anyone says.
  • Layers, layers, layers.
  • I love bold colors but also neutrals.
  • I love wearing something unexpected with every outfit like a bright pop of color or a crazy pattern, heels with jeans or a random piece of jewelry.  Sometimes it ends up a little wacka-do but I try to own my quirky style rock what I got.
I've been wanting so badly to take the things I've been learning about fashion and myself and apply them to my real life closet and this week the folks at No nonsense helped me with my goals.  I was surprised by an awesome package in the mail from No nonsense.  Inside were No nonsense tights and leggings.
Both fit perfectly into my style.  I put together two looks from clothes in my closet and I even made a few pieces that were inspired by them.
First, here are the leggings.  I loved that these were corduroy leggings.  What?!  I've never heard of such a thing but I love them.  It totally fits with my love of the unexpected.  Plus I think they up the style factor because they don't just look like leggings you threw on to work out in.  This is an outfit I would wear basically anywhere.  And yes, I would wear those heels to the park.  I know, I'm crazy.


Leggings - No nonsense tights and leggings, Shirt - handmade from vintage linen {tutorial to come}, Cardigan - Target, Shoes -  Payless, Belt - Z Outlet

I love these tights because they are feminine but also a little foxy.  They have these sweet flowers on them but also give a hint of fishnet without going overboard.  I also love that the toe is so sheer that I can wear them with an open toed sandal.  This would be an outfit I would wear on a Sunday or a dress up occasion.
 
Tights - No nonsense tights and leggings, Shirt - handmade from vintage poly blend {tutorial to come}, Skirt - repurposed from skirt I've had since high school {tutorial to come}, Shoes - Payless, Belt - Z Outlet, Necklace - Z Outlet
Jill Martin has recently partnered with No nonsense and shows you some more ways to wear their tights and leggings in this short little video.

I really am planning on buying more of these now that I know they are so comfortable and cute.
If you're interested in getting some yourself you can get them at food & drug stores as well as mass retailers.  And the best part is they are super affordable and who doesn't love that?!  You can also visit No nonsense on Facebook to check out all of their fun colors and styles.
So tell me - -What is your fashion style?  What do you love to wear?  What won't you be caught dead in?  What makes you happy and feel most relaxed in your body?  Are you a jeans and t-shirt kind of girl or are you like me and a pair of heels just makes you smile?

Visit Sponsor's Site

Tuesday, September 25, 2012

The Marguerite Ribbon Tied Dress {Tutorial}

I've been kind of MIA lately haven't I?  How 'bout I make it up to you with a new dress tutorial?? 


Am I forgiven?


I wish the picture quality was better but all I had to work with was my iPod.  So please push past the overexposed parts to see the cuteness which is this dress.  And the fabric... that's my favorite part!  So pretty!
 

 The dress has ribbon straps that are fed through button holes in the back and then tied into a pretty bow. 
 
 
I originally posted this tutorial over at The Ribbon Retreat.
The fabric is from the new Marguerite line by Cynthia Walker for Riley Blake.  It's so feminine and gorgeous.


A simple dress with a lot of sweetness and it's easy to make too!


Let's get started.  Here's what you'll need:


Supplies:
 
For size 5-6T I used...
 
-  1 1/2 yards Marguerite Red Main
-  1/2 yard white muslin
-  1/4 yard Marguerite Blue Dot
-  Bodice pattern {see below}


Step 1:  Create pattern pieces.


Trace a shirt onto paper as you see above {I guess I can't list digital drawing as one of my special skills.  I hope you can still get the gist of it. You'll of course make your lines much more straight than you see here}.  You will want to add at least 1/4 inch seam allowance.  This is your front piece.


For the back piece you will cut out a replica of the front except for this piece you will mark approx. 1 1/2 inches in on each side {This measurement may vary depending on the size of the dress.  Just go with what looks right}.  From that mark you will then draw a curved line to the top of the armpit.


You'll now have two pattern pieces.  A front bodice piece and a back bodice piece.


Step 2:  Cut out your pieces.
 
You will need the following to complete your dress.
 
- 1 front piece out of main fabric
- 1 front piece out of muslin
- 1 back piece out of main fabric
- 1 back piece out of muslin
- 1 rectangle for the skirt that is approx 2x's the size of your waist out of main fabric
- 1 rectangle the width of your main skirt by about 6 inches out of accent fabric
- 2, 1 yard pieces of ribbon


Step 3:  Sew together bodice.


Take the two front pieces and lay them right sides together.  Between the layers pin the ribbon on the inside approx 1/4 inch from the sides of the top.  Stitch where you see the blue line.

Now take the two back pieces and place them together, right sides facing, and stitch just the same as above.  *Note:  you will NOT place ribbon between the back pieces.


Trim the pieces.  Cut off excess ribbon.  Cut the corners off.  Cut slits at the curves to so the curves will lay flat.


Now, open the back and front piece and pin together, right sides facing, like in the photo above.  Sew up the sides.


Flip bodice out and iron flat.


Top stitch around the top of the bodice.


On the back piece, sew two button holes spaced evenly apart.

You are now done with the bodice.  It's easy peasy from here.  You're almost done!


Step 4:  Sew skirt.
 
 
Fold the accent fabric in half so that the long rectangle is about 3 inches wide.  Sew accent fabric to pain piece.  Sew up side seams until you get one large tube.  This is your skirt.


At the top of the skirt use a ruffle foot or setting on your machine to ruffle or gather the top of the skirt.


Step 5:  Attach the pieces.


Right sides together, pin your skirt top to the open bottom of the bodice.  Stitch together.


Top stitch the seam by the hem on the bottom of the skirt.


Step 6:  Trim up your ribbon.


Try the dress on and slip the ribbon over the shoulders and through the button holes.  Tie a bow and trim them to your desired length.  Use fray check to secure the fibers on the ends so it will not fray.


Step 7:  Enjoy watching your sweetie pie in her new beautiful dress!
 
 
If you make the dress be sure to stop by and show me a picture of your darling and her new dress!


P.S.  I thought I should mention that I didn't win the Ultimate Room Makeover.  Super bummer.  But I did want to say how much I appreciated all of your support and love.  I have the best readers and really appreciate you.  So even though I don't get an awesome room makeover I still feel blessed to have y'all, so thank you!
 
______________________
 
Related Posts Plugin for WordPress, Blogger...