Showing posts with label Embroidery. Show all posts

Monday, June 24, 2013

The Snitch Tee

What is the best book series in the whole entire world?  If you answered Harry Potter you are correct.  100 points to Gryffindor!

I'm always looking for new t-shirt ideas for Jackson and when I can throw a little Harry Potter in the mix it's just a great big golden bonus.  Speaking of golden, here is Jackson's golden snitch tee.
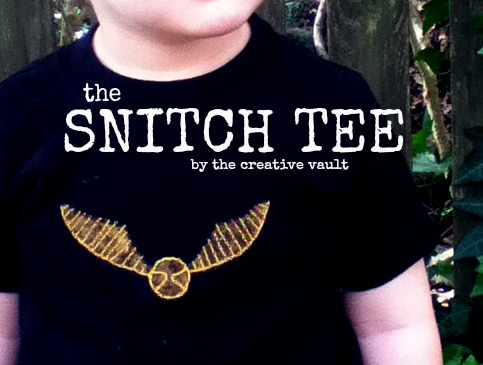

This is a hard shirt to photograph {mostly because it's always covered in dirt from a messy little boy who won't stand still}.  It's just a plain black tee, a painted snitch and hand embroidered detail and if you keep reading I'll tell you exactly how to make one of your own.


A few weeks ago the school age son of a friend of mine saw this shirt and begged his mom to go to the store to buy him one that very instant.  It was nice to know that the shirt was "cool" and that he recognized it as a snitch.

Jackson usually wears it with his mustard skinny cords.

 
Want to make your own??
 
ACCIO TUTORIAL!!!!!
 
Supplies:
  • t-shirt
  • interfacing
  • gold craft paint
  • gold embroidery thread
  • needle
  • iron
  • freezer paper stencil
Directions:
 
Step 1:  Cut out an image of a snitch onto freezer paper.  You can trace a snitch onto paper and cut it out or you can print it directly onto the freezer paper and cut it out from there.  This makes your stencil.  You don't need any detail with the stencil just the outlined image.
 
Step 2:  Iron on a small rectangle of interfacing to the inside of the shirt in the area that you want the design.  This acts as a stabilizer for your embroidery.  Without it your image will come out wonky and will not hold shape over time {for reference the shirt you see in the picture has been washed dozens of times and still holds it's shape}.
 
Step 3:  Iron the freezer paper stencil onto the front of the shirt and use the gold paint to paint inside the stencil.  * You'll probably want to put a piece of card board inside the shirt before you paint to keep the paint from bleeding through to the back.
 
Step 4:  After the snitch is dry, add detail using embroidery thread.  There are many ways you can do this.  I didn't do anything technical, I just free hand stitched.  I really don't know anything about hand embroidery but according to this pin the technique I used looks similar to the "threaded running stitch".
 
And that's it!  The whole project took me about an hour to create while I watched Downton Abby for the millionth time.  You really can do so many things with this painting and embroidery technique you're only limited to your imagination.


This shirt and this boy are just so cool that the crazy Mamarazzi just can't stop taking pictures of them!


Alright, I'm off to go dig up my old Harry Potter books and read them all again! 
 
Are you as obsessed as I am? 

Saturday, April 6, 2013

Easter Bunny Egg Cozies & Owl

Did you have a nice Easter?  I hope you did!

Ours was very nice and relaxing.  Church and the bunny stuff and dinner with friends.  What could be better than that?!

A few days later we were surprised with a great big box of even more Easter stuff from Nonie and Grandpa.  Inside were the cutest little bunnies I ever saw.  My mom had knit these adorable Easter Bunny Egg Cozies.  I died.  Inside each one was a little Cadbury egg that I did not let the kids touch because I did not want them messing with the bunnies.  I declared them MINE!


I've showed you other great stuff that my mom has knit or crocheted before HERE and HERE.  She's just so talented.  I can't get enough.  If you're on Ravelry (a social network for yarn enthusiasts) you can check out her page and even more of her projects.  Her user name is MOBOYLE.

The pattern she used is called Huggie Bunnies and is available for free download from Ravelry by Sandra Paul.

{P.S. If you're wondering about the background fabric, it's a clothing cotton I found recently at JoAnn Fabrics.  There's a whole line that goes with it.  Super cute.  It will soon be a dress so keep an eye out for that post in the future.}


Mom put a Cadburry egg in each one but they could easily fit a regular sized egg too.  Such a cute little project that I can't wait to save and pull out for next years Easter baskets.  Maybe by then I'll be more generous and share with the kids.  Maybe.

But the bunnies weren't all that Nonie knitted up for the kids.  She also included this adorable little Owl Puff.  I thought the eyes were especially neat.  It's little rounds of felt attached with rounded safety buttons.


The pattern for the Owl Puffs is available for free on Ravelry by Jenna Krupar.


Hope you feel inspired by my talented mom and all these adorable patterns! 

Kisses from the Cutts Family!  xoxo


Wednesday, August 8, 2012

DIY Books I Totally Want

I've had my eye on a few DIY books lately. Here are a few that I've been window shopping:


{You can click on the pictures or the links to take you to Amazon where you can read full descriptions, reviews.}


1.  Young House Love: 243 Ways to Paint, Craft, Update & Show Your Home Some Love by John and Sherry Peterisk.  I've been following their blog for a little under a year now and I love nearly everything they do.  I look forward to their daily posts with anticipation.  This is the ultimate DIY couple.  I have learned so much about my own personal style and how to make things happen around my house that I never knew was even possible.  If the book is anything like their blog I know I'm gonna' love it.  

2.  Fabrics A to Z The Essential Guide to Choosing and Using Fabrics for Sewing by Dana Williard.  I know basically nothing about fabric.  I know what looks pretty and that's about it.  I sew with what I have on hand and it's mostly plain ol' cotton.  I inherited lots of great vintage fabrics and I know nothing about them.  I feel like this book is essential for me to improve as a seamstress and designer.

3.  Martha Stewart's Encyclopedia of Sewing and Fabric Crafts.  Three words; Martha Stewart Encyclopedia.  Enough said.

4.  The Handbuilt Home by Ana White.  I first discovered Ana White's blog when it was just brand new and I was hooked from the start.  She is a super hot mom who builds furniture knock offs of really expensive name brand things.  Oh but that's not all, she give you the plans to make them yourself.  It couldn't be easier.  I've built quite a few things and I got the building bug and I can't remember a time that I was more inspired to learn a new craft.  I'm not sure what her first book has in store but I know I want to build everything in it.

5.  Martha Stewart Cookies. I think we can agree that the title says it all.

6.  Famous Frocks by Sarah Alm.  This is a book that is all about iconic dresses from movies.  The book shows you how to make the dresses and even includes patterns to make 20 dresses.  I have wanted to try this book out for a while.  I have never tried a pattern book but the thought makes me a little giddy.

7. The BurdaStyle Sewing Handbook by Nora Abousteit.  I think this book is another essential for me to get if I want to improve my sewing skills.  Everything I know I taught myself or picked up along the way watching others.  I really have no idea how things are supposed to be done and I feel like if I did I would have the skill and confidence to make so much more.  It looks like this book also comes in Kindle form which could be helpful at the sewing table.


Do any of you have any of these books?  What do you think of them?   Any other DIY book advice?  I'd love to hear what inspires you and makes you want to get creative.


Monday, February 20, 2012

Adelyn's Dress

Maggie's speech therapist is having her first little baby.  We are so excited for her!  Her therapist is just the sweetest and has helped Maggie progress in her speech so much.  We wanted to do something special for her and her baby girl, Adelyn (Add-uh-Lynn) .  Isn't that such a beautiful name!?!

I made her this little peasant style dress from a nice thick white cotton.  It is seriously one of my favorite dresses that I've made.  I only wish my pictures could show you it's full sweetness.


The neck and arms have elastic.  I created a matching hair bow from the scraps of fabric and ric rac.

This is what makes it my favorite though - the light teal ric rack and the pink hand embroidered name.  I haven't done any embroidery in a LONG time.  It was really so easy.  I don't know what has been holding me back.  I simply wrote her name in pencil and traced the marks with my needle and thread.


I think what makes this my favorite though was that I took the time to create French seams.  It makes for such a beautiful inside and steps up the quality of the dress by about a million notches. I was so glad I did this step it made it feel more boutique as opposed to just handmade.


As cute as this little dress is, I know it is nothing in comparison to how cute that sweet baby will be!


Anyone ever used French seams?  Interested in learning how?  Just speak up and I'd be happy to create a tutorial.  Well, I'm off to sew some more!


Monday, December 26, 2011

Play Spools

We had a great Christmas.  I hope you did too.  So many highlights and so much fun.  The kids were really into it this year {last year I had to bribe Mags with candy just to open presents}.  And my husband treated me like a princess, just like he always does.  You know how on Modern Family Claire is a horrible gift giver to her husband and he's the best ever?  Yeah, that's us.  I think I made up for it this year though with electronics and sports gear.

I made several gifts for the kids and I'll gradually get to posting what I've made.  Today I'll show you the simplest gift I made.

Play Spools


Maggie is obsessed with my craft supplies.  My craft room is a disaster because really what 3 year old can resist bin after bin filled with ribbon and jars of buttons just waiting to be tossed in the rain to rain down on their head?  One of her favorites is to take my spools of thread, hold onto the string and drag the spools around the house.  It makes me nuts.  She needs some craft supplies of her own.

I like to reuse everything so I've been saving empty spools of thread.  I hot glued different kinds of yarn around each one and left about a foot of yard free at the end that way she can wrap it herself or pretend to sew.  It just took a few minutes to make each spool.

When she opened it she shouted "YES!" then promptly ran upstairs to place the spools onto my sewing machine and pretend to sew.  We eventually had to bring her back down so the family could finish opening presents!  I think it was a hit.

Take a look around the craft bins and see if there is some re-purposing you can do too!

Saturday, December 24, 2011

Vintage Handmade Stocking and A Great Big Merry Christmas!

Well, the stockings are all hung {or laid nicely on the couch} with care in the hopes that St. Nicholas soon would be there!  I surely can't sleep knowing that Christmas is tomorrow so I wanted to show you the beautifully, hand stitched stocking my Grandma Rosie {aka Nonie} made me when I was born.  Each member of my family has one with a different scene and each is just as elaborate and gorgeous as the last.  I hate to call it vintage because it's exactly as old as me but let's face it - it's getting there.


I've had a difficult time making stockings for my own family.  Nothing I can do will ever match what Nonie did.  What a wonderful, talented woman!  I miss you Nonie!

______________


I hope each of you have a wonderful Holiday Season filled with joy, happiness, family, creativity and lots and lots of love!


Merry Christmas from The Cutts Family!


And if you're wondering... yes... this is the best family photo we got this year.
Sigh...
I long for the day when we have beautiful family photo but for now I'm just happy with what I've got.  
Crazy kids, a great husband and lots and lots of love.

Seasons Greetings to All!!!

Monday, November 14, 2011

Fall Fabric Hoops

Elizabeth finally called in a missing persons report on me.  I can NOT believe I haven't blogged in a month!  There was so much Halloween insanity on the Internet I'm sure y'all survived without me.  But I'm back!  Well, kind of.  You see my computer is broken.  Like, broken broken and I've had to share the lap top with my husband.  Between the Phd and Fantasy Football I don't get to use it much and when it's available I just want to nap.  I'm sure you'll forgive me.

I'll be doing lots of random catching up for a little while - just because the computer is broken doesn't mean I haven't been crafting away!


Today I want to show you my super simple fall decor.  The whole project took about 20 minutes to do.  It will take you 5 if you skip the applique.


Fall Fabric Hoops


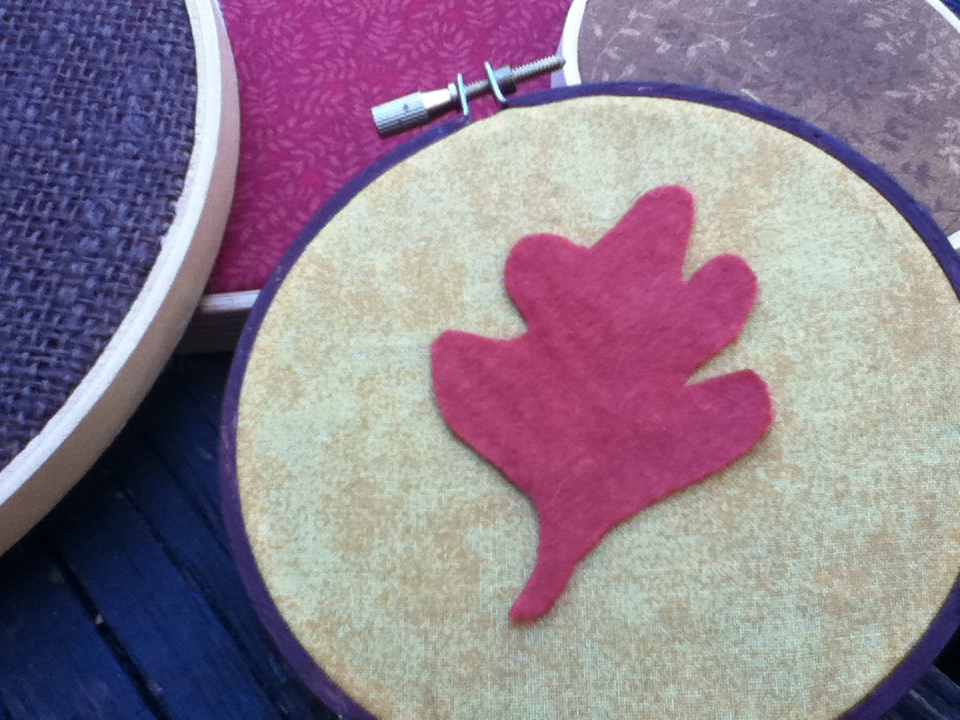
I took a bunch of wooden embroidery hoops that my mom gave me and filled them with different fabrics from my scrap bins.  The whole project was free.  Yay.


The leaf is cut from a rust colored piece of wool felt.  I used the leaf pattern on the Disney character Cricut cartridge as a template.


The fall is an applique cut using the Plaintain School Book font cartridge.  I know that my machine can cut fabric but I am in the habbit of cutting out the letter/shape tracing it onto the Heat and Bond and then cutting it out by hand bedore I iron it on.

Here is a crummy picture of how I arranged them on my wall.  Nothing fancy, just simple hoops to remind me it's fall.


Here's how to make your own:

Step 1:  Pick out your fabrics and your hoops.  I used quilters cotton, burlap and wool felt.

Step 2:  Place the fabric in hoop.  For a permanent fix line the outside of the inner circle with a thin layer of glue.  I may have other plans for these hoops after fall is over so I did not add glue.


Step 3: Trim off excess.  And you're done.  Told you it was simple.


*If you plan of adding applique iron-ons, add the letter to the fabric first then place fabric in hoop.


Related Posts Plugin for WordPress, Blogger...