Showing posts with label Teenager. Show all posts

Monday, June 24, 2013

The Snitch Tee

What is the best book series in the whole entire world?  If you answered Harry Potter you are correct.  100 points to Gryffindor!

I'm always looking for new t-shirt ideas for Jackson and when I can throw a little Harry Potter in the mix it's just a great big golden bonus.  Speaking of golden, here is Jackson's golden snitch tee.
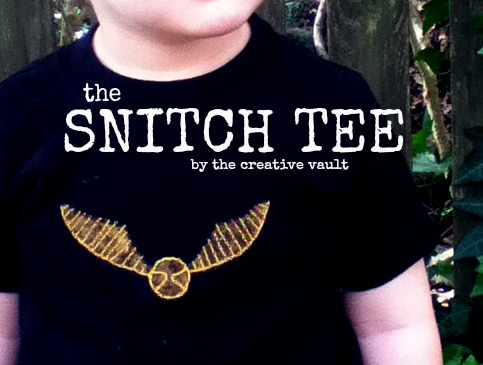

This is a hard shirt to photograph {mostly because it's always covered in dirt from a messy little boy who won't stand still}.  It's just a plain black tee, a painted snitch and hand embroidered detail and if you keep reading I'll tell you exactly how to make one of your own.


A few weeks ago the school age son of a friend of mine saw this shirt and begged his mom to go to the store to buy him one that very instant.  It was nice to know that the shirt was "cool" and that he recognized it as a snitch.

Jackson usually wears it with his mustard skinny cords.

 
Want to make your own??
 
ACCIO TUTORIAL!!!!!
 
Supplies:
  • t-shirt
  • interfacing
  • gold craft paint
  • gold embroidery thread
  • needle
  • iron
  • freezer paper stencil
Directions:
 
Step 1:  Cut out an image of a snitch onto freezer paper.  You can trace a snitch onto paper and cut it out or you can print it directly onto the freezer paper and cut it out from there.  This makes your stencil.  You don't need any detail with the stencil just the outlined image.
 
Step 2:  Iron on a small rectangle of interfacing to the inside of the shirt in the area that you want the design.  This acts as a stabilizer for your embroidery.  Without it your image will come out wonky and will not hold shape over time {for reference the shirt you see in the picture has been washed dozens of times and still holds it's shape}.
 
Step 3:  Iron the freezer paper stencil onto the front of the shirt and use the gold paint to paint inside the stencil.  * You'll probably want to put a piece of card board inside the shirt before you paint to keep the paint from bleeding through to the back.
 
Step 4:  After the snitch is dry, add detail using embroidery thread.  There are many ways you can do this.  I didn't do anything technical, I just free hand stitched.  I really don't know anything about hand embroidery but according to this pin the technique I used looks similar to the "threaded running stitch".
 
And that's it!  The whole project took me about an hour to create while I watched Downton Abby for the millionth time.  You really can do so many things with this painting and embroidery technique you're only limited to your imagination.


This shirt and this boy are just so cool that the crazy Mamarazzi just can't stop taking pictures of them!


Alright, I'm off to go dig up my old Harry Potter books and read them all again! 
 
Are you as obsessed as I am? 

Thursday, May 30, 2013

Graduation Crafts! Diploma Cover Scrapbook

Hey, hey, hey! It's graduation time!  There's nothing like the feeling of letting all those school burdens go and feeling that sense of accomplishment.  Plus, it makes me want to sing School's Out by Alice Cooper and who doesn't love that song?  Nobody, that's who, because that song is awesome.

Johnny Boy and I got married our Junior year of college so we spent our Senior year and our first year of marriage enjoying date nights at the library.  Oh yeah, keepin' the romance alive.  Nothing says love like a 1,000 page science textbook.  We graduated Spring of 2006 from BYU-Idaho, John with a bachelor degree in Chemistry and me with a bachelor degree in Geology and Earth Science.  Nerds.  You can say it.  We know. 

John's parents were generous and bought us nice frames for our diplomas which left us with these empty diploma covers.  You know I wasn't going to let that go to waste.


The cover is a nice pleather and satin bound cover with our university stamped in silver on the front.  This isn't a piece of junk {I mean I paid thousands of dollars and years of my life to get it} and it had a greater purpose than just tossing it.

So I added a few scrapbook stickers and pictures from our big day and The Diploma Cover Scrapbook was born.


This scrapbook is John's.  Mine is basically the same.  Just with a few more pictures of my parents.


I also had these cute little diplomas that I stuck in there.  You can buy a similar one HERE.  If you don't frame your original diploma you could still keep it in the cover and just scrapbook the left cover.  Lot's of options here.

 
The scrapbook is nice and compact and fits on my bookshelf but I can also take it out every spring to remember the accomplishments that we achieved and look at how cute we look in black robes and cardboard hats pre-children.
 
 
Happy Graduation to All You Grads! 


Feel free to turn this post into a little graduation brag board - Did your baby graduate Kindergarden, High School, College?  Give a shout out to your High School {Reed High class of 2000!} or did you finally pass all your classes and get that higher degree?  Whatever it is, y'all have worked hard so be sure to brag about it below in the comments!  


Thursday, January 17, 2013

Frosty Potter - The Snowman Who Lived

Y'all.

Things went crazy today in Alabama. It snowed! It's snowed here a couple of times before {less than once a year} but you Northerners would probably call it frost or a dusting of snow.

No, today was serious snow. When it snows down here everything shuts down completely. No one dares to drive because there are so many hills and no one knows what to do. So Southerners do what we always do when "severe weather" strikes - stock up on bread and milk and hole up in our homes until it goes away and gets warm again.

But I was brave and I tried to find winter clothes for us {I ended up in canvas shoes with no socks} and Maggie and I got creative and built the world's greatest snowman.

So without further ado, I'd like to offer you greetings from Alabama, The Cutts Family and Frosty Potter - The Snowman Who Lived!!


Wednesday, January 2, 2013

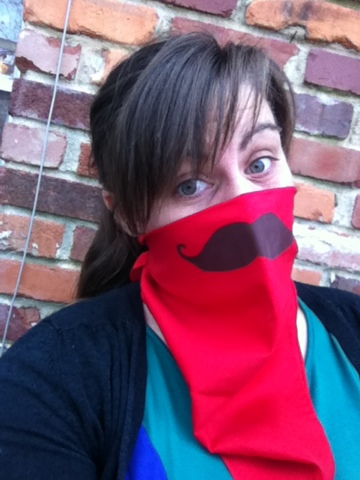
The Mustache Bandana

Happy New Year!

It's been a while. Hope you had an excellent holiday season. Despite being sick for a month we still managed good times. Santa didn't bring me a new computer (so I'm still blogging from my iPod) but I'm working on it. So many things to show you!

In the mean time, I thought I'd share the gift I made for my little brother. He rides a Harley so I thought a nice bandana would help keep the bugs out of his teeth when he rides. It's a bit of a gag gift but I figured every rider needs a nice full mustache.

To make your own simply fold a bandana in half (I bought mine at Hobby Lobby) and make a stencil of a mustache from freezer paper. Iron it on about an inch below the fold so that it sits right where your upper lip is. Paint inside the stencil and then peel off. Easy peasy!

It almost makes me want to take up bike riding. Too bad I'm a total chicken. I think I'll just stick to arts and crafts.


Sunday, July 29, 2012

I hope she... {thoughts on Skirting the Issue}

This month, Project Run & Play has been hosting an event asking people to make skirts to be delivered to girls in the foster system.  The skirt below is my donation.  It's a purple lined skirt with a sheer sparkly purple overlay.  The wrinkly picture does it no justice.  But my daughter calls it the princess dress and begs me to let her keep it, so I know some other little girl will love it too.

I keep thinking about that little girl.  How is this helping her?  "Sorry your parents aren't there and your life is so hard.  Here's a skirt."  I wish I could do more for her.  I wish I could take her into my home and make her part of my family.  I wish I could love her and protect her forever.  But I can't.  I'm not in a place in life where that is possible.  I wish I could take in all the children of the world but I can't do that either.
  

While I can't do these things, I can do this one thing.

So with this skirt I hope the message is sent to this precious little girl that she is loved.  That someone is thinking of her.  So I give this little skirt to you and send with it all my hopes for you.

I hope she...

feels like a princess,
is strong and confident,
stands up for what is right,
wears a smile.

I hope she...

feels loved,
loves others,
is kind,
works hard.

I hope she...

finds a place to call home,
is safe,
is happy,
feels peace.

I hope she...

can forgive,
can move forward,
can  build her future
and be the best she can be.

I hope she...

knows she's beautiful,
knows she's special,
knows she's worthy,
she's good enough.

I hope she...

knows that she's not alone.


Sunday, July 22, 2012

Family History Presentation

This past weekend I was asked to present at a regional family history conference. It was a lot of fun. I promised the attendees I would link to the presentation through here so they could look over it again.

Follow the link to view.

Teaching Our Children About Family History

I'd love to share what I have with you my readers as well, so I'm putting together a round up of all of the great ideas I found. In the meantime, feel free to check out the presention but come back later this week for a blog version. It's stuff every family could benefit from.

Hope you had a great weekend!

Friday, July 13, 2012

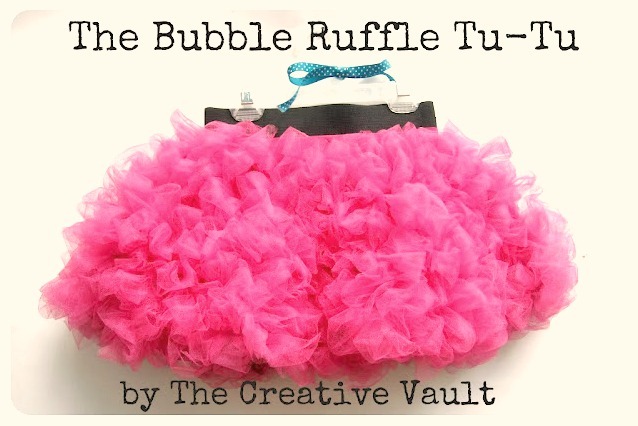
Bubble Ruffle Tu-Tu Tutorial

Last month I shared this tutorial over at UCreate.  It was so much fun being over there and it was so nice to hear all of the bubble ruffle tu-tu love.  When I created the bubble ruffle tu-tu I never expected it to get the reaction that it did!  I thought it was time I brought it home so here it is -


This is a little skirt that you can make to look very sophisticated or super fun.  It has everything a girl needs - fluffy, frilly, twirly, sassy, chic, you name it!  I can't help but think of how amazing bubble ruffles in white chiffon would look on the bottom of a wedding dress.  There are just so many possibilities.  The best part?  ANYONE CAN MAKE THIS SKIRT.

This skirt looks like it might be complicated and requires a lot of sewing skill but it doesn't.  Even a beginner can do this.  You technically don't even need to know how to sew a straight line.  And because the bubble ruffles are so fluffy it easily will hide any mistakes you might make.


You can complete this skirt in 4 basic steps.


I know, you're thinking, "That was technically only 3 steps."  But trust me, step #4 is the most important and most fun part.


Let's get started.  Here's what you'll need.


For the black skirt I cut up an older lady style nightgown to make the skirt.  The skirt base was made from a slip and the ruffles were made from a nylon chiffon.  Neither of which needed to be hemmed.  For the pink skirt I used quilters cotton and tulle.  If you use cotton like this you will need to hem your skirt to keep it from fraying.  Do your best to pick colors that match each other so it will all flow together.

For my 4 year old I used 1 yard of cotton and 4+ yards of tulle.  You of course would need to determine the amount you'd need for the size you create but you can use this as a guide.

You can purchase 2 inch wide black elastic HERE.


STEP 1
Make a modified circle skirt.


To create your circle skirt pattern, measure A & B.  To create the curve you can tie a string to a pencil and hold it the length that you need.  Simply move it up and down on your paper to create the nice curve.

If you look closely at the picture above you can see that the fabric is folded in half on the bottom and then folded over again and there is a fold on the left hand side.  When you fold it this way you will cut out one continuous circle.


Now that you have your nice circle you need to modify it a bit.  As a true circle skirt it is too bulky with the ruffles, but using this modification you cut down on the bulk while still keeping the twirl factor alive.

Cut a pie shape out of the skirt like the picture above shows. You don't need to get too technical about how much you cut out.  Like I said, this is a very forgiving skirt.  Sew up that now open seam.

If you are using a material that will fray, now is the time to secure those edges so they look nice and clean.  For mine I serged the edges then folded it under and top stitched, but you can use any number of hemming techniques you are familiar with.  If you're using a material that won't fray you don't need to hem the skirt.


STEP 2
Sew Bubble Ruffles All Over Skirt


First things first - cut your tulle in 2-3 inch wide strips.  It's ok if its not perfect.


Take a strip of tulle, bunch it up a little and stitch onto your skirt.  Then about 2 inches later, bunch up your fabric again and stitch again.  Repeat this step in a random pattern until you've covered the entire skirt.


This is what it looks like after one strip of tulle has been sewn on.  As you can see you'll need a lot of tulle.


Although you'll be sewing in a random pattern there is no need to sew and stop, sew and stop. If you look at the back of my skirt you can see that I just made one continuous line.


A faster way to make the ruffles is to lay your tulle strip in a zig zag pattern and sew down the middle.  It works faster but you really have to make sure you fill in all the spaces next to it to get that full bubble look.

After you make a few bubble ruffles you'll get in the swing of things and the work will go much faster.

Leave about an inch or two at the waist free of ruffles so you can attach your elastic.


STEP 3
Attach Elastic


When you sew the elastic together and then stitch down the edges it creates a nice flat round of elastic and a finished look.  When you attach they elastic you'll need to make sure you stretch out the elastic to line up smoothly with the waistband as you sew to ensure it has the give it needs to fit over your little girls tum.


Step 4
Rock it!


The best part about creating is creating smiles!


I hope you create a bubble ruffle tu-tu for the girls in your life.  If you do be sure to stop by The Creative Vault and show me.  I'd love to see it!

Thank you Kari for noticing my little tu-tu and inviting me here today.  It is such an honor and a ton of fun!  

Thank you!  Thank you!  Thank you!

Wednesday, June 20, 2012

The School Tee

Here's another fun t-shirt idea for kids {or even grown up kids too!} The School Tee.


I've seen this idea floating around the internet for a while so this Christmas I made one for Mags.  It was REALLY easy.

I painted blue stripes every inch or so across the whole shirt.  I left it streaky because that was always the lined paper I liked but if you want yours more solid a paint pen would work really nicely.  I then added a more solid red line down the side.  For the holes I just colored them in with a permanent marker.


Now I don't know about you but I wasn't always the most studious or focused.  My former school mates can testify.  So instead of notes on my papers they were most definitely filled with scribbles.  This tee needed scribbles.  Using a fine tipped permanent marker I drew a few little scribbles to make this tee a little more personalized.

Sadly, Miss Mags got to wear her special tee in public only once, on New Years Eve.  After a nice family outing to a UAB basketball game she cut the palm of her hand.  8 hours and 3 stitches later, we rang in the New Year in the ER.  Yay.  Let's just say, the shirt got a little ruined in all the excitement.  Guess that just means I have an excuse to make another one!


To view details on other tees from The Creative Vault click on the picture


Visit thecsiproject.com

Thursday, February 16, 2012

{Tutorial} Personalized Christmas Card Bookmarks

In January I was visiting over at So You Think You're Crafty, a super fun craft competition blog.  They are in the middle of a season so go on over an follow along.  I'm obsessed with competition so you know I love it.  Missy was kind enough to feature this tutorial - so here it is if you missed it.  Enjoy!

________________________


If you know me at all you know that I absolutely LOVE to re-purpose things.  There is something so satisfying about turning something old into something new.  Nearly everything I do is re-purposed in some way.  It's important to me to use what I have and not be wasteful.  For tips and rules on salvaging items you can read my post HERE.

Today I wanted to show you a personalized gift that you can make using leftover Christmas cards.  I love getting Christmas cards but I hate throwing them away come January.  I really have no need to keep them, so I often like to turn them into a cute bookmark to give back to my friend.  It's a simple little thing you can give as a little birthday gift or even a "thanks for being my friend" token.  The best part is you know they like the picture.  Heck, they're the ones that picked it out!    


There are so many possibilities.  You can even use your own leftover cards or pictures to make gifts for the grandparents or rip through your old magazines.  I mean what tween doesn't want to be staring at Justin Bieber while reading that book for English class?  And yes, I'll admit the super creepy bookmark of Edward Cullen is mine.  What can I say?  I just can't read Twilight without it.


But I digress... let's get back to the Christmas cards.  These not only are great because they are personalized but they are durable, and cute.  I also like that they are large in size so you're not losing it, but not so thick that you warp your book

Want to make your own????


Supplies:
  • Card or other picture
  • Card stock paper
  • Fabric scraps
  • Ribbon scraps
  • Scissors
  • Glue Stick
  • Sewing machine
  • Lamination machine OR clear contact paper OR clear packing tape


Step 1:  Cut out picture from card and attach to card stock with glue stick.  Cut the entire piece to be about the size that you want your bookmark to be.


Step 2:  Laminate entire bookmark.**

I have my own lamination machine.  It was very inexpensive {around $25 from Sam's Club} and I use it for everything.  If you don't have a lamination machine and if you don't know a teacher who can hook you up, you can go to a copy store or parent teacher store.  You can also buy laminating pouches that don't require heat.  Or you can just cover the front of your picture with clear packing tape.

**This step can be skipped but I find that protecting the picture keeps smudges off the photo as well as makes it water resistant.


Step 3:  Trim off extra lamination.


Step 4:  Lightly use glue stick to adhere scraps of fabric around the picture on the front of the bookmark.  You just want a small amount of glue to hold the fabric in place long enough to keep it in place for the next step.


Step 5:  Using your sewing machine, sew around the photo to secure the fabric to the bookmark.


Step 6:  Trim up the fabric creating about a 1/4 inch boarder.


Step7:  Attach ribbon to the back of bookmark.


Step 8:  Cover the back of bookmark with another piece of fabric.


Step 9:  Sew around the entire outer edge
.

Ta-da!  

If you put two pictures together you can use ribbon to separate each picture, like I did in the photo below.

This is a super versatile project and you can really get creative and make this your own.  So grab those cards and fabric scraps and get creative!


Related Posts Plugin for WordPress, Blogger...