Showing posts with label Animals. Show all posts

Monday, April 8, 2013

Updating the Deck - Phase 1

It's spring so naturally I've been gradually emerging from the cave which is my house and getting out into the sun to work on some house projects.  Plus, I'm tired of being fat and I've been looking for ways to "work out" without actually working out.  Saturday's project was to tackle the deck.

When we bought the house in 2007 the deck pretty much looked exactly like this.


Outdated lattice and dead dry looking wood.  I never had a deck growing up and I just figured that the deck was old and that's just what they looked like.  I did not learn the magic of a pressure washer until recently.  My neighbor just built a beautiful brand new deck which I have been enviously staring at for the last couple of months.  I thought I was just doomed to have the crappy deck.  But last week he had his deck stained and a man came out and pressure washed the stairs that we share at the same time {you can see them in the background}.  They were new again!  What?!?  Seriously?!  My deck isn't old and dried out!  It's just dirty!  It was like a tiny little flicker of hope burning inside me. 

I could do this.  I could make this baby awesome again.  Sweetness.

The man who did the neighbors deck quoted me $1,000 to revamp mine.  Uhhh.... no dude.  That's cool.  I think I can tackle this baby on my own.

So today was phase one.  REMOVE THE LATTICE.

Wanna see how it looks now???

 
Booyah!
 
Gone baby!
 
I did it mostly by myself {Jackson always had a tool in hand and Maggie helped me haul stuff to the curb}.  But all it took was a hammer and a chair to stand on to reach all the tall parts.

Let's look again shall we?


So much better right?!?

To remove it I just used a hammer to remove the rusty nails and to act as a crow bar.  The lattice came off fairly easily after that.  I listed the large lattice pieces on Craigslist for free {maybe someone could use them in their garden} but I'm pretty sure most of it will just be picked up by the garbage company.


It only took about 2 1/2 hours from tear down to clean up and a portion of that time was dedicated to screaming, and jumping and waiting for the big scary lizard to relocate.  He just stared at me with his creepy dead eyes, daring me to move him but there was no way in hell that was going to happen so I waited patiently for him to move on on his own.  Can you imagine if he had jumped on my face and attacked?  The horror.  Just my luck though he'll have relocated into my house now that I've torn his down.  *shudders*

Okay let's think of some happy thoughts like this cute helper -
 
 
Ahh.... that's better.  He was so determined.  He thinks he's Fix It Felix.  He kept hitting himself in the head with the hammer {I guess that's how you learn} so I eventually moved him to pliers duty.  No more accidents after that.

The deck looks better but it's a far cry from done.

Next on the deck to do list:
  •  Clean out the leaves and junk from underneath
  • Pressure wash the deck
  • Repair loose railings
  • Stain and seal the deck {I may try to match my neighbors deck but I may go with a nice dark stain.  Thoughts?}
And if you're like my mom and are wondering about that one beam that looks a little bendy, don't worry, that beam is mostly to support the lattice.  There is nothing wrong with the structure of the deck.  The three large beam are the main support beams.  I don't know yet if I'll remove those extra beams yet.  Who knows?  Probably not though. 

Hope you feel inspired to get out there and tackle a project at your house that you've been putting off.  Even if it means getting out there and doing something that looks tough all by yourself, I'm here to testify that YOU CAN DO IT!

Saturday, April 6, 2013

Easter Bunny Egg Cozies & Owl

Did you have a nice Easter?  I hope you did!

Ours was very nice and relaxing.  Church and the bunny stuff and dinner with friends.  What could be better than that?!

A few days later we were surprised with a great big box of even more Easter stuff from Nonie and Grandpa.  Inside were the cutest little bunnies I ever saw.  My mom had knit these adorable Easter Bunny Egg Cozies.  I died.  Inside each one was a little Cadbury egg that I did not let the kids touch because I did not want them messing with the bunnies.  I declared them MINE!


I've showed you other great stuff that my mom has knit or crocheted before HERE and HERE.  She's just so talented.  I can't get enough.  If you're on Ravelry (a social network for yarn enthusiasts) you can check out her page and even more of her projects.  Her user name is MOBOYLE.

The pattern she used is called Huggie Bunnies and is available for free download from Ravelry by Sandra Paul.

{P.S. If you're wondering about the background fabric, it's a clothing cotton I found recently at JoAnn Fabrics.  There's a whole line that goes with it.  Super cute.  It will soon be a dress so keep an eye out for that post in the future.}


Mom put a Cadburry egg in each one but they could easily fit a regular sized egg too.  Such a cute little project that I can't wait to save and pull out for next years Easter baskets.  Maybe by then I'll be more generous and share with the kids.  Maybe.

But the bunnies weren't all that Nonie knitted up for the kids.  She also included this adorable little Owl Puff.  I thought the eyes were especially neat.  It's little rounds of felt attached with rounded safety buttons.


The pattern for the Owl Puffs is available for free on Ravelry by Jenna Krupar.


Hope you feel inspired by my talented mom and all these adorable patterns! 

Kisses from the Cutts Family!  xoxo


Monday, June 11, 2012

Car Play Mat & Storage Bag

I said I needed to show you more boy stuff so here's a fun one!

I wanted to show you something that had it all - Sewing, scraps, BOYS {and Girls!}, play, Imagination, DETAILS,  repurposed, STORAGE, cute fabric, Bright Colors... you get the point.  I hope I didn't disappoint!

Introducing.... The Car Play Mat & Storage Bag!


Each piece was drawn and cut by hand and appliqued onto the mat.  With a park, zoo, speedway, beach, neighborhood and church there is a whole town full of imaginative adventure waiting to happen.  Each piece of fabric was chosen to look authentic, waves for the ocean, brick for the zoo wall, florals for the bushes and trees, cobblestones and sand, even the stained glass windows on the church, etc.  Let's just say, I have a lot of random scraps around the house!


The kids love to play with the mat but the fact that the mat is easily cinched into a bag to store all those little cars is what gets momma REALLY excited!  We can easily carry the bag with us to appointments and activities to keep us entertained during those long waits.  And when we are done, one tug of the cord and "bloop!" all cleaned up.


I think everyone needs a Car Play Mat & Storage Bag.  I hope you agree!

Friday, June 8, 2012

Nursery Blocks & Subway Art

Welcome to my new followers!  At first glance it might seem like this is a sewing blog.  But really it's an everything blog.  I've just been addicted to sewing lately.  So let's mix it up shall we?

Today I thought I'd show you a little baby gift I made for a friend a while ago.  You guys, this baby is so cute and small and sweet.  Babies are just the best.


I made these little nursery blocks from my scrap wood pile.  I wish I would have taken their measurements but they were pretty petite.  I think the big one is a one inch board that's 10 x 7 {I don't know, I'm just making that up really} and the smaller blocks are made from 2 x 4's.

The smaller blocks are for sitting on a shelf but the subway art has a metal tooth hanger on the back and has the option of being hung.  For the images I used my Cricut and Sure Cuts A Lot program.


For the owl I used a vinyl stencil of the outline of the owl and painted the entire thing brown.  Once it was dry I cut out another stencil that had the eyes, feathers and wings and stenciled that part white.


To create the aged look to the finish I randomly painted brown spots on the edges and corners.  I then rubbed Vaseline over the brown spots and then covered the whole thing in pink paint.  The pink didn't want to stick to the parts that were Vaselined and I rubbed the pink away in those areas with a baby wipe.  It gives it a shabby chic vintagey feel.


For the tree I just did the same thing as the owl.  I use one stencil and painted the whole thing brown and then made another stencil for the leaves and trunk and painted that one white.  Just a simple layering of stencils can make for a fun result.

Simple little keepsake blocks that anyone can make.  If you don't have a cutting machine you can make a stencil with vinyl and an exacto knife or even try a little hand painting.  You could conjure up your skills from the days of toll paining in the 90's.  {Please tell me I'm not the only one that remembers toll painting.}

Now,  what I really need to do to switch it up is show you some boy crafts.  Stay tuned.  I'll be showing you a really fun one next!


Saturday, March 3, 2012

Shaun the Sheep Cupcakes {tutorial}


Happy Baaaah-lated Leap Day!!

Leap Day is kind of a big deal around here.  HUGE in fact because this year Maggie got to celebrate her 1st birthday!  That's right, she's a Leap Day baby!


In February 2008 we were expecting her.  Her due date was at the beginning of the month but part way through my pregnancy they pushed her due date back two weeks.  Then something happened that I wasn't expecting she was 12 days late.  Not that's not a typo - TWELVE.  I felt like I was pregnant for 11 months. After about a week over due, the doctor wanted to schedule an induction.  I asked if we could do the 29th because heck I've waited this long might as well get the girl a cool birthday while I'm at it.  Well, I checked into the hospital the night before and they were going to induce me at 6 AM.  Turns out I didn't need an induction afterall because I went into labor that night.  It was meant to be!  A unique birthday for a very unique little girl.  She was the only one born in our hospital (which is a big one) that day.  So special!  

Since I get asked this a lot I'll tell you that we celebrate her birthday on non-leap years on February 28th.  Though I tend to get carried away and celebrate all week.  Also, we have so far not had any problems with her birthday being on Leap Day.  On non-leap years she still gets birthday rewards from stores and I've never had paper work or official document problems with it either.  It's just a super fun day to have a birthday!

Okay - now back to the cupcakes.

It's Shaun the Sheep!!!  


For those who don't know Shaun the Sheep is a clay-mation TV show by the same people that do Wallace & Grommit.  You can watch it on Netflix or buy it on Amazon.  It's actually a very funny cute show. 

Shaun the Sheep is Maggie's favorite everything.  This is her getting ready for bed wearing the Shaun hat her Nonie made for her (more on that one later) and holding the little Shaun from her G&G Cutts.  All while watching Shaun the Sheep on the DS.  At night she asks me to sing her the theme song before she goes to sleep.  Spoiled.


This year the only thing she asked for for her birthday was Shaun the Sheep cupcakes.  When your child who has problems with communicating with speech, never asks for anything, and has a birthday only every four years asks for Shaun the Sheep cupcakes you better get that girl Shaun the Sheep cupcakes!

Here's what I came up with.


Want to make your own?  They are a lot easier than they look.  I promise.


Supplies:

Cupcakes
White frosting
Mini-Marshmallows
Mini-chocolate chips
Wax or parchment paper
Piece of paper
Cookie Sheet
Sandwich bags or piping bags


 Step 1: 

Draw the shape of the Shaun head on a piece of paper.  I practiced a couple of times before I settled on one.


Step 2:

Melt about 1/4 to 1/3 cup of chocolate chips in a sandwich bag.  Place chips in bag and place in microwave for 20 seconds.  Take out and lightly squish the chips to mash/mix them.  Continue this process of heating for 20 second intervals until chocolate is melted.  Slice off a tiny corner of the baggie when done.


Step 3:

Place wax or parchment paper on top of drawing.  Pipe chocolate onto wax paper to fill in the shape.  Don't worry if it's lumpy.  The lumpy part is the back of Shaun's head.  You won't be seeing it.


Step 4:

Repeat as many times as you want and place Shaun heads on a baking sheet and place in the fridge or freezer to harden.


Step 5:

Once hardened, peel off the heads and flip them over.  Use the icing to create two dots for eyes.  Inside each white dot place an upside down mini chip for the dark center of the eye.  And you're done with your Shaun head!


Step 6:  

Frost your cupcake.

Step 7:

Cover cupcake in mini-marshmallows.

Step 8:

Use a dollop of frosting to attach the Shaun head to the cupcake body.


These sheep are so cute and so yummy.  The girls loved them but most importantly Maggie loved them.  The joy on her face was priceless.  So happy to make a little girls birthday wish come true!


{P.S.  You can find Season 1 and Season 2 of the show at Amazon.  Along with several short movies that we've never even knew existed.  Also, here is the Shaun the Sheep plushie that she got.}

Saturday, January 7, 2012

The Doggie Princess

"Yay! Doggie Princess!"

That's what she shouted when she opened this gift Christmas morning.  Ummm... sure... whatever you say,   Doggie Princess it is then!


I had a pretty clear idea of what t-shirts I wanted to make for Jackson for Christmas {you can see the Batman shirt HERE} but I was stumped with Mags. So I just simply asked her.  We looked at all sorts of images online and she kept saying she wanted the doggie.  Using my Cricut and Sure Cuts A Lot program I made a freezer paper stencil and painted a Dachshund onto a pink shirt I got at Hobby Lobby for $3.  I felt like it was just too plain so I had sewed four plastic pearls to her neck to give her a nice blinggy collar.

She was so excited about it and has been so happy to wear it.  Mission accomplished.


Friday, November 25, 2011

Breaking Dawn Party

I do not apologize for what you are about to see.  Why?  Because this was the BEST.  NIGHT.  EVER.  I know there is some Twi-hate in the world but I will have none of it here.  So come visit our Breaking Dawn Pre-Party and enjoy the festivities.

This was our pre-party for the midnight showing of the latest Twilight movie.  A large group of us had been going to midnight showings all along but I really felt like this year we needed a little more.  So with the generosity of my friend Michelle who volunteered her house along with many other contributers we partied.


Edward here to welcome you to the festivities. 

I used my Halloween wreath, changed out the orange ribbon for some red and attached some chess pieces (to represent the book cover).  Behind the wreath I taped a picture of Edward.  Because the party was at night and the porch was dark, his creeptastic stare freaked eveyone out as they approached the door.  Bonus!


My friend, Amy from Indulge With Me executed my idea for Vampire Cupcakes perfectly.  White cake and white frosting with shimmery sprinkles.  They had to sparkle!  Amy found the cupcake wrappers at Hobby Lobby.  Aren't they perfect?


Oh yeah, and did I forget to mention that they were filled with blood!!?!?!!!  Who-wah-ha-ha!!

Okay so maybe not blood, maybe it was delicious raspberry filling.  You can get the recipes for the cupcakes HERE.

I know what you're thinking - How could we possibly forget Team Jacob?  Of course we didn't!


We had a whole plate of Werewolf Treats.

Way to save Bella once again!  Good  doggie!  Good boy! 

I used this ginger snap recipe (minus the pepper) and they turned out delicious.  People who weren't normally fans of ginger snaps loved them.  I'll definetly make this recipe again.  Amy found the cookie cutter at Hobby Lobby.  It wasn't as easy to cut out the ginger snaps with the cutter as I would have liked but we made it work.  I baked a whole flat sheet of the dough.  While it was still hot, I cut out the bones and then removed the excess cookie bits.  I then put the bones back in the oven for a few more minutes to firm them up a little more.

Now, now, calm down.  We didn't forget the humans either. 

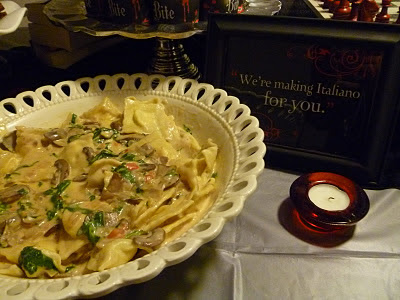
Introducing Porta"Bella" Mushroom Ravioli.


I made the raviolis from scratch and by scratch I mean, I rolled them out and filled them, so for reals scratch.  I then topped them with a portabella, spinach and garlic alfredo sauce.  Recipes and tutorials to come.


Michelle wowed us with the coolest drinks ever!  She printed out these fun wrappers she found and placed them on water bottles and hawaiian punch.

I made sure to drink my blood type, O negative.  It is the tastiest afterall.

There was lots more food.  Tons actually but I failed to get pictures of it all.


I really should have taken more pictures of the decorations too.  Michelle did such a great job!  She represented all 4 books perfectly by using the items from their covers placed around her house.  Here is her sons chess set.  He's quite the entrepreneur and charged her $1 to spray paint the pieces red! Ha ha!  She also had red ribbon draped, flowers, and red apples along with framed quotes from the movie and the books.  She also made yarn balls {you can see them in the background of the first cupcake pic} and repurposed some tissue paper hanging decorations {also in first pic} by spray painting them black, to hang from the ceiling.


Being the over achiever that I am I also brought my wedding dress to display.  Afterall, Breaking Dawn does feature the wedding of the century!


What's that you say?  Is that for reals a picture of Bella?


 Uhhh.... yeah.... I totally went there.  Bella looks pleased though don't you think?  Well, I know her expression never changes so you'll just have to take my word for it.  Very happy.

And I can't forget to mention this.  Not only did I pull my wedding dress out for the first time in almost 7 years but I also used the leftover red ribbon from our wedding.  Look very carefully... notice the brand of the ribbon?  Cooincidence?  I think not.  I always knew that John and I's love was perfect and timeless. 

Here's all my favorite girls at 2:30 am {about 10 or so didn't make it to the movie part}.  We all had a blast and can't wait for Breaking Dawn Pre-Party Part 2 and... Titanic Pre-Party and... Hunger Games Pre-Party and...

What can I say?  We like to party!


Related Posts Plugin for WordPress, Blogger...