Showing posts with label Wood Crafts. Show all posts

Wednesday, August 8, 2012

DIY Books I Totally Want

I've had my eye on a few DIY books lately. Here are a few that I've been window shopping:


{You can click on the pictures or the links to take you to Amazon where you can read full descriptions, reviews.}


1.  Young House Love: 243 Ways to Paint, Craft, Update & Show Your Home Some Love by John and Sherry Peterisk.  I've been following their blog for a little under a year now and I love nearly everything they do.  I look forward to their daily posts with anticipation.  This is the ultimate DIY couple.  I have learned so much about my own personal style and how to make things happen around my house that I never knew was even possible.  If the book is anything like their blog I know I'm gonna' love it.  

2.  Fabrics A to Z The Essential Guide to Choosing and Using Fabrics for Sewing by Dana Williard.  I know basically nothing about fabric.  I know what looks pretty and that's about it.  I sew with what I have on hand and it's mostly plain ol' cotton.  I inherited lots of great vintage fabrics and I know nothing about them.  I feel like this book is essential for me to improve as a seamstress and designer.

3.  Martha Stewart's Encyclopedia of Sewing and Fabric Crafts.  Three words; Martha Stewart Encyclopedia.  Enough said.

4.  The Handbuilt Home by Ana White.  I first discovered Ana White's blog when it was just brand new and I was hooked from the start.  She is a super hot mom who builds furniture knock offs of really expensive name brand things.  Oh but that's not all, she give you the plans to make them yourself.  It couldn't be easier.  I've built quite a few things and I got the building bug and I can't remember a time that I was more inspired to learn a new craft.  I'm not sure what her first book has in store but I know I want to build everything in it.

5.  Martha Stewart Cookies. I think we can agree that the title says it all.

6.  Famous Frocks by Sarah Alm.  This is a book that is all about iconic dresses from movies.  The book shows you how to make the dresses and even includes patterns to make 20 dresses.  I have wanted to try this book out for a while.  I have never tried a pattern book but the thought makes me a little giddy.

7. The BurdaStyle Sewing Handbook by Nora Abousteit.  I think this book is another essential for me to get if I want to improve my sewing skills.  Everything I know I taught myself or picked up along the way watching others.  I really have no idea how things are supposed to be done and I feel like if I did I would have the skill and confidence to make so much more.  It looks like this book also comes in Kindle form which could be helpful at the sewing table.


Do any of you have any of these books?  What do you think of them?   Any other DIY book advice?  I'd love to hear what inspires you and makes you want to get creative.


Monday, July 23, 2012

Ombre Ambiance

So if you've been following along these past few weeks you may be saying to yourself, "Where is Alicia's post about voting for So You Think You're Crafty this week?"

Well, I'm here to tell you... sad day... it's over.
Done-zo. Ka-putz.  I was voted off the island.  Whatever you call it, I was eliminated.

I'm left scratching my head on where I went so wrong this week.  I had no idea I had such a fail on my hands.  I really loved my project but to each her own I guess.  My mom suspects that it could be that the ombre dying of the table cloth didn't translate as well on camera.  It's entirely possible.  I guess I just have to chalk it up to the fact that I had fierce competition and someone had to go last week so why not me?  I'm sad to leave the competition and had a great time.  I'll enjoy following along and cheering on my fellow competitors.

The theme was ombre so I gussied up some of the things that were just blah and tried to give them a little wow factor.  Here's my entry but come back tomorrow and the next day for tutorials on the paint technique I used as well as the rubber dipped vases.

Using items I already had at home, I created a nice little ombre table scape.  Except for the bowls & forks, I made everything you see here, including the table.  But we can just focus on the ombre.  For the ombre theme I dyed some vintage fabric that I sewed into a table cloth and accented with some rubber dipped mini vases.  I spray painted a Chinese lantern left over from my wedding in two tones of blue and also painted the handles of my salad tongs to match. 


I used several shades of blue to create a nice, tranquil vibe.  Perfect for enjoying my beautiful backyard.

Thank you to all who supported me in this competition and continue to support me through this blog.  You guys make me feel like a winner!  {I fully recognize the cheesiness of that last statement but it's true.}

The good news is, now that I'm out I have lots more time to dedicate to The Creative Vault and re-opening my shop for the first time in 3 years.  That should be fun.  

Oh yeah... and I may have a fun Harry Potter Week in store too so stay tuned!

Monday, November 14, 2011

Fall Fabric Hoops

Elizabeth finally called in a missing persons report on me.  I can NOT believe I haven't blogged in a month!  There was so much Halloween insanity on the Internet I'm sure y'all survived without me.  But I'm back!  Well, kind of.  You see my computer is broken.  Like, broken broken and I've had to share the lap top with my husband.  Between the Phd and Fantasy Football I don't get to use it much and when it's available I just want to nap.  I'm sure you'll forgive me.

I'll be doing lots of random catching up for a little while - just because the computer is broken doesn't mean I haven't been crafting away!


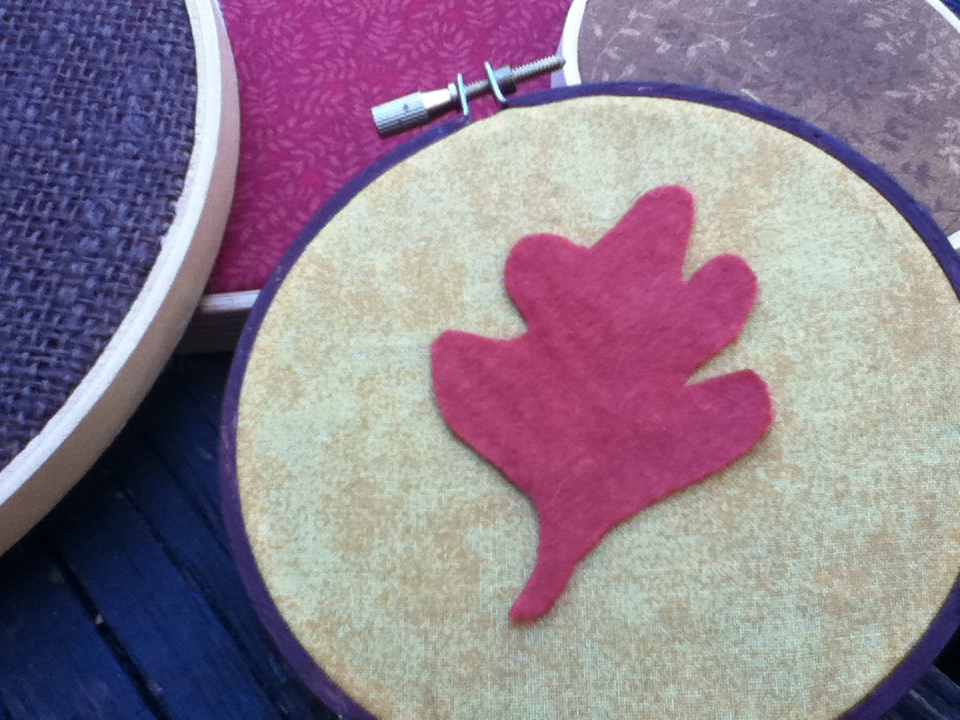
Today I want to show you my super simple fall decor.  The whole project took about 20 minutes to do.  It will take you 5 if you skip the applique.


Fall Fabric Hoops


I took a bunch of wooden embroidery hoops that my mom gave me and filled them with different fabrics from my scrap bins.  The whole project was free.  Yay.


The leaf is cut from a rust colored piece of wool felt.  I used the leaf pattern on the Disney character Cricut cartridge as a template.


The fall is an applique cut using the Plaintain School Book font cartridge.  I know that my machine can cut fabric but I am in the habbit of cutting out the letter/shape tracing it onto the Heat and Bond and then cutting it out by hand bedore I iron it on.

Here is a crummy picture of how I arranged them on my wall.  Nothing fancy, just simple hoops to remind me it's fall.


Here's how to make your own:

Step 1:  Pick out your fabrics and your hoops.  I used quilters cotton, burlap and wool felt.

Step 2:  Place the fabric in hoop.  For a permanent fix line the outside of the inner circle with a thin layer of glue.  I may have other plans for these hoops after fall is over so I did not add glue.


Step 3: Trim off excess.  And you're done.  Told you it was simple.


*If you plan of adding applique iron-ons, add the letter to the fabric first then place fabric in hoop.


Wednesday, July 6, 2011

Simple Rustic Console Table

I love building stuff.

Have you guys met Ana White yet?  Well I haven't officially met her but I'm in love with her SITE.  She's a homemaker from Alaska who builds furniture and then shares simple easy to do plans with you for FREE.  You heard me, I said the F word.  Check out her site but be prepared for your life to change.  Forever.

I became a fan of her site a long time ago and was one of her first followers.  It's been awesome to see it grow.  Pretty much I have all of her plans on my to-do list.


Recently I used her plans to make the Simple Rustic Console Table.  I had 5 (count 'em, 5!) junk areas in and around my kitchen/dining area.  I was feeling sad because my house was constantly messy.  Shoes were strewn all over the floor.  Bills, paperwork, coupons, magazines and toys everywhere.  Good luck trying to find your keys in the heap.  This wonderful table took me less than 2 hours to make (including paint), cost me about $40 (including baskets, they were on clearance after Easter, score!) and has made me happy ever since.  I can see my floor again.  And my dining room table.

Laying out my boards to see what it should look like.  I adjusted the plans to make mine about 5 inches shorter than the original plans.  I have Lowes cut all my wood for me.  All I have to do is tell them where.  It's great!

Built and ready for paint.

All the instruction I needed to complete the whole thing.  It really is easier than it looks.  Ana has nice printout instructions but I don't have a printer and I work better off my caveman drawings anyway.

All done!  Doesn't it just fit perfectly here?


Did I mention I love building stuff?

_________________________

Visit thecsiproject.com

Friday, June 24, 2011

Camp Craft Series: The Good Deed Tree

This is the last day in the Camp Craft Series.  Be sure to check out all of the crafts in the series


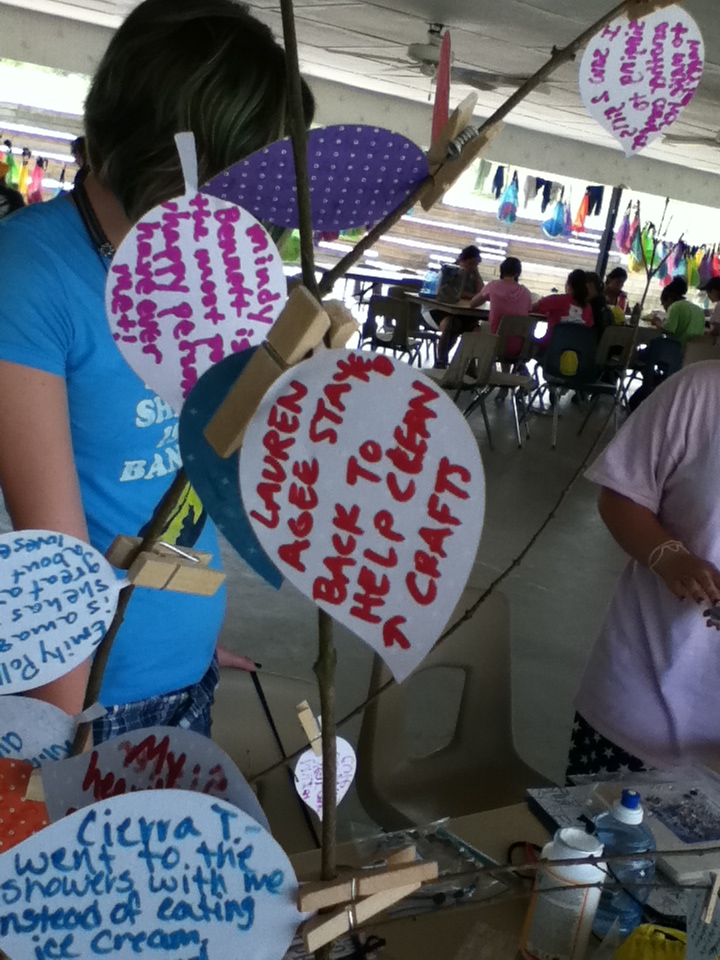
Sharon, the camp director wanted to have A Good Deed Tree.  She wanted something similar to THIS but more earthy.  I was able to help her out and created this tree for her.  It was so simple it took less than 15 minutes to do.


Supplies:
  • Empty burlap rice bag
  • Empty #10 can
  • Ribbon
  • Rocks
  • Tree Branches
  • Pruning shears
  • Paper leafs (I cut mine out using my Cricut)
  • Baby clothespins


TUTORIAL:


Step 1:  Gather branches.  Trim off excess leaves or smaller branches with pruning shears.

Step 2:  Cut off the top of burlap rice bag (save the zipper for another project!) and turn inside out.

Step 3:  Slide empty can into bag.

Step 4:  Place branches into can and arrage until it looks best to you.

Step 5:  Fill in empty gaps with rocks, gravel, dirt, etc.

Step 6:  Wrap ribbon tightly around tree and burlap.  This will also help keep it secure.

Step 7:  Have the leafs and clothespins available for the girls to write the good deeds that they see others do.
Do you see the rocks??  They fill in the gaps and add weight to the can.


The girls were able to notice the good things that others did and were also able to give eachother credit for those good things.  Win - win! 

Monday, June 20, 2011

Camp Craft Series: Wooden Frames


For girls camp this year, Natalie and I really wanted something that the girls could really personalize.  We also wanted the girls to have something to keep pictures from their time at camp. 


These are the examples we had for them to see (Natalie's is on the right.  Look closely she used buttons to cover some of the dots!  So cute!) and the girls really wowed me with their creativity!  Here are just a few examples.  I just wasn't able to get pictures of all of them.  Nearly every girl made a frame so I would say they were very popular.  The best part is the frame itself cost only $1!!


TUTORIAL:


Supplies:
  • Wooden Frame (found at Micahel's for $1)
  • 1 piece of 12x12 scrapbook paper
  • Mod Podge
  • Paint
  • Ink pad
  • Sandpaper
  • Additional desired decoration - ribbon, gems, glitter, buttons, etc.


What the frame looks like to start out with.  These are found in the wood section at Michaels.


 Step 1:  Remove packaging and trace frame onto paper.


Step 2:  Cut paper out.


Step 3:  Paint entire frame.  Get in every cranny.  Let dry.


Step 4:  Paint a thin but even layer of Mod Poge to the front of the frame.  Place paper cut out on top of glue and smooth out.

Step 5:  Use sandpaper to sand off any paper overhang.  In a downward motion pull the paper down.  This will sand the paper off and create a nice smooth edge.  The picture below is what it will start to look like when you sand the paper off.  Continue to sand until the paper is completely gone.  Do this all around frame.


Step 6:  Ink all around the edges using an ink pad and using the same downward motion you used with the sandpaper.  Let dry. 

Step 7:  Coat the entire frame in Mod Podge again.  *** If the paper starts to come up and bubble do not try to smooth it out.  You will only ruin your frame.  Let it dry, the bubbles will smooth themselves out provided that you did your best to smooth the paper out in step 4.***

Step 8:  Add additional decoration however you would like.


I love these frames.  They are simple to do and you can personalize them so easily.  I love to give them as gifts.


If you missed the past posts in the series you can find them here


Stay tuned tomorrow for 

Stamped Washer Necklaces 
Related Posts Plugin for WordPress, Blogger...