Showing posts with label Young Women. Show all posts

Monday, November 21, 2011

Create - Ispirational Video

I recently was asked to speak at at Young Women leader training meeting. The main topic I was asked to speak on was how creative doesn't just mean crafty. It was a wonderful opportunity for me to think more about what creativity means.


In my preparation I came across an inspiring video with clips from one of my favorite talks of all time, "Happiness, Your Herritage" by Dieter F. Uchtdorf. This talk touches on so many points that are inspiring and encouraging to all women. It should be no surprise though that what touched me the most was the part of his talk about creativity.  This short youtube clip has been done in such a beautiful way.  I watch it over and over again and just feel a surge of empowerment everytime I do.  It makes me want to drop everything and create something of "substance or beauty".


I hope that this video and my blog can insipre you to create something that brings you joy.  There is no better feeling than creating "something that did not exist before".  So like he says, "start small" and "Don't let the voice of critics paralyze you", especially if that critic is you.

Create something today.  Because you're amazing and the world is waiting.


Friday, June 24, 2011

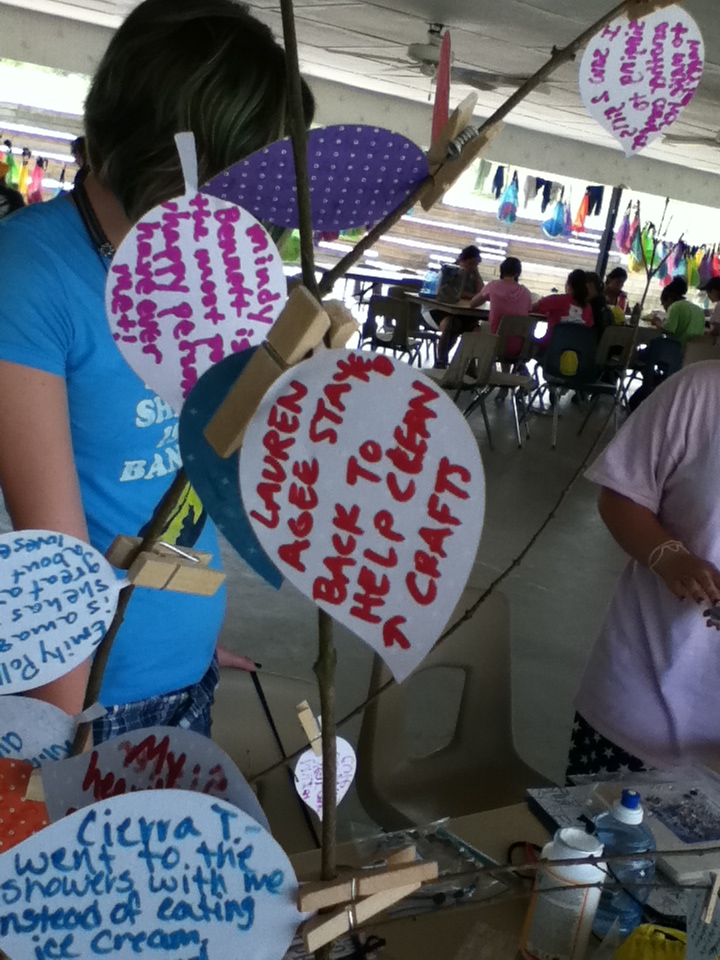
Camp Craft Series: The Good Deed Tree

This is the last day in the Camp Craft Series.  Be sure to check out all of the crafts in the series


Sharon, the camp director wanted to have A Good Deed Tree.  She wanted something similar to THIS but more earthy.  I was able to help her out and created this tree for her.  It was so simple it took less than 15 minutes to do.


Supplies:
  • Empty burlap rice bag
  • Empty #10 can
  • Ribbon
  • Rocks
  • Tree Branches
  • Pruning shears
  • Paper leafs (I cut mine out using my Cricut)
  • Baby clothespins


TUTORIAL:


Step 1:  Gather branches.  Trim off excess leaves or smaller branches with pruning shears.

Step 2:  Cut off the top of burlap rice bag (save the zipper for another project!) and turn inside out.

Step 3:  Slide empty can into bag.

Step 4:  Place branches into can and arrage until it looks best to you.

Step 5:  Fill in empty gaps with rocks, gravel, dirt, etc.

Step 6:  Wrap ribbon tightly around tree and burlap.  This will also help keep it secure.

Step 7:  Have the leafs and clothespins available for the girls to write the good deeds that they see others do.
Do you see the rocks??  They fill in the gaps and add weight to the can.


The girls were able to notice the good things that others did and were also able to give eachother credit for those good things.  Win - win! 

Wednesday, June 22, 2011

Camp Craft Series: Headbands with Interchangable Bows

We wanted the girls to feel as beautiful on the outside as they are on the inside so we decided to make hair accessories.  These are super popular right now in stores, plus, the young women have been begging to learn how to make them.

 I showed each girl how to make the loop for the headband but I left the bow making mostly up to them.  If I could do it over and if I had the man power to watch over the rest of the crafts I would have sat down and done just bows and flovers with the girls.  There are so many ways to make these that I'm not going to do a tutorial for every kind of flower I know how to make but there are excellent tutorials HERE and HERE at my friend Elizabeth's blog, The Moonlit Nest, and also a great one HERE at her friend's blog Sewing in No Man's Land.  Those should keep you busy for a while.

As you can see from these pictures, the girls did great on their own!  SO gorgeous!


Supplies:

We had on hand the following items.  There was lots left over but hopefully the Young Women can find something to do with all of it.  If not I sure know I can!  Ha ha. 
  • Clear plastic gems (pack of 1,500 in assorted sizes from Hobby Lobby)
  • Buttons (miscellaneous button pack $5.99 at Joann's)
  • Plastic pearls (2 packs at 350 pearls per pack from Hobby Lobby)
  • Felt in various colors
  • Tule in various colors
  • Some sort of poly-satin in various colors
  • Metal headbands (Purchased from Korean seller on Ebay, excellent price, less than .40 cents each.
  • Skinny metal aligator clips (found at Sally's Beauty supply in packs of 100)
  • Lots and lots of ribbon (found in ribbon remnant packs you can read more about these packs HERE at my old money saving blog)


TUTORIAL:


You will need one head band, a small piece of ribbon, and clips.
Step 1:  Attach ribbon to the inside of headband using hot glue.

Step 2:  Wrap ribbon tightly around headband once and secure with more hot glue.

Step 3:  Wrap ribbon around one more time but leave a small loop (just enough to slide a clip through.  Glue ribbon end to inside of headband and trim off excess ribbon.
See the loop?


Now you can just slip in any clip and hair bow that you'd like.  The possibilities are endless.


If you missed them, make sure you check out the other crafts in the series


A be sure to come back for the last two days in the series

Thursday - Journals

Friday - Good Deed Tree


Tuesday, June 21, 2011

Camp Craft Series: Personalized Washer Necklaces

If you're wondering what the most popular craft we did at girls camp this year, wonder no more.  This was it.  We bought extra washers and we ran out.  I hated to tell the girls that there were no more.  If we ever do this craft again I'm buying at least twice the amout we need, if not more.  Sharon, the camp director, came up with this craft and I'm so glad she did, it was a hit!


All of these pictures are of necklaces the girls created.  Including the ones above.  I loved to see what the girls wanted to stamp into them and the beautiful prints that they chose.  Some even found unique and interesting ways to tie them.  I loved them all.


TUTORIAL:

Supplies:
  • Stamping set (found HERE at Harbor Freight)
  • Hammer
  • Small washer
  • Large washer
  • Scrap of paper
  • Mod Podge
  • Paint or permanent marker
  • Jewelry cord*


*We purchased multi-colored packs of cord from Joann's jewelry section for about $8 a pack.  I'm unable to locate a link to the exact item but they carry a nice variety of cording and you should be able to find what you need in the store. 


Step 1:  Stamp your personalized words onto small washer.  Hold the stamp steady and hammer into washer.

Step 2: Fill in stamped image with paint or permanent marker.  This will help image stand out more.  Wipe away excess paint or ink.  A baby wipe works best to do this.

Step 3:  Take large washer and trace onto a piece of paper.  Cut out the circle.

Step 4: Apply a thin, even layer of Mod Podge to one side of large washer.

Step 5:  Place paper cut out onto large washer and smooth out.  Apply an even coat of Mod Podge over the top.  Let dry.

Step 6:  Tie the whole thing together with cord or ribbon.


Simple right!?!  And just to show you how clever, creative and talented these girls are, check out this stunning washer.  This was done by wrapping the embroidery floss from the friendship bracelets around the washer.  To secure it they tied the ends in knots on the back side.  All of these girls are brilliant.


If you missed them, be sure to check out the other tutorials in the series


Be sure to come back tomorrow for

Headbands with Interchangeable Flowers

Monday, June 20, 2011

Camp Craft Series: Wooden Frames


For girls camp this year, Natalie and I really wanted something that the girls could really personalize.  We also wanted the girls to have something to keep pictures from their time at camp. 


These are the examples we had for them to see (Natalie's is on the right.  Look closely she used buttons to cover some of the dots!  So cute!) and the girls really wowed me with their creativity!  Here are just a few examples.  I just wasn't able to get pictures of all of them.  Nearly every girl made a frame so I would say they were very popular.  The best part is the frame itself cost only $1!!


TUTORIAL:


Supplies:
  • Wooden Frame (found at Micahel's for $1)
  • 1 piece of 12x12 scrapbook paper
  • Mod Podge
  • Paint
  • Ink pad
  • Sandpaper
  • Additional desired decoration - ribbon, gems, glitter, buttons, etc.


What the frame looks like to start out with.  These are found in the wood section at Michaels.


 Step 1:  Remove packaging and trace frame onto paper.


Step 2:  Cut paper out.


Step 3:  Paint entire frame.  Get in every cranny.  Let dry.


Step 4:  Paint a thin but even layer of Mod Poge to the front of the frame.  Place paper cut out on top of glue and smooth out.

Step 5:  Use sandpaper to sand off any paper overhang.  In a downward motion pull the paper down.  This will sand the paper off and create a nice smooth edge.  The picture below is what it will start to look like when you sand the paper off.  Continue to sand until the paper is completely gone.  Do this all around frame.


Step 6:  Ink all around the edges using an ink pad and using the same downward motion you used with the sandpaper.  Let dry. 

Step 7:  Coat the entire frame in Mod Podge again.  *** If the paper starts to come up and bubble do not try to smooth it out.  You will only ruin your frame.  Let it dry, the bubbles will smooth themselves out provided that you did your best to smooth the paper out in step 4.***

Step 8:  Add additional decoration however you would like.


I love these frames.  They are simple to do and you can personalize them so easily.  I love to give them as gifts.


If you missed the past posts in the series you can find them here


Stay tuned tomorrow for 

Stamped Washer Necklaces 

Sunday, June 19, 2011

Camp Craft Series: Locker Magnets

This is part of a series of tutorials of crafts that were made at Girls Camp.  Check back throughout the week for more tutorials and amazing examples from all the wonderful, creative girls.


When deciding on crafts we chose to create these locker magnets.  We wanted to girls to come away with something that would remind them of their values, of who they are, of the Savior, of things that are important to them.  We hope that these magnets will be a reminder, a hope, a comfort to the girls (even if just for a second) on those long hard days of school.  There is so much temptation to do wrong that sometimes it takes a little reminder of who you are, and where you're going to keep you on the straight and narrow.


Supplies:

  • Glass Tiles 1 7/8 x 7/8 (see below)
  • Images (see printables below)
  • Mod Podge
  • E 6000 glue
  • Magnets (see below)
  • Foam brush
  • Scissors


The glass tiles and magnets were purchased from ThoseSweetSensations.  I was unable to find the tiles anywhere in stores and this shop had exactly what I needed in the quantities I needed and for a reasonable price.  They also had the best magnets I have ever seen.  I would highly recommend getting their magnets.  They were extremely thin and extremely strong.


 If you click on the following images you will be directed to a site where you can print off the images for the magnets.  I would recommend printing with a laser jet (we used a copy service) and letting the ink dry at least over night to ensure you won't have a smudged image.


*THESE PRINTABLES ARE FOR PERSONAL USE ONLY*
In no way do you have permission to sell anything made from them.


Click to get printable


TUTORIAL:


Step 1:  On the rough side of the glass paint on a thin but even layer of Mod Podge.
Step 2:  Cut out the image and place it face down onto the Mod Podged side of the glass.

Step 3:  Allow glue to dry enough that the paper won't move if you touch it.  Your image will look foggy at first.  The Mod Podge will dry and become clear.
Step 4:  Take a small amount of the E 6000 and place it on one side of the magnet.

Step 5:  Place the magnet onto the back of the paper and tile.  Let dry.


These were the simplest craft that we had and some of the girls who considered themselves, "not crafty" enjoyed making these.  There wasn't a lot of room for personalization with these but we did have extra glass gems that I donated from my personal stash.  The young women were able to use the same method as above but used scrapbook paper instead of the printables.


One girl created a set of magnets with the Young Women Values written on them.  They are so beautiful.  She used scrapbooking paper and a permanent marker to create them.


Make sure you come back tomorrow for

Decorated Wooden Frames

and check out yesterday's

Friendship Bracelets

if you missed 'em!


Related Posts Plugin for WordPress, Blogger...