Showing posts with label Gifts. Show all posts

Thursday, May 30, 2013

Graduation Crafts! Diploma Cover Scrapbook

Hey, hey, hey! It's graduation time!  There's nothing like the feeling of letting all those school burdens go and feeling that sense of accomplishment.  Plus, it makes me want to sing School's Out by Alice Cooper and who doesn't love that song?  Nobody, that's who, because that song is awesome.

Johnny Boy and I got married our Junior year of college so we spent our Senior year and our first year of marriage enjoying date nights at the library.  Oh yeah, keepin' the romance alive.  Nothing says love like a 1,000 page science textbook.  We graduated Spring of 2006 from BYU-Idaho, John with a bachelor degree in Chemistry and me with a bachelor degree in Geology and Earth Science.  Nerds.  You can say it.  We know. 

John's parents were generous and bought us nice frames for our diplomas which left us with these empty diploma covers.  You know I wasn't going to let that go to waste.


The cover is a nice pleather and satin bound cover with our university stamped in silver on the front.  This isn't a piece of junk {I mean I paid thousands of dollars and years of my life to get it} and it had a greater purpose than just tossing it.

So I added a few scrapbook stickers and pictures from our big day and The Diploma Cover Scrapbook was born.


This scrapbook is John's.  Mine is basically the same.  Just with a few more pictures of my parents.


I also had these cute little diplomas that I stuck in there.  You can buy a similar one HERE.  If you don't frame your original diploma you could still keep it in the cover and just scrapbook the left cover.  Lot's of options here.

 
The scrapbook is nice and compact and fits on my bookshelf but I can also take it out every spring to remember the accomplishments that we achieved and look at how cute we look in black robes and cardboard hats pre-children.
 
 
Happy Graduation to All You Grads! 


Feel free to turn this post into a little graduation brag board - Did your baby graduate Kindergarden, High School, College?  Give a shout out to your High School {Reed High class of 2000!} or did you finally pass all your classes and get that higher degree?  Whatever it is, y'all have worked hard so be sure to brag about it below in the comments!  


Saturday, April 6, 2013

Easter Bunny Egg Cozies & Owl

Did you have a nice Easter?  I hope you did!

Ours was very nice and relaxing.  Church and the bunny stuff and dinner with friends.  What could be better than that?!

A few days later we were surprised with a great big box of even more Easter stuff from Nonie and Grandpa.  Inside were the cutest little bunnies I ever saw.  My mom had knit these adorable Easter Bunny Egg Cozies.  I died.  Inside each one was a little Cadbury egg that I did not let the kids touch because I did not want them messing with the bunnies.  I declared them MINE!


I've showed you other great stuff that my mom has knit or crocheted before HERE and HERE.  She's just so talented.  I can't get enough.  If you're on Ravelry (a social network for yarn enthusiasts) you can check out her page and even more of her projects.  Her user name is MOBOYLE.

The pattern she used is called Huggie Bunnies and is available for free download from Ravelry by Sandra Paul.

{P.S. If you're wondering about the background fabric, it's a clothing cotton I found recently at JoAnn Fabrics.  There's a whole line that goes with it.  Super cute.  It will soon be a dress so keep an eye out for that post in the future.}


Mom put a Cadburry egg in each one but they could easily fit a regular sized egg too.  Such a cute little project that I can't wait to save and pull out for next years Easter baskets.  Maybe by then I'll be more generous and share with the kids.  Maybe.

But the bunnies weren't all that Nonie knitted up for the kids.  She also included this adorable little Owl Puff.  I thought the eyes were especially neat.  It's little rounds of felt attached with rounded safety buttons.


The pattern for the Owl Puffs is available for free on Ravelry by Jenna Krupar.


Hope you feel inspired by my talented mom and all these adorable patterns! 

Kisses from the Cutts Family!  xoxo


Wednesday, January 2, 2013

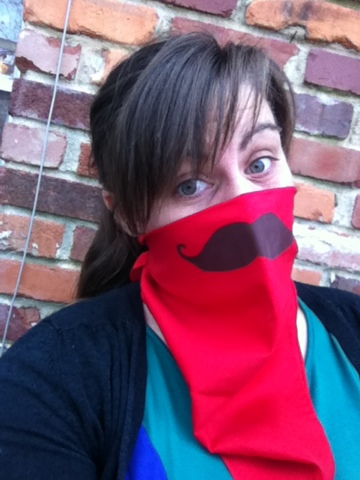
The Mustache Bandana

Happy New Year!

It's been a while. Hope you had an excellent holiday season. Despite being sick for a month we still managed good times. Santa didn't bring me a new computer (so I'm still blogging from my iPod) but I'm working on it. So many things to show you!

In the mean time, I thought I'd share the gift I made for my little brother. He rides a Harley so I thought a nice bandana would help keep the bugs out of his teeth when he rides. It's a bit of a gag gift but I figured every rider needs a nice full mustache.

To make your own simply fold a bandana in half (I bought mine at Hobby Lobby) and make a stencil of a mustache from freezer paper. Iron it on about an inch below the fold so that it sits right where your upper lip is. Paint inside the stencil and then peel off. Easy peasy!

It almost makes me want to take up bike riding. Too bad I'm a total chicken. I think I'll just stick to arts and crafts.


Sunday, September 9, 2012

One Seam Pajama Pants Tutorial

I have a really fun tutorial for you today but I just have one order of business before I begin.  Remember when I showed you my sad, sad living room?  Well voting is happening right now so if you can hop on over and vote for #69 (yours truly) I'd love you forever.  Just click on the star below #69 and that's it.  You can vote once a day.  Thanks for your votes in advance!


Today I show you how to make single seam cuffed pajama pants.  Y'all, these are so easy and you can make them in any size or style you want.  You will not find an easier pants tutorial.


Most pants you see will have an inseam and and outer seam that runs down the sides of the pants.  One seam pants have just an inner seam which means less work, more comfort.  This one seam technique is perfect for comfy pj's and lounge pants.

You can make these in any size, adult to kids, and once you have your pattern it takes less than 30 minutes to put it together.  Great for gifts for the upcoming holidays.  {Yikes!  Did I just say it was almost Christmas!?!}


I also wanted to highlight The Ribbon Retreats Licensed Fabric and how great it is for boys.  What little man doesn't imagine himself as Batman or Superman?  The fabric is awesome enough for boys to want to wear and it gives us an excuse to craft for the guys in our life because let's face it, crafting for them can be so hard!  There is also licensed fabric for girls too so be sure to check it out.

Let's get started!

Supplies:


- Main Fabric, Batman Blue Logo
- Coordinating Fabric, Batman Black Brick
Thread
-  Pants Pattern (see below)


Step 1:  Create your pattern.  

Lay a pair of pants onto craft paper.  I buy my paper at the dollar store but you can also use the back of wrapping paper.  


Trace your pants by adding half an inch to the sides.  Add about an inch and a half to the top and 1-2 inches to the hem.  You'll see that I made the waist and the hem line as straight as possible.

You can make adjustments according to how your starter pants fit your child.  I wanted my pants to be looser than the jeans I measured from so I added a little room.

For the cuff you will mark 1-2 inches above the original hem.


Now you have two pattern pieces - a pant leg and a cuff.


Step 2:  Cut out your pieces.  

Lay your pant pattern on the fold of your main fabric.  Cut 2.


For the cuff, fold your coordinating fabric horizontally and then once over vertically (see photo below).  Lay your pattern piece on top, lining it up where the folds are and cut 2. 


You should now have a total of 4 pieces.


Step 3:  Lay the pants right side together and stitch the sections indicated in the picture.

{Don't let the different fabric throw you off.  I just forgot to take a picture of this step in the Batman fabric.  Sorry.}

Step 4:  Keeping right sides together open the pants up and stitch the entire curve of the inseam.


If you don't want a cuff to your pants you're basically done.  After this step you would just need to add an elastic casing and hem the bottom.  If you're wanting a cuff, read on...

Step 5:  Prepare the cuff. 


Sew the short sides of the cuff together, right sides together. 


 Fold the cuff in half with the seam on the inside. 


Attach the cuff to the outside of the pant (while they are still inside out) and stitch.  When you attach the cuff this way the raw or serged edge will be on the outside of the pant.  When you roll up the cuff you won't see it at all.  I like it this way because it creates a smoother inside and is more comfortable but if you'd rather the edge be on the inside of the pant than you would just attach in the same way with the pants right side out. 

Step 6:  Create a casing for the elastic.

 Fold over the waistband and stitch, leaving about a one inch opening.  Pull your elastic through and stitch it together.  Sew the opening closed.


I find that the best way to sew the elastic together is to lay one piece on top of the other and stitch together.
 
 
Step 7:  {Optional} 

The cuff should stay nicely when you flip it up but if you wish you can tack it in place with a few hand stitches on the side.  I didn't do this to mine.


   See how easy they are to make?  You'll have a dozen done before you know it.
 
If you make these jams I'd love to see a picture!
 
 
{This tutorial was originally posted at The Ribbon Retreat be sure to stop by and check out their awesome blog and shop.}


Wednesday, August 8, 2012

DIY Books I Totally Want

I've had my eye on a few DIY books lately. Here are a few that I've been window shopping:


{You can click on the pictures or the links to take you to Amazon where you can read full descriptions, reviews.}


1.  Young House Love: 243 Ways to Paint, Craft, Update & Show Your Home Some Love by John and Sherry Peterisk.  I've been following their blog for a little under a year now and I love nearly everything they do.  I look forward to their daily posts with anticipation.  This is the ultimate DIY couple.  I have learned so much about my own personal style and how to make things happen around my house that I never knew was even possible.  If the book is anything like their blog I know I'm gonna' love it.  

2.  Fabrics A to Z The Essential Guide to Choosing and Using Fabrics for Sewing by Dana Williard.  I know basically nothing about fabric.  I know what looks pretty and that's about it.  I sew with what I have on hand and it's mostly plain ol' cotton.  I inherited lots of great vintage fabrics and I know nothing about them.  I feel like this book is essential for me to improve as a seamstress and designer.

3.  Martha Stewart's Encyclopedia of Sewing and Fabric Crafts.  Three words; Martha Stewart Encyclopedia.  Enough said.

4.  The Handbuilt Home by Ana White.  I first discovered Ana White's blog when it was just brand new and I was hooked from the start.  She is a super hot mom who builds furniture knock offs of really expensive name brand things.  Oh but that's not all, she give you the plans to make them yourself.  It couldn't be easier.  I've built quite a few things and I got the building bug and I can't remember a time that I was more inspired to learn a new craft.  I'm not sure what her first book has in store but I know I want to build everything in it.

5.  Martha Stewart Cookies. I think we can agree that the title says it all.

6.  Famous Frocks by Sarah Alm.  This is a book that is all about iconic dresses from movies.  The book shows you how to make the dresses and even includes patterns to make 20 dresses.  I have wanted to try this book out for a while.  I have never tried a pattern book but the thought makes me a little giddy.

7. The BurdaStyle Sewing Handbook by Nora Abousteit.  I think this book is another essential for me to get if I want to improve my sewing skills.  Everything I know I taught myself or picked up along the way watching others.  I really have no idea how things are supposed to be done and I feel like if I did I would have the skill and confidence to make so much more.  It looks like this book also comes in Kindle form which could be helpful at the sewing table.


Do any of you have any of these books?  What do you think of them?   Any other DIY book advice?  I'd love to hear what inspires you and makes you want to get creative.


Sunday, July 29, 2012

I hope she... {thoughts on Skirting the Issue}

This month, Project Run & Play has been hosting an event asking people to make skirts to be delivered to girls in the foster system.  The skirt below is my donation.  It's a purple lined skirt with a sheer sparkly purple overlay.  The wrinkly picture does it no justice.  But my daughter calls it the princess dress and begs me to let her keep it, so I know some other little girl will love it too.

I keep thinking about that little girl.  How is this helping her?  "Sorry your parents aren't there and your life is so hard.  Here's a skirt."  I wish I could do more for her.  I wish I could take her into my home and make her part of my family.  I wish I could love her and protect her forever.  But I can't.  I'm not in a place in life where that is possible.  I wish I could take in all the children of the world but I can't do that either.
  

While I can't do these things, I can do this one thing.

So with this skirt I hope the message is sent to this precious little girl that she is loved.  That someone is thinking of her.  So I give this little skirt to you and send with it all my hopes for you.

I hope she...

feels like a princess,
is strong and confident,
stands up for what is right,
wears a smile.

I hope she...

feels loved,
loves others,
is kind,
works hard.

I hope she...

finds a place to call home,
is safe,
is happy,
feels peace.

I hope she...

can forgive,
can move forward,
can  build her future
and be the best she can be.

I hope she...

knows she's beautiful,
knows she's special,
knows she's worthy,
she's good enough.

I hope she...

knows that she's not alone.


Related Posts Plugin for WordPress, Blogger...