Showing posts with label Organization. Show all posts

Monday, June 11, 2012

Car Play Mat & Storage Bag

I said I needed to show you more boy stuff so here's a fun one!

I wanted to show you something that had it all - Sewing, scraps, BOYS {and Girls!}, play, Imagination, DETAILS,  repurposed, STORAGE, cute fabric, Bright Colors... you get the point.  I hope I didn't disappoint!

Introducing.... The Car Play Mat & Storage Bag!


Each piece was drawn and cut by hand and appliqued onto the mat.  With a park, zoo, speedway, beach, neighborhood and church there is a whole town full of imaginative adventure waiting to happen.  Each piece of fabric was chosen to look authentic, waves for the ocean, brick for the zoo wall, florals for the bushes and trees, cobblestones and sand, even the stained glass windows on the church, etc.  Let's just say, I have a lot of random scraps around the house!


The kids love to play with the mat but the fact that the mat is easily cinched into a bag to store all those little cars is what gets momma REALLY excited!  We can easily carry the bag with us to appointments and activities to keep us entertained during those long waits.  And when we are done, one tug of the cord and "bloop!" all cleaned up.


I think everyone needs a Car Play Mat & Storage Bag.  I hope you agree!

Tuesday, November 22, 2011

Hair Bow Holder

Here is a fun little hair bow holder I made for Maggie a little while ago.  If anyone is interested in a full tutorial speak up - I'd be happy to create one for you.  This is such a simple project and who doesn't love a little organization in their life?


The holder can fold up to make a little carrying case.  Or it can hang on the wall open and store bows where you can see them.  Either way - Hair Bow WIN.  We keep ours next to the changing table so when we take the bows out when she gets ready for bed the holder is right there.


I basically just created a long double sided piece of fabric.  Enclosed in the seams were two pieces of ribbon one to attach the bows to and one for the handle.  I sewed down the middle to secure the ribbon a little better.  When all was said and done I added a button and button hole.  Viola!

This would be a great gift especially if you included a few bows with it too.  I also think that this would be great for those little girls that dance or cheer since they always seem to have a million bows.  Heck, what little girl doesn't!?!

Get those bows out of the drawer and make yourself a hair bow holder today!

Wednesday, August 31, 2011

Make Your Own Coupon Keeper

Whether you're a major coupon clipper or just use a coupon here or there it's a great way to save money.  I used to be a big couponer and sadly after I was pregnant with baby #2 I just fizzled out.  I do use coupons when I can but I don't collect them from the paper anymore.

Here is what I would use to store my coupons in an organized and easy way. 


I was in desperate need of a larger coupon holder and I didn't want to have to buy a binder and business card holder inserts. I estimated that to do so would have cost me around $10-$15 which would have defeated the point of all my coupon clipping these past few weeks.
 
 
I went digging in an old drawer and found a picture holder from the 7th grade (yes, that would be over 15 years ago). Thank goodness I didn't throw it out! There were a few crummy pictures in it and I hadn't touched it for years. I took the pictures out and created paper tabs (I cut my tabs using my Cricut but you can just fold over rectangles of paper) and stapled them to the inside. I then sorted my coupons.  The labels are for the sections of the store, baby, dairy, meat, cereals, toiletries, medicine etc.  The photo book spaces are the perfect size to store irregular sized coupons too. 
 
 
Simple as that! They are now organized, easy to view, and easy to find. Now I'm not flipping through my messy stacks of coupons trying to find what I am looking for.  And it's a great way to reuse all those picture books you are not using.


Tuesday, August 9, 2011

Menu Board

My friend Sabrina is the best.  She spoils me and my kids rotten.  I love spending time with her and look forward to the summers because that means extra Sabrina time.  She teaches High School science and has 4 {awesome} teenage kids that keep her busy the rest of the year.

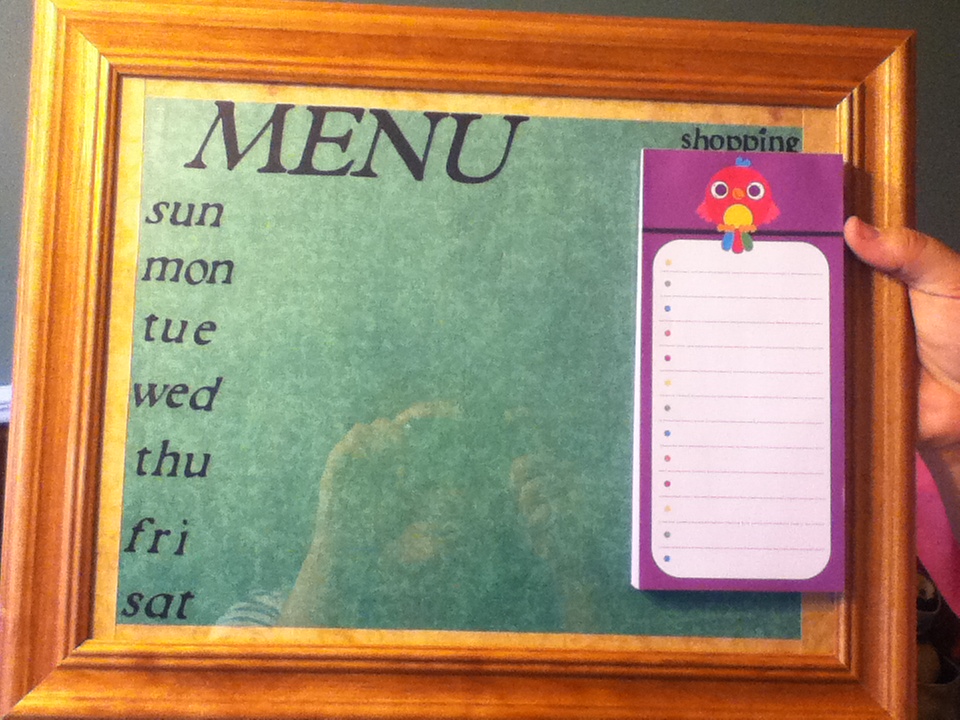
Last week we made sure to get in an extra day together before school started back up and she came bearing crafty gifts.  She brought me an 11x14 inch frame {the size you would get for an 8x10 picture with mat} and the idea to make menu boards!  This was something I desperately needed!

I used scraps of 12x12 paper and included a ribbon embellishment.  I cut out letters using my Cricut cartridge, "All Mixed Up", to write Menu and the letters of the days of the week.  Place your page behind the glass and you have an adorable dry erase board to write your menu for the week.


This is the basic idea of a menu.  I'm still new to this planning things out business and this menu got changed about 10 times this week but it's a start.  I already feel like I have dinner better under control.  I love it.  The best part is you can make several backgrounds and switch it up whenever you want.  How fun will it be to do different backgrounds for the Holidays?

Sabrina did 3 different fun backgrounds and this was one of them.  The font was from the cartridge, "Plantain School Book" italic font.  The coolest part about Sabrina's was that she had this amazing idea to attach a magnetic shopping list to the board.

She used e-6000 glue to attach two metal pieces.  The list sticks right on.  She said that she didn't take into account the extra weight on one side but once she used some double sided tape on the back the leaning was no problem  I'm certain an extra hook in the back of the frame would work as well.
Hope you feel inspired to make your own.  This was so simple and fin to do.

Thanks Sabrina!!!

Related Posts Plugin for WordPress, Blogger...